Introduction
Uplynk has traditionally secured their APIs with a user-generated token that utilized API keys that are viewable in the Uplynk CMS. This technique is not very flexible, meaning that any API key generated by a user could access all Uplynk functionality, regardless of whether the user of the API key needs this access.
Scoped API Keys allows specific API functionality to be limited to those individuals or systems that need it. Uplynk’s traditional API integration keys and the new Scoped API Keys will coexist for the foreseeable future.
How Are Scoped API Keys Implemented?
To implement Scoped API Keys, Uplynk moved to using a more modern and standardized way of doing API authentication using XAuth with JSON Web Tokens (JWTs).
The Uplynk CMS allows for both the creating and testing of JWTs to avoid having to debug API key access while developing code.
Limitations
Scoped API keys cannot be used for creating playback tokens. Scoped API keys are meant purely for the REST calls to the system itself, rather than playback.
XAuth Authentication
XAuth API authentication uses XAuth keys and JSON Web Tokens (JWTs).
XAuth keys:
- An XAuth key is created within the Uplynk CMS and contains public and private encryption keys, the allowed scope (permissions) for using APIs, the ability to not allow tokens to be used after a certain time, Key ID, and other information.
- The scope of an XAuth key allows for implementing the Principle of Least Privilege (POLP) methodology.
- XAuth keys are used to generate ES256 (Elliptic Curve Digital Signature Algorithm) encrypted JWTs for API authentication.
- In the Uplynk CMS, XAuth keys are called “Scoped API Keys”.
JWTs:
- A JWT is sent with the API request in a new request header called
X-Auth-Uplynk-JWT. - When Uplynk receives an API request with a JWT, it validates the information in the token against the XAuth key (Scoped API Key) in the CMS to allow or disallow access.
Uplynk decided to use XAuth authentication to allow a user to:
- Authenticate using JWTs which have standard libraries for every programming language.
- Create key revisions to allow for the adjustment of permissions given for an API user.
- Have keys that expire after a short time for temporary access.
- Quickly activate, deactivate, or revise keys to allow or prevent access to API endpoints.
- Utilize the principal of least privilege (POLP) to control functionality access via API.
- Create user-specific tokens.
- Create tokens that are only valid during a specific time window.
Uplynk API Scopes
Uplynk allows users to give different API permissions for the following functional areas:
- Ads
- Assets
- Channels
- Clipping
- Ingest
- Linear Playlists
- Live Events
- Workspace
Each functional area may have subareas and read/write control. Generally, API permissions should be as limited as possible, following POLP.
The table below shows all of the different API scopes:
| Scope | Scope Permissions | Scope Description |
|---|---|---|
| Ads | video.services.ads | Allows read and write access for ad APIs |
| Ads - Read | video.services.ads:read | Allows read access for ad APIs |
| Ads - Write | video.services.ads:write | Allows write access for ad APIs |
| Assets | video.services.assets | Allows read and write access for APIs used for managing assets and content libraries |
| Assets - Read | video.services.assets:read | Allows read access for asset APIs |
| Assets - Write | video.services.assets:write | Allows write access for asset APIs |
| Assets - Libraries - Read | video.services.assets.libraries:read | Allows read access for APIs which deal with content libraries |
| Assets - Libraries - Write | video.services.assets.libraries:write | Allows write access for APIs which deal with content libraries |
| Assets - Libraries – Shared Users Admin | video.services.assets.libraries.users:admin | Allows access to API functionality to control which users can access this account’s content libraries |
| Channels | video.services.channels | Allows read and write access for APIs used for managing linear channels |
| Channels - Read | video.services.channels:read | Allows read access for APIs used for managing linear channels |
| Channels - Write | video.services.channels:write | Allows write access for APIs used for managing linear channels |
| Channels - Blackouts - Read | video.services.channels.blackout:read | Allows read access for APIs used for managing blackouts on linear channels |
| Channels - Blackouts - Write | video.services.channels.blackout:write | Allows write access for APIs used for managing blackouts on linear channels |
| Channels - Schedules - Read | video.services.channels.schedule:read | Allows read access for APIs used for the Channel Scheduler |
| Channels - Schedules - Write | video.services.channels.schedule:write | Allows write access for APIs used for the Channel Scheduler |
| Clipping | video.services.clipping | Allows read and write access for APIs used for managing clipping |
| Clipping - Read | video.services.clipping:read | Allows read access for APIs used for managing clipping |
| Clipping - Write | video.services.clipping:write | Allows write access for APIs used for managing clipping |
| Ingest | video.services.ingest | Allows read and write access for APIs used for managing ingest regardless of method |
| Ingest - Slicer - Read | video.services.ingest.slicer:read | Allows read access for APIs used for controlling Slicers, either on-premise or cloud-based |
| Ingest - Slicer - Write | video.services.ingest.slicer:write | Allows write access for APIs used for controlling Slicers, either on-premise or cloud-based |
| Ingest - Slicer - Operator | video.services.ingest.slicer:ops | Allows on-premise Slicers to use Scoped API Key tokens in their configuration files. This is a Beta feature and must be enabled by the Uplynk support team. |
| Ingest - Cloud Slicers Live - Read | video.services.ingest.cloudslicer.live:read | Allows read access for APIs used for controlling cloud-based Slicers for linear |
| Ingest - Cloud Slicers Live - Write | video.services.ingest.cloudslicer.live:write | Allows write access for APIs used for controlling cloud-based Slicers for linear |
| Ingest - Cloud Slicers VOD - Read | video.services.ingest.cloudslicer.vod:read | Allows read access for APIs used for controlling cloud-based Slicers for VOD |
| Ingest - Cloud Slicers VOD - Write | video.services.ingest.cloudslicer.vod:write | Allows write access for APIs used for controlling cloud-based Slicers for VOD |
| Ingest - Failover Groups - Read | video.services.ingest.failover-groups:read | Allows read access for APIs used for controlling Slicer Failover |
| Ingest - Failover Groups - Write | video.services.ingest.failover-groups:write | Allows write access for APIs used for controlling Slicer Failover |
| Linear Playlists | video.services.linear-playlists | Allows read and write access for APIs used for managing linear playlists |
| Linear Playlists - Read | video.services.linear-playlists:read | Allows read access for APIs used for managing linear playlists |
| Linear Playlists - Write | video.services.linear-playlists:write | Allows write access for APIs used for managing linear playlists |
| Linear Playlists - Smartstart | video.services.linear-playlists.smartstart:write | Allows write API access for Smartstart functionality which is a specialized version of a virtual linear playlist |
| Live Events | video.services.le | Allows read and write access for APIs used for managing live events |
| Live Events - Read | video.services.le:read | Allows read access for APIs used for managing live events |
| Live Events - Write | video.services.le:write | Allows write access for APIs used for managing live events |
| Live Events - Ops | video.services.le.ops | Allows API access for getting the list of other accounts who are authorized to operate live events |
| Workspace | video.services.workspace | Allows read and write access for APIs used for general system settings |
| Workspace - Scoped API Keys - Read | video.services.workspace.api-key:read | Allows read access for APIs used for managing Scoped API Keys |
| Workspace - Scoped API Keys - Write | video.services.workspace.api-key:write | Allows write access for APIs used for managing Scoped API Keys |
| Workspace - Scoped API Keys - Admin | video.services.workspace.api-key:admin | Allows administrative access for APIs used for managing Scoped API Keys |
Creating a Scoped API Key
Scoped API Keys have both public and private encryption keys which need to be kept by the user in what they consider a secure location.
After Scoped API Key creation, a user can download this key information in Privacy Enhanced Mail (PEM) format or as plaintext in an .env file. PEM is the most common format for storing cryptographic key information. The Uplynk sample code for using Scoped API Keys uses .env files.
There is no limit to the number of Scoped API Keys allowed so it is recommended to have more keys that are limited in scope than less keys than have more scope in case a key is compromised.
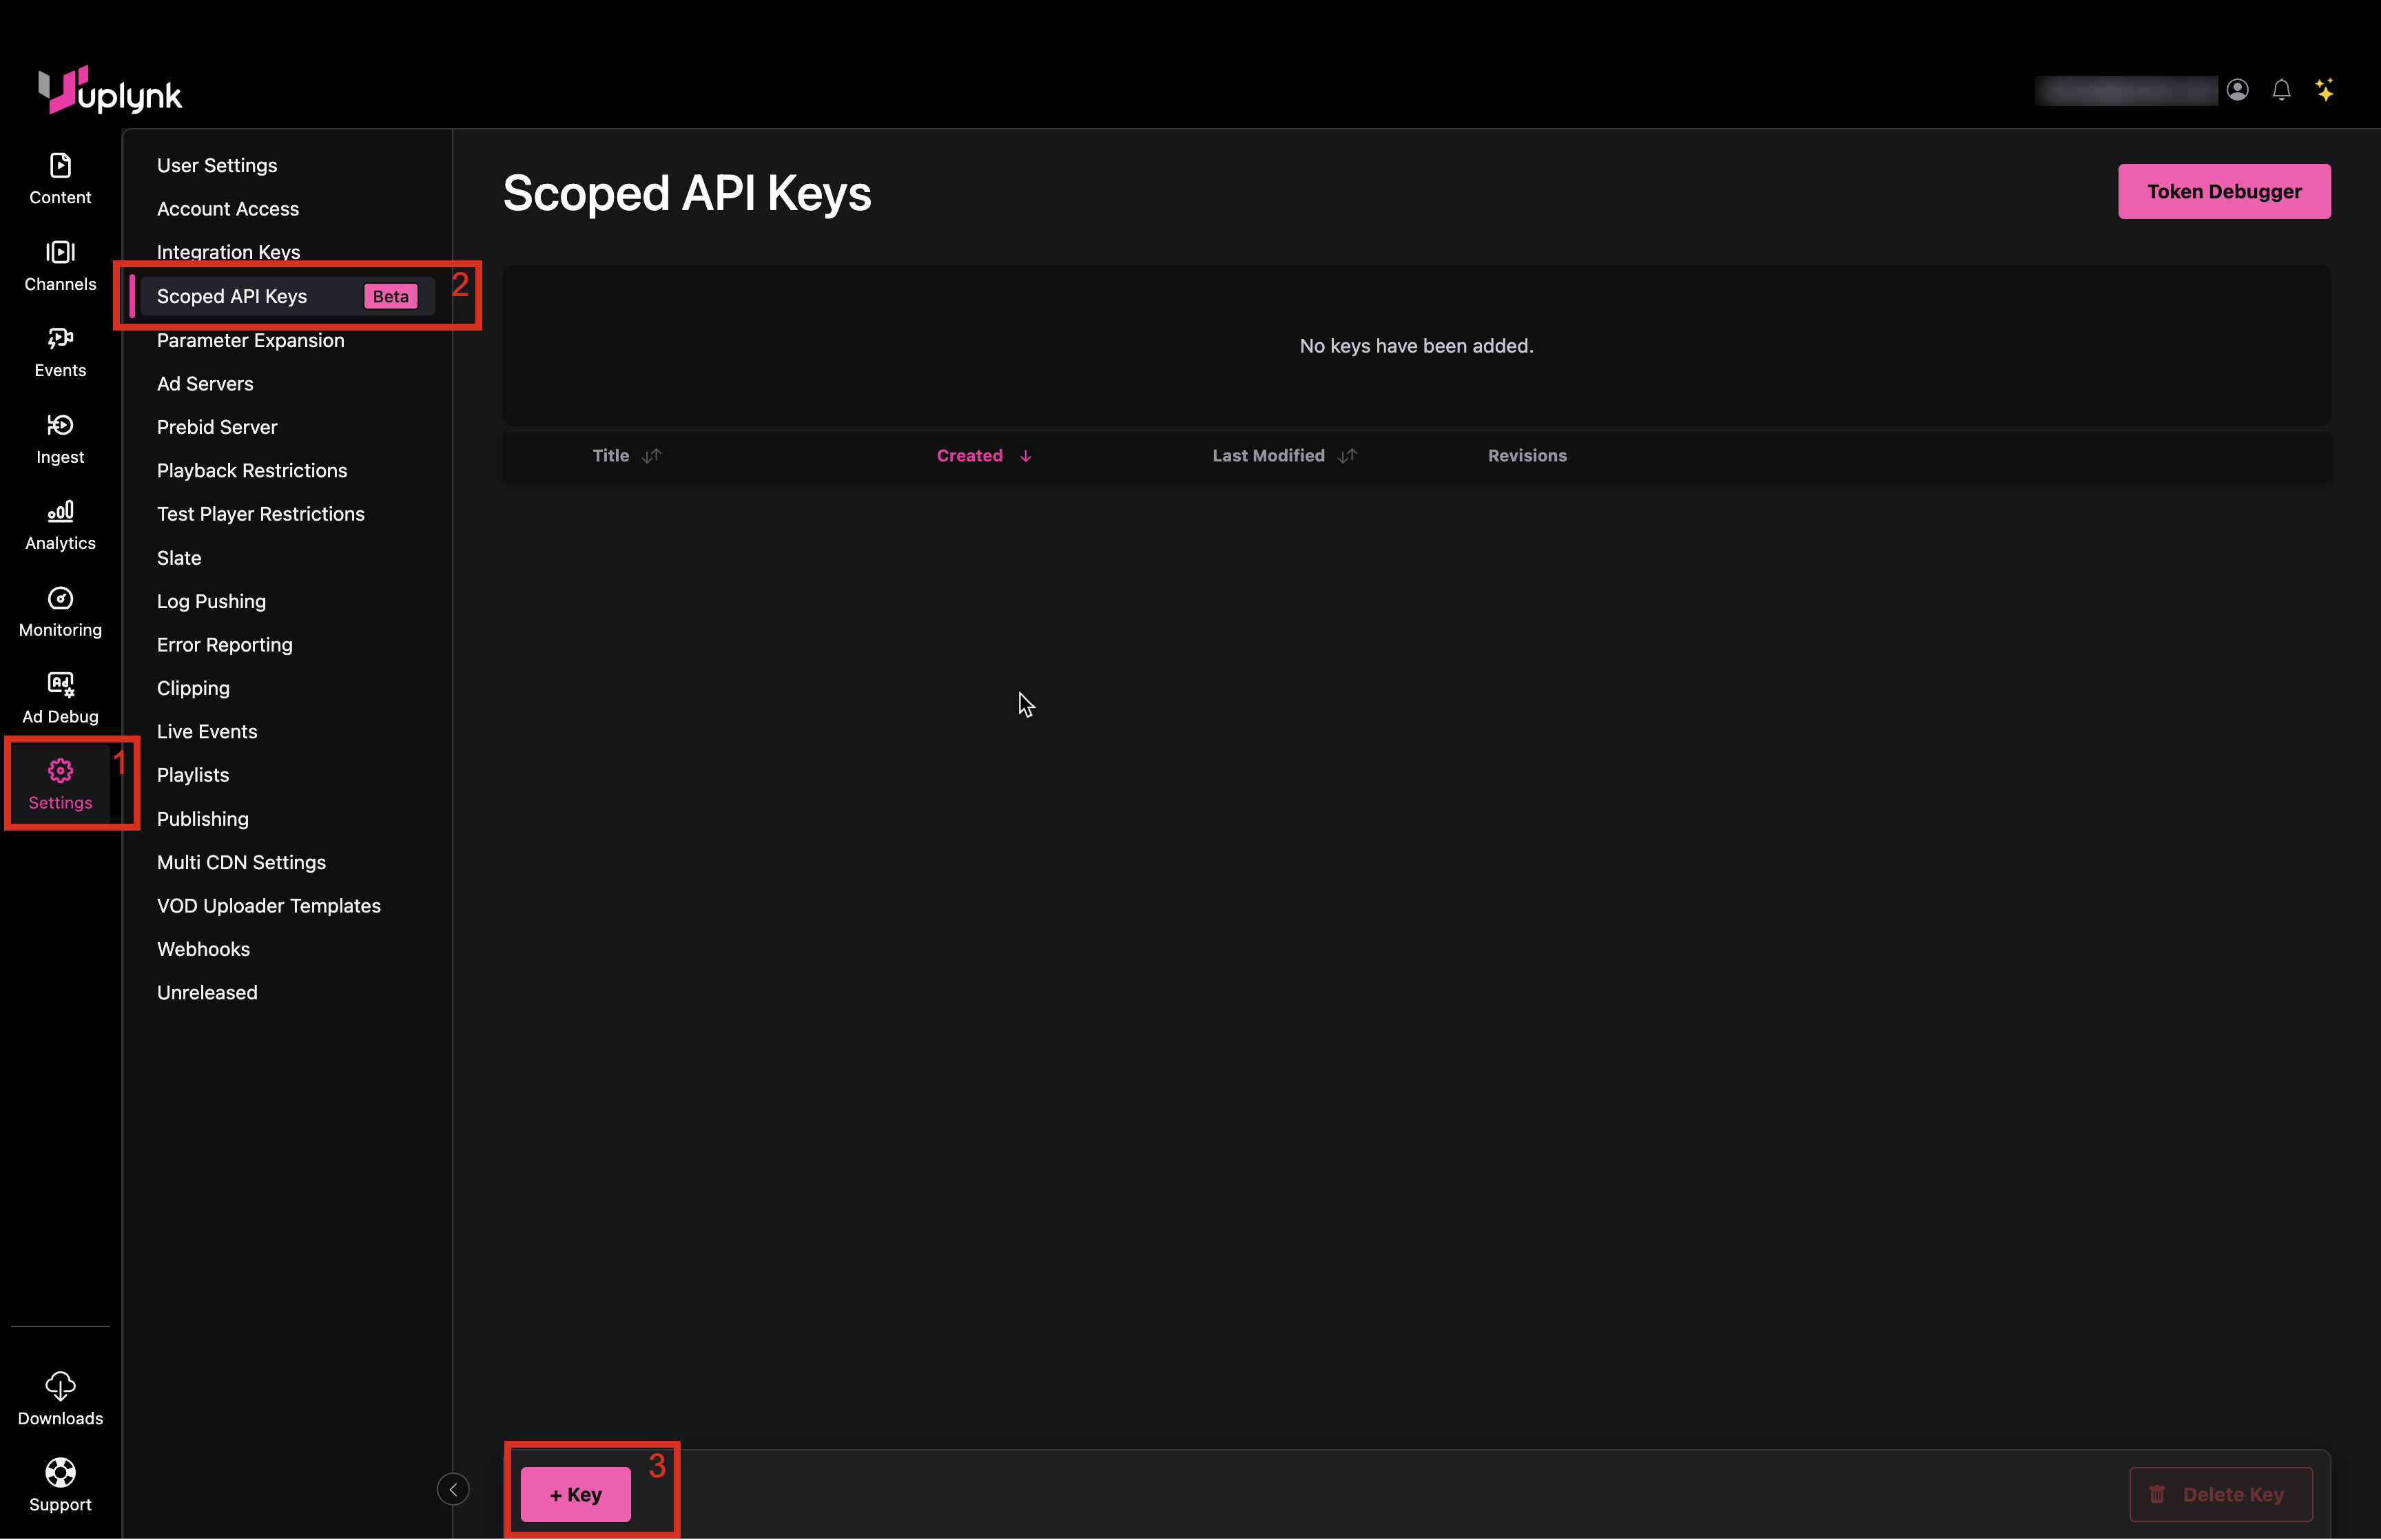
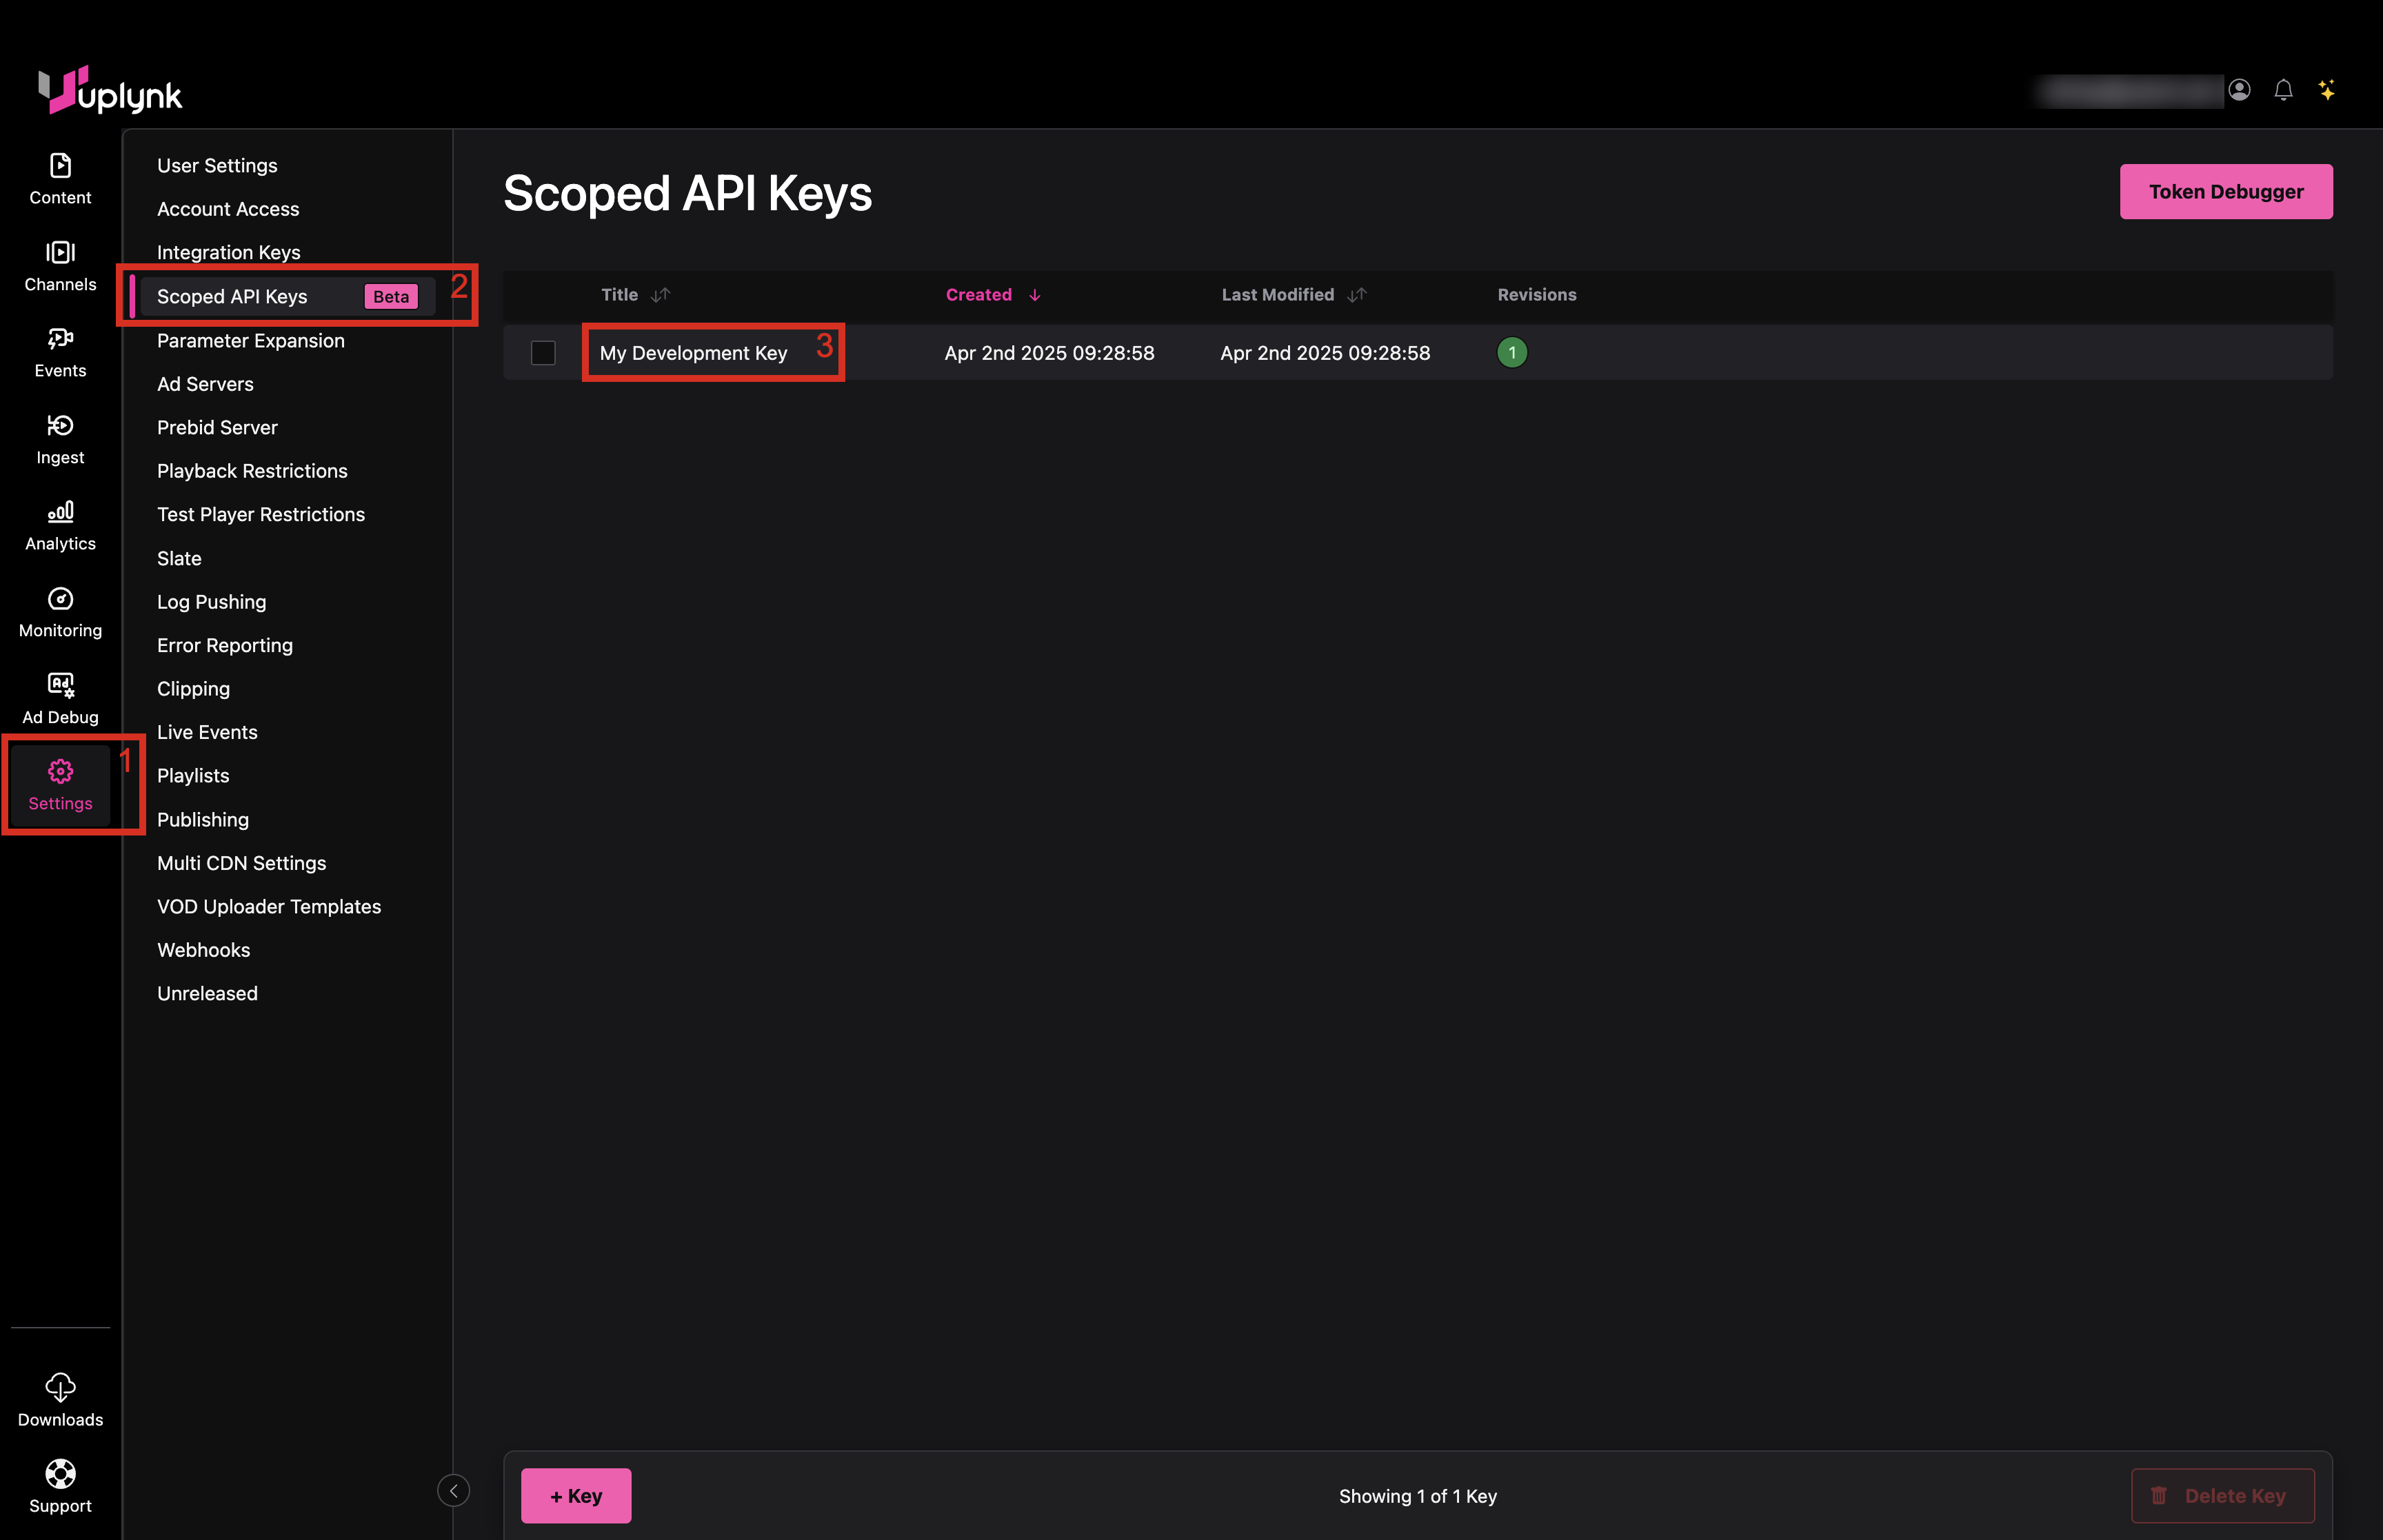
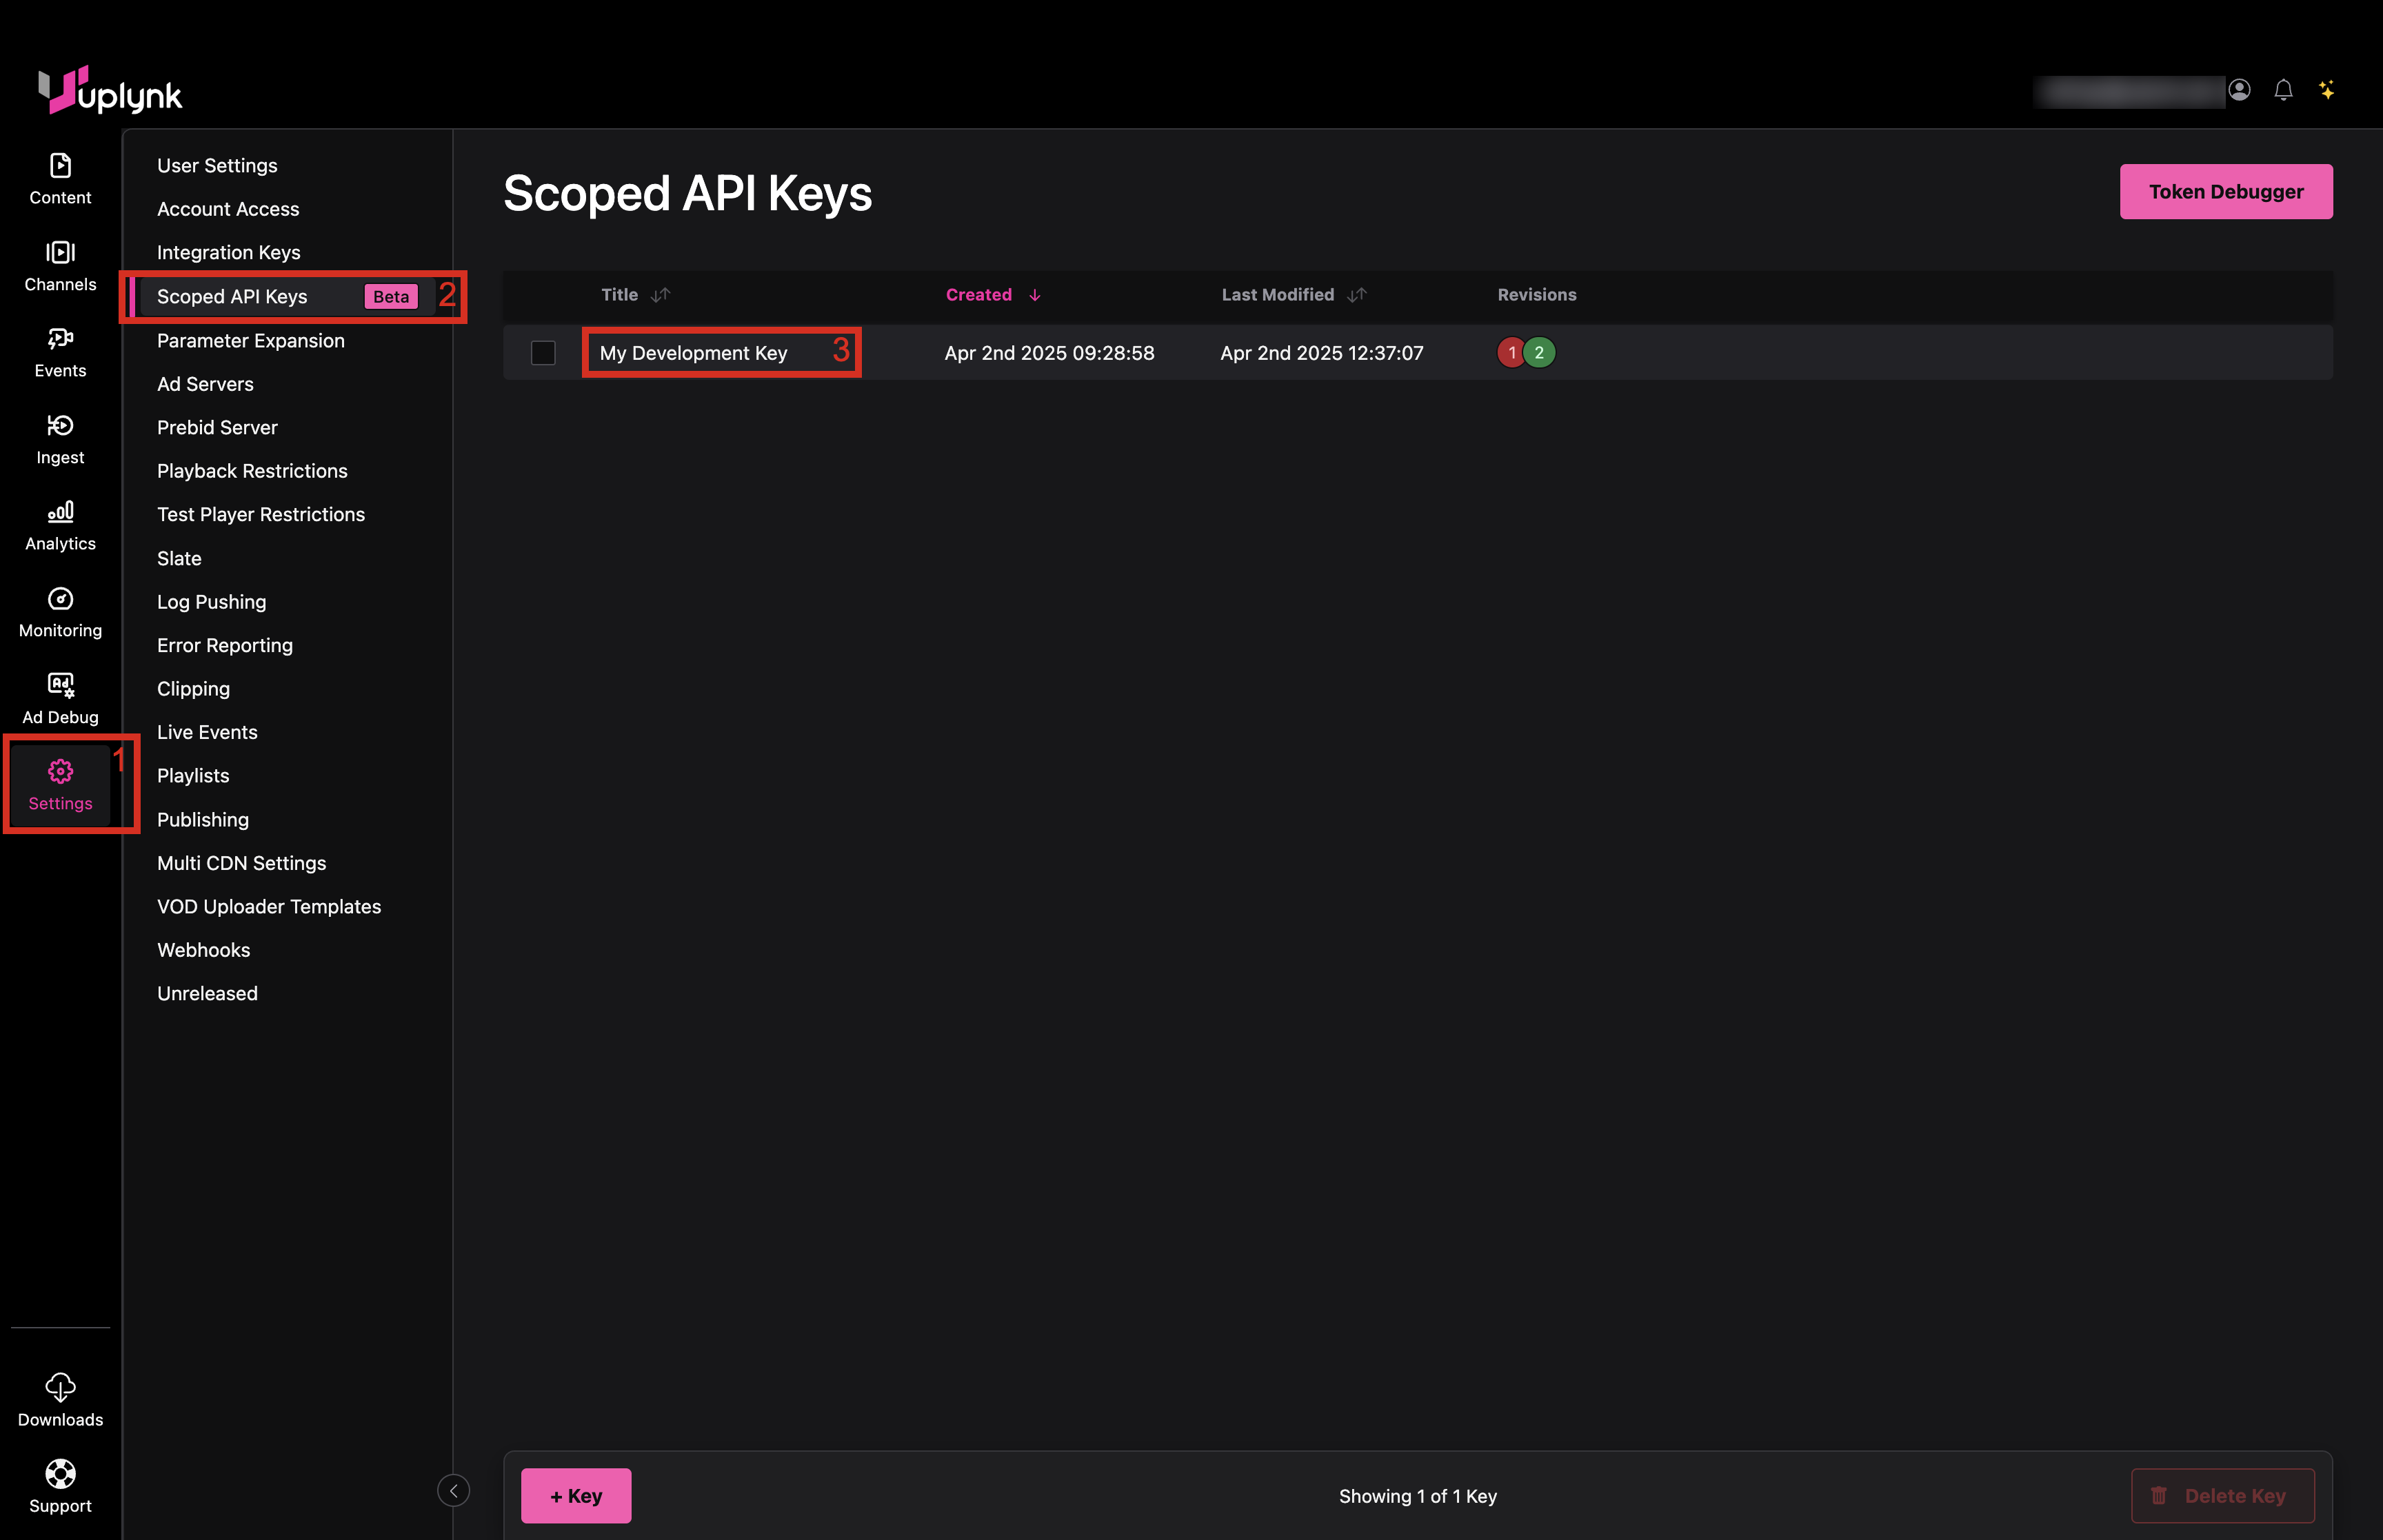
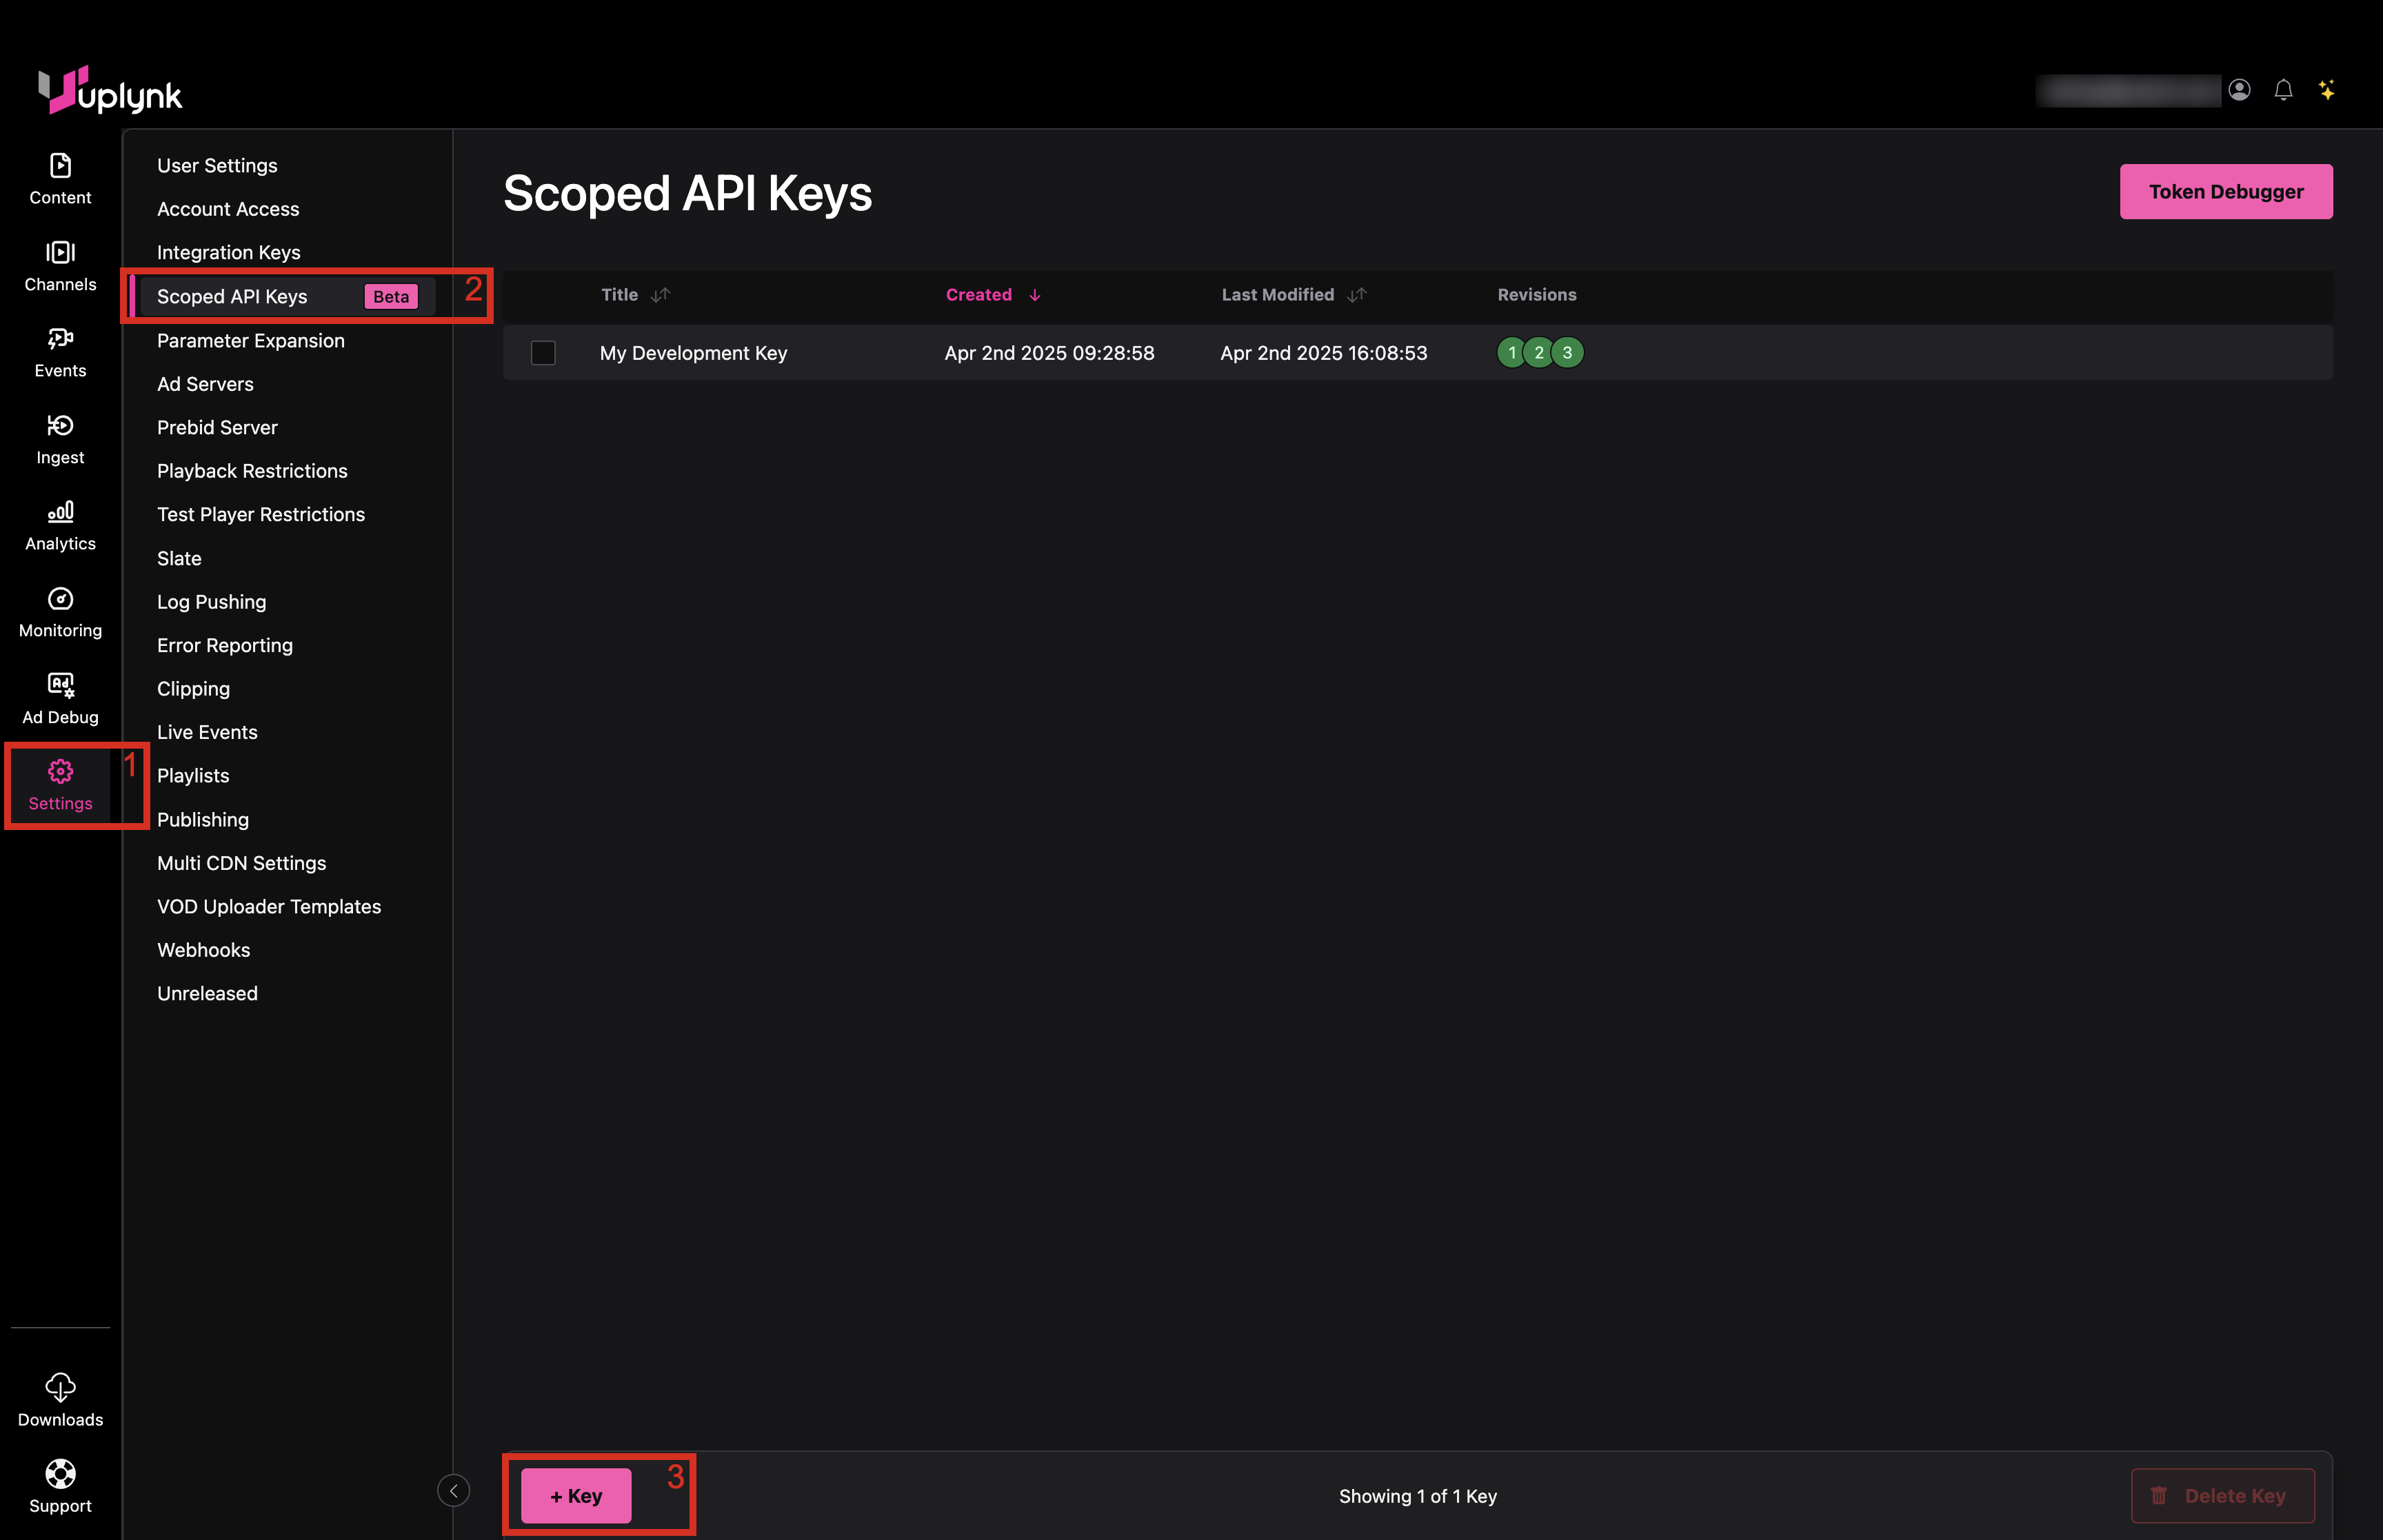
To create a Scoped API Key:
- Go to Settings tab in CMS
- Click Scoped API Keys tab
- Click + Key
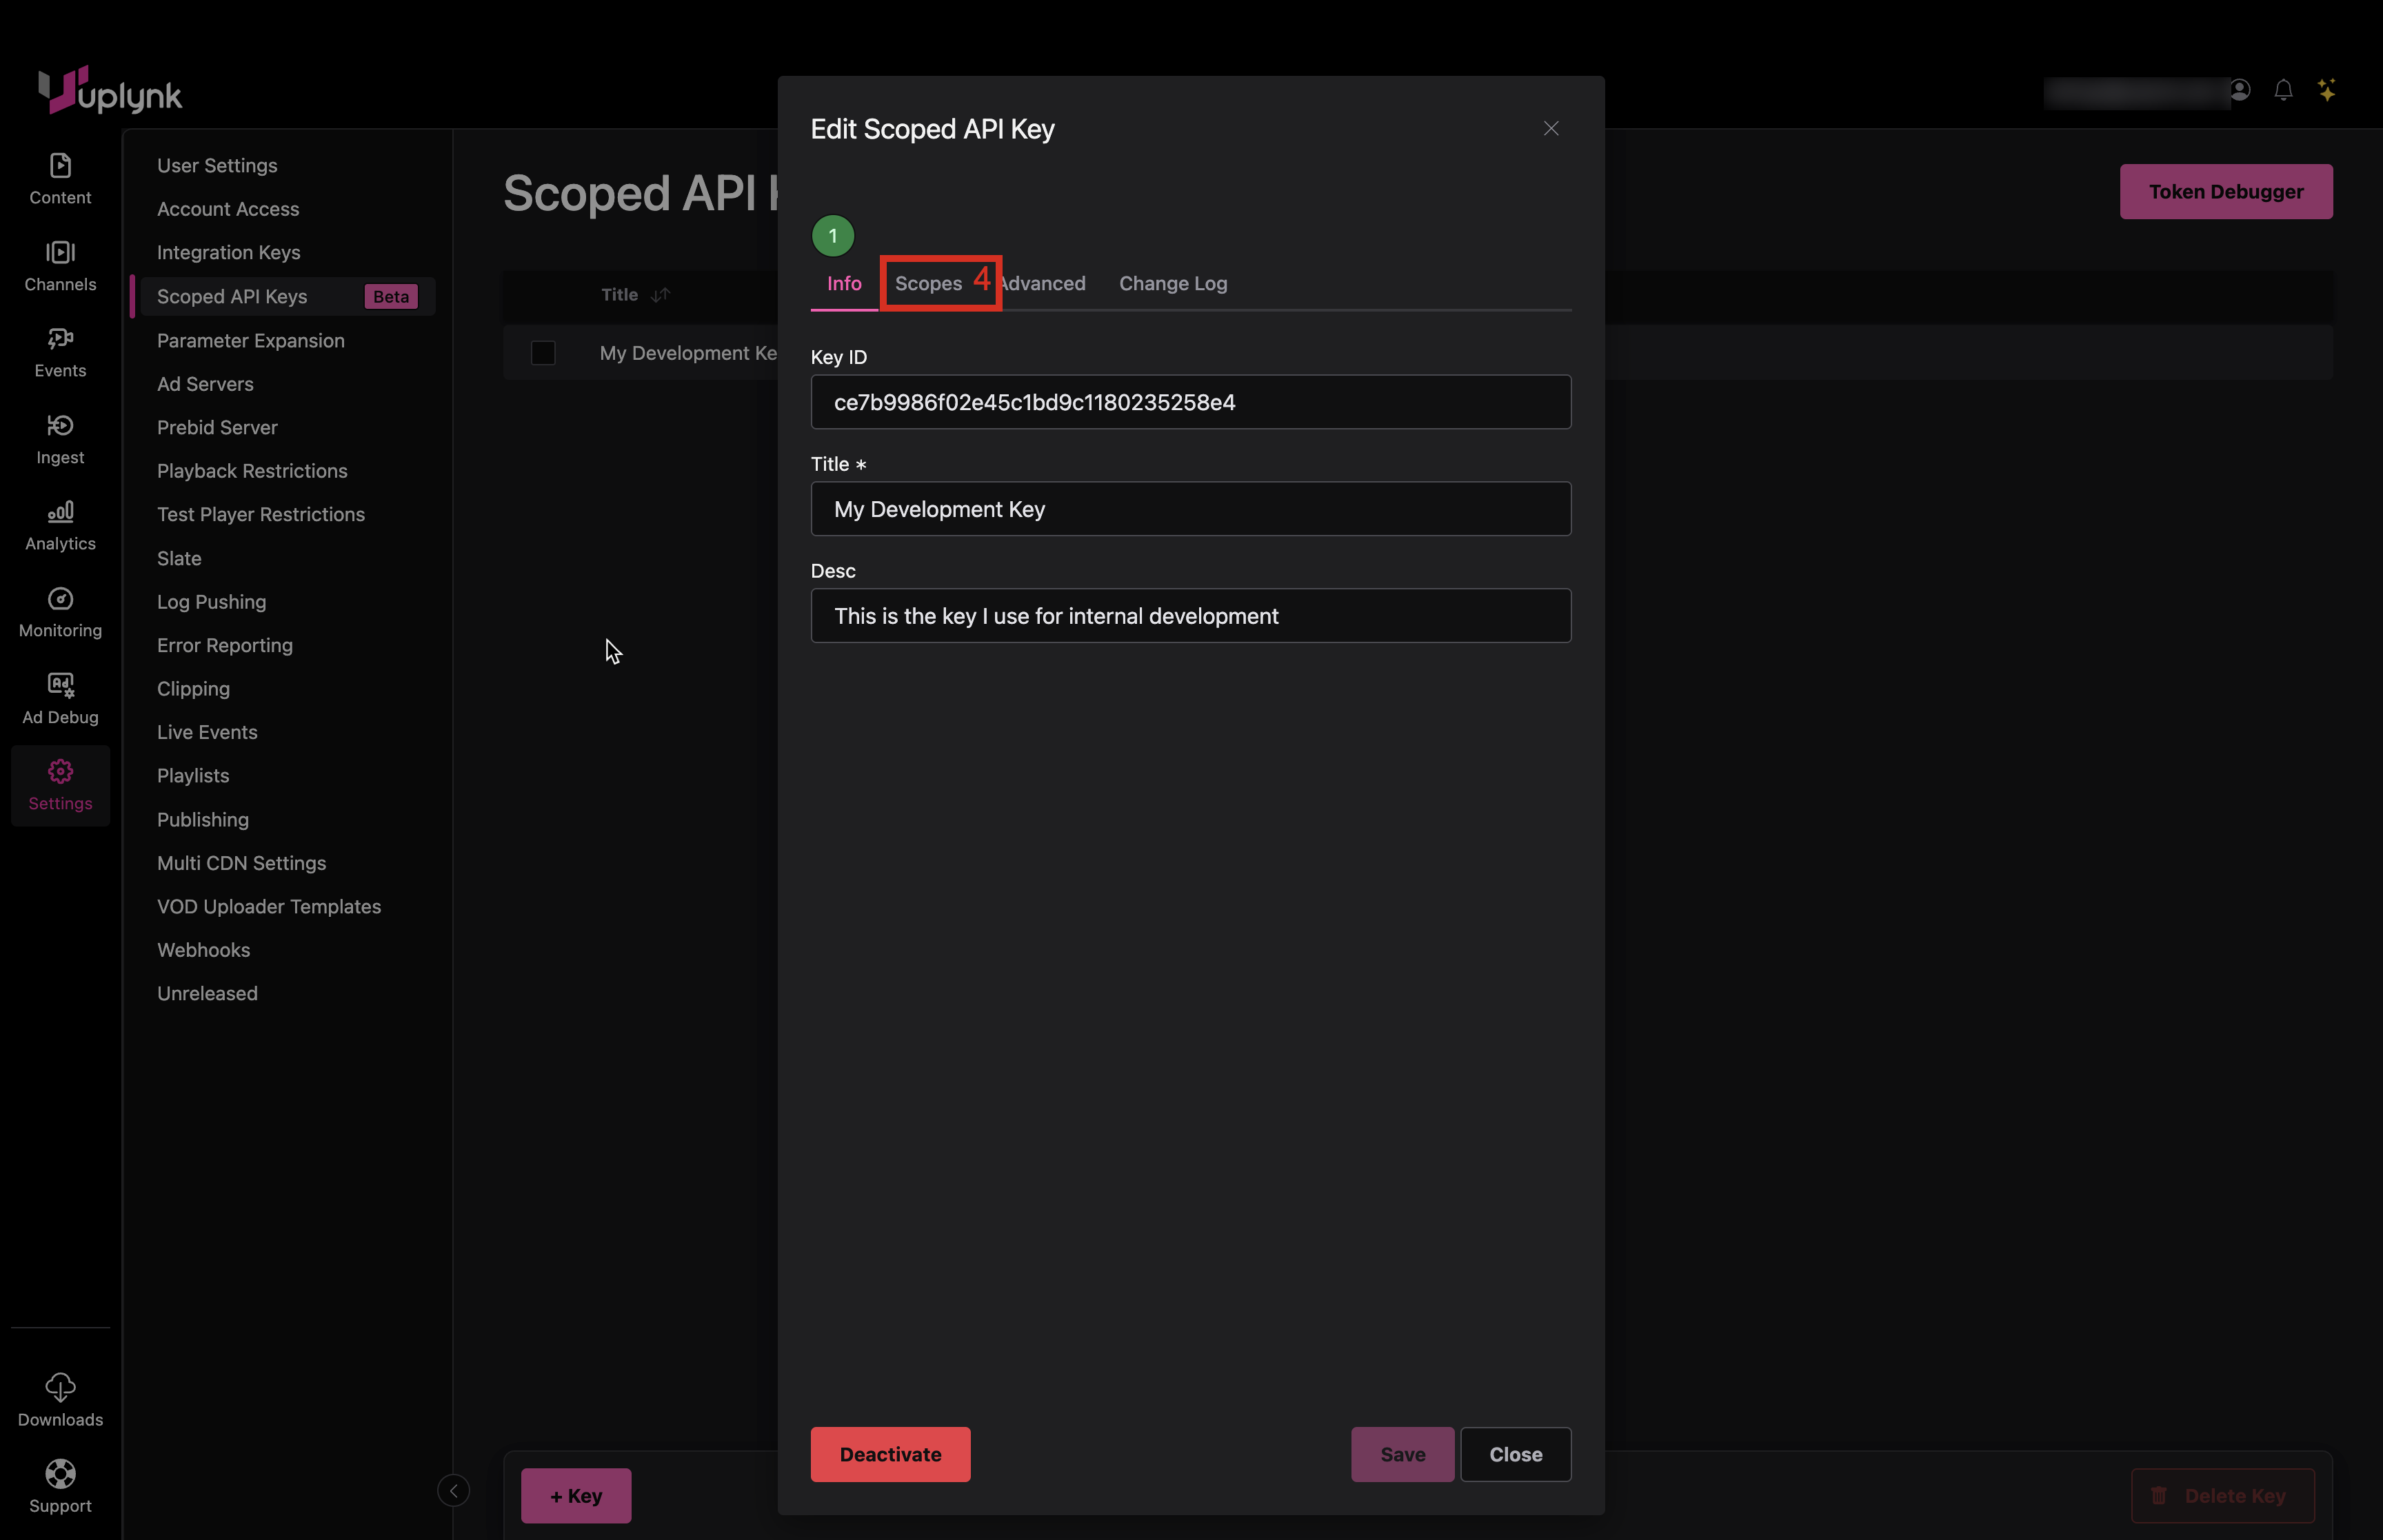
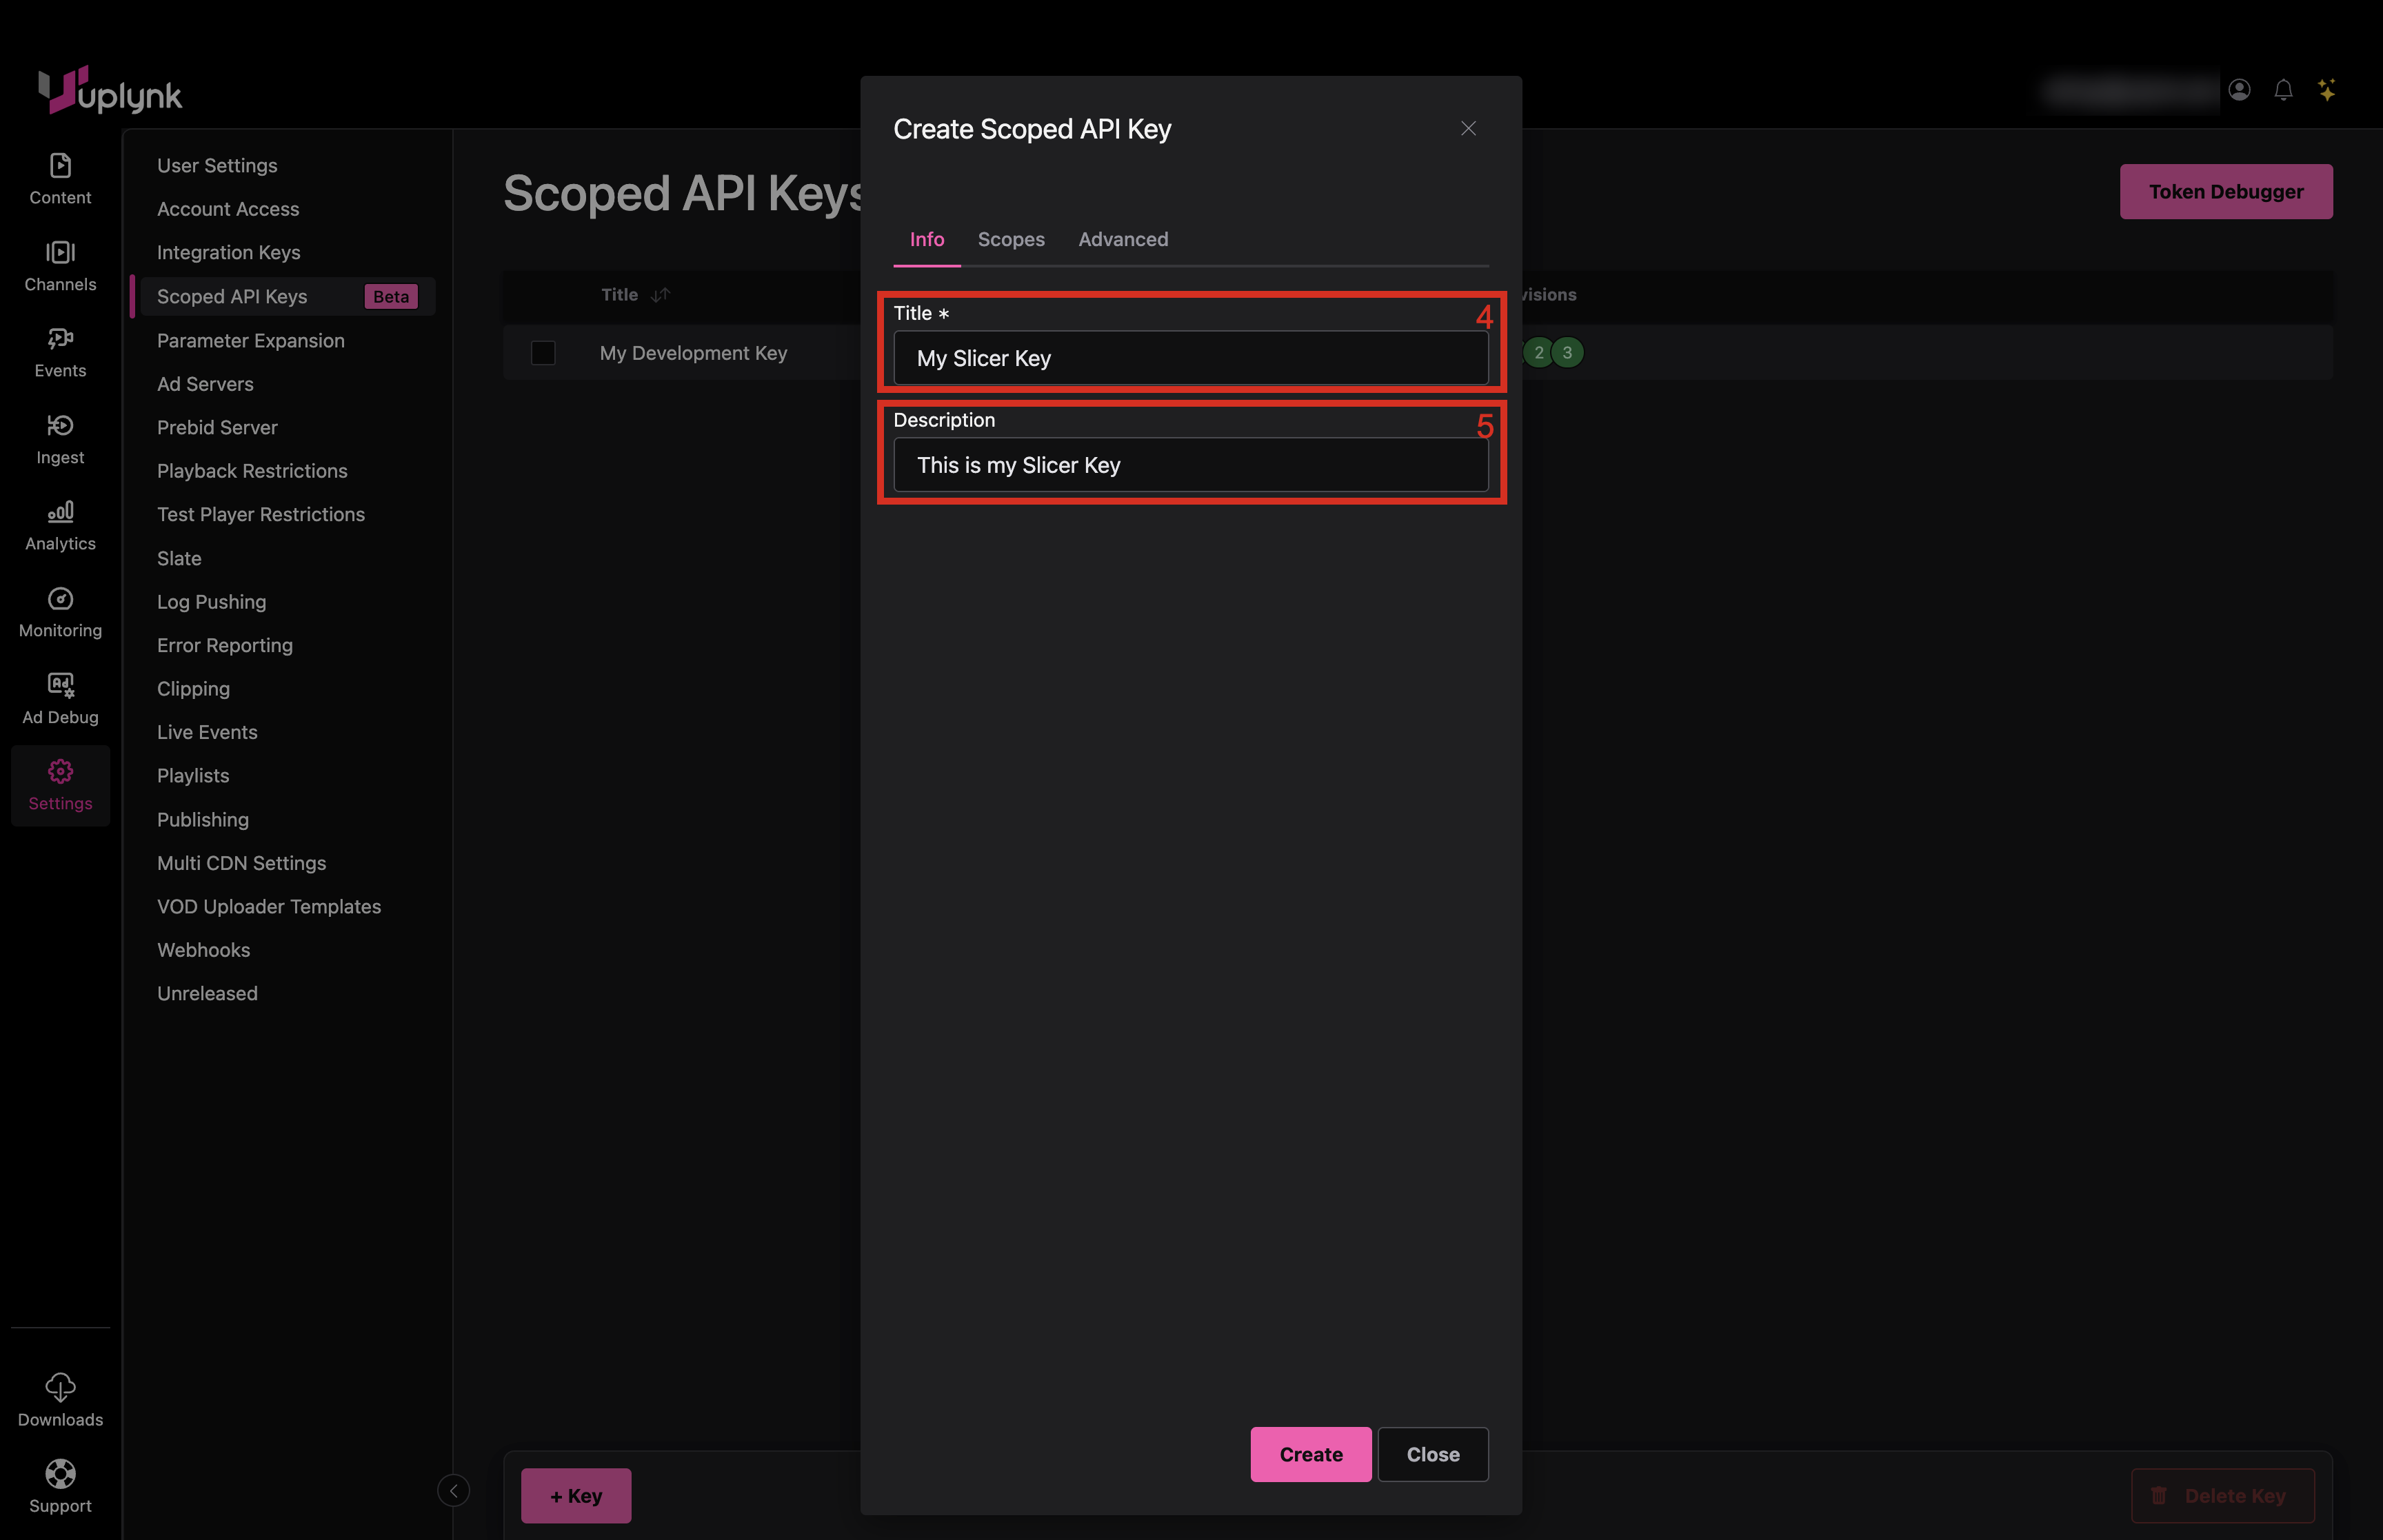
- Enter a name for the Scoped API Key
- Enter a description for the Scoped API Key
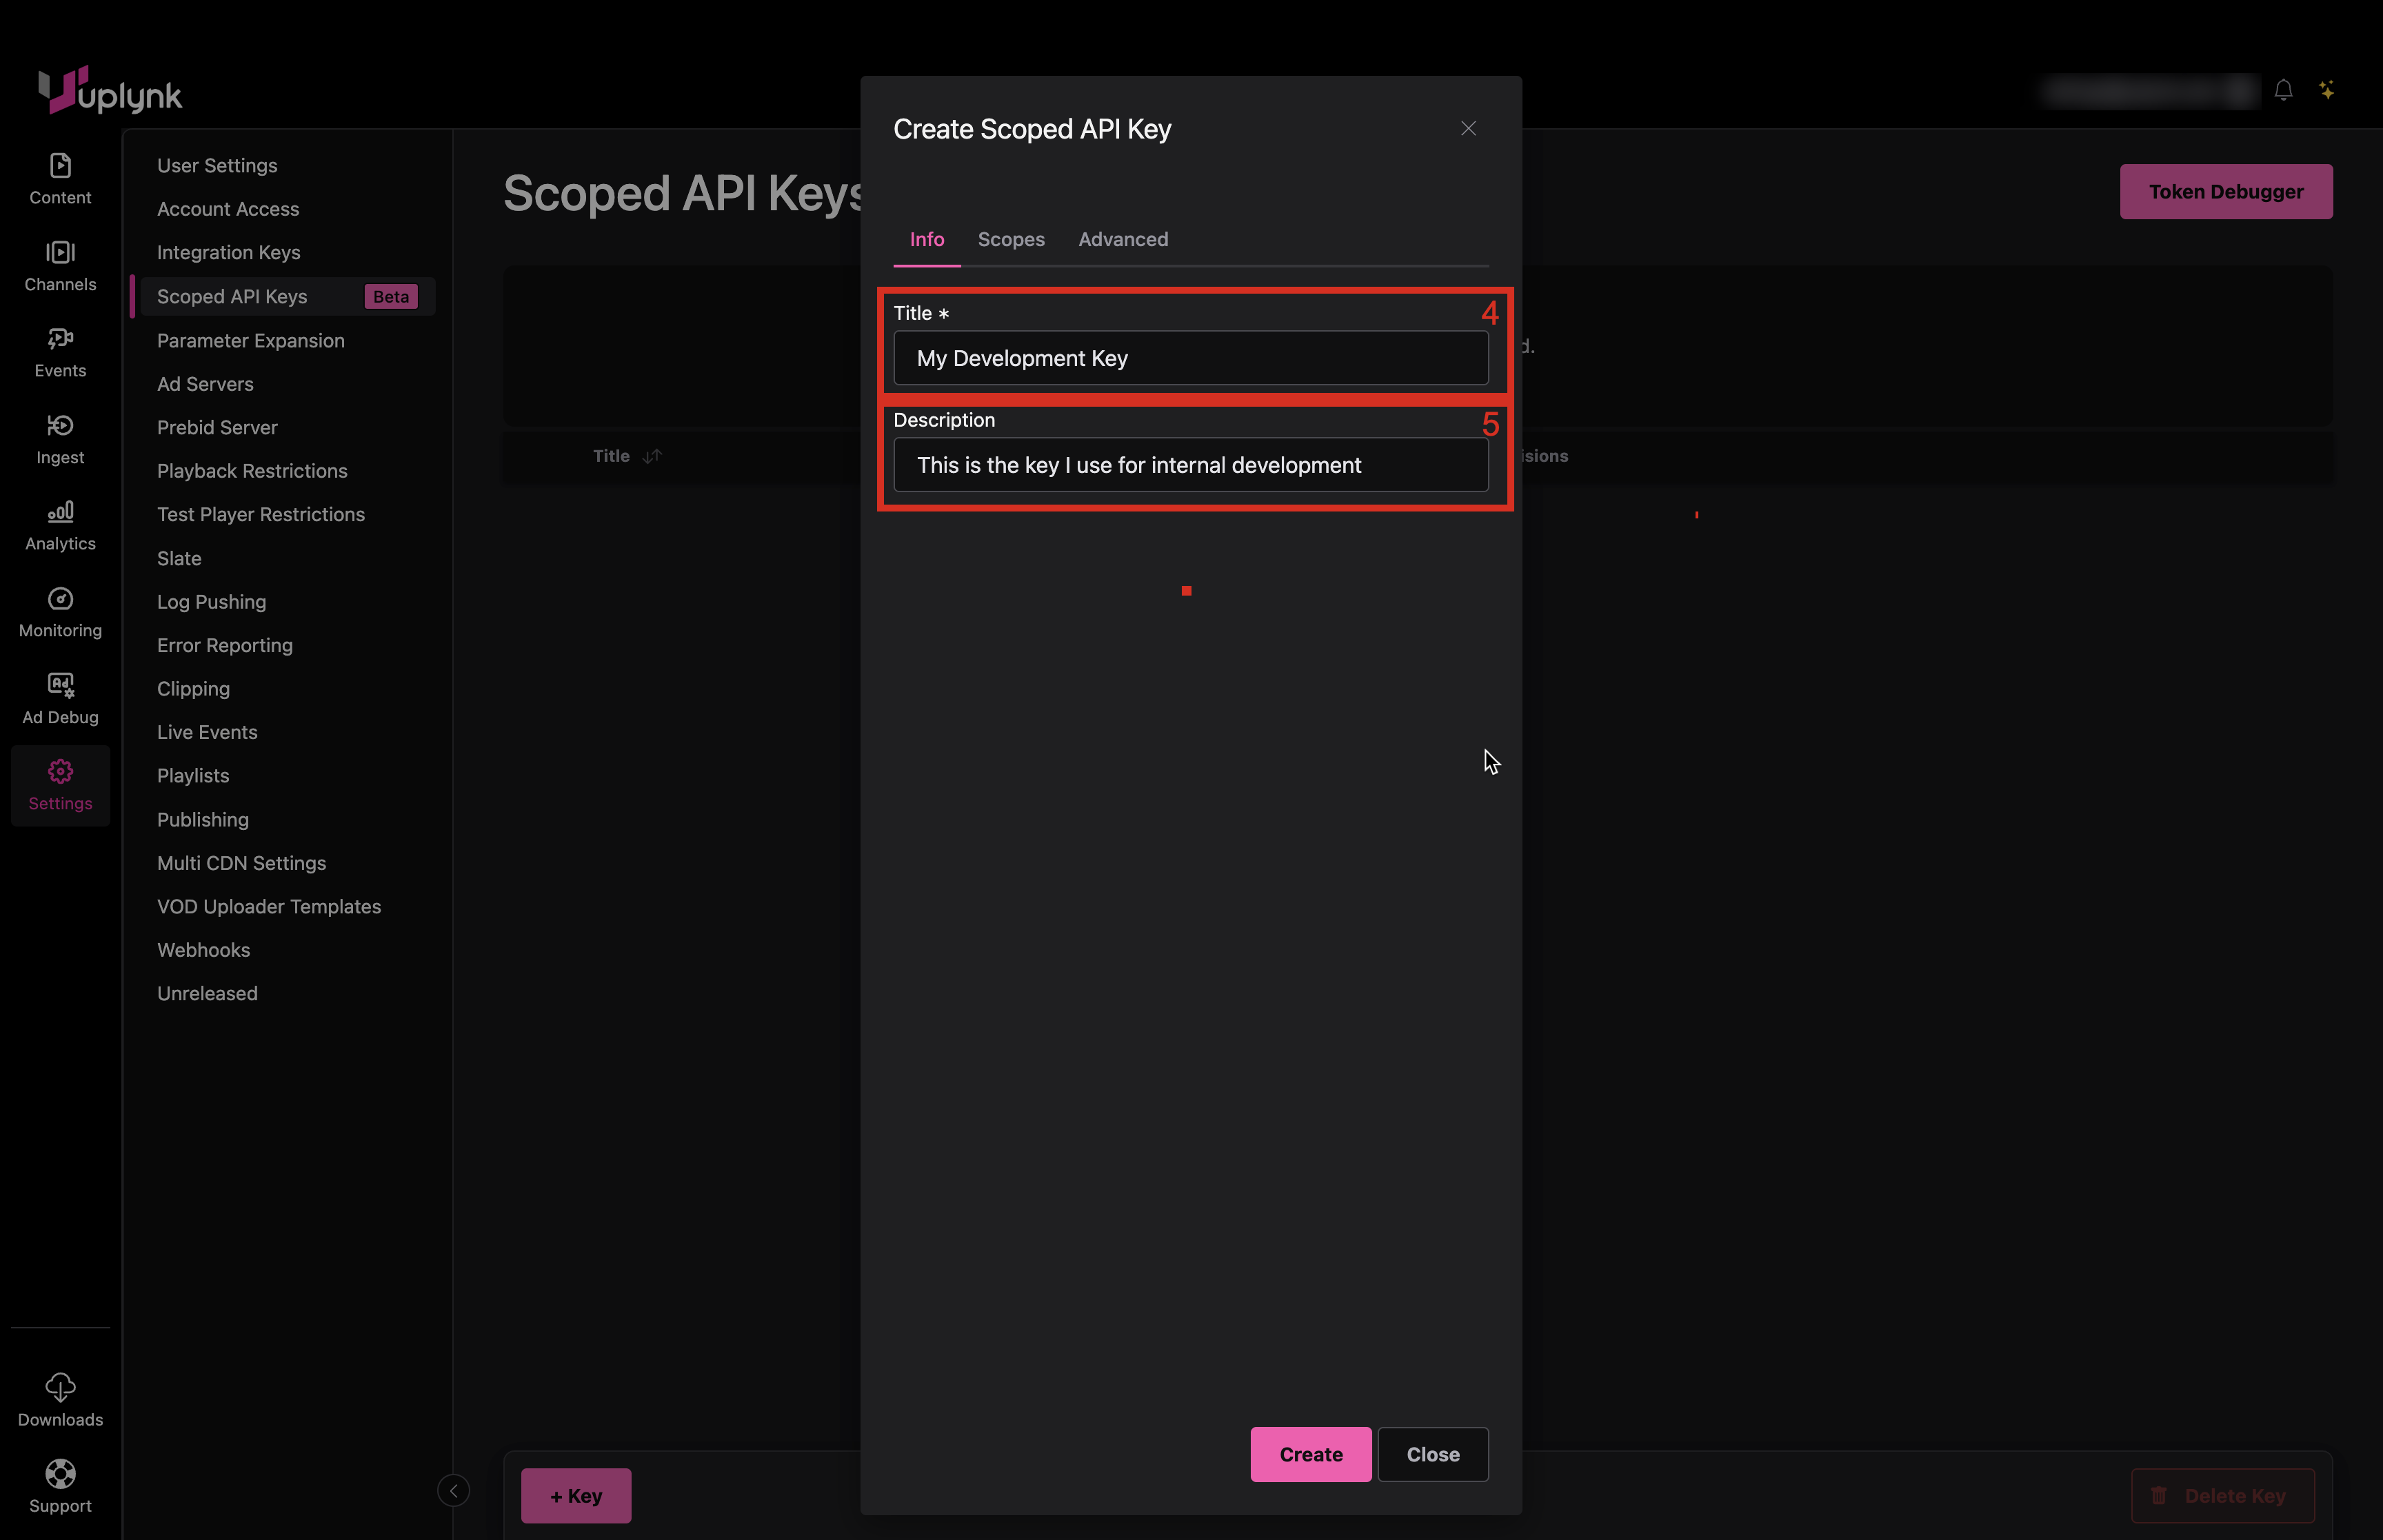
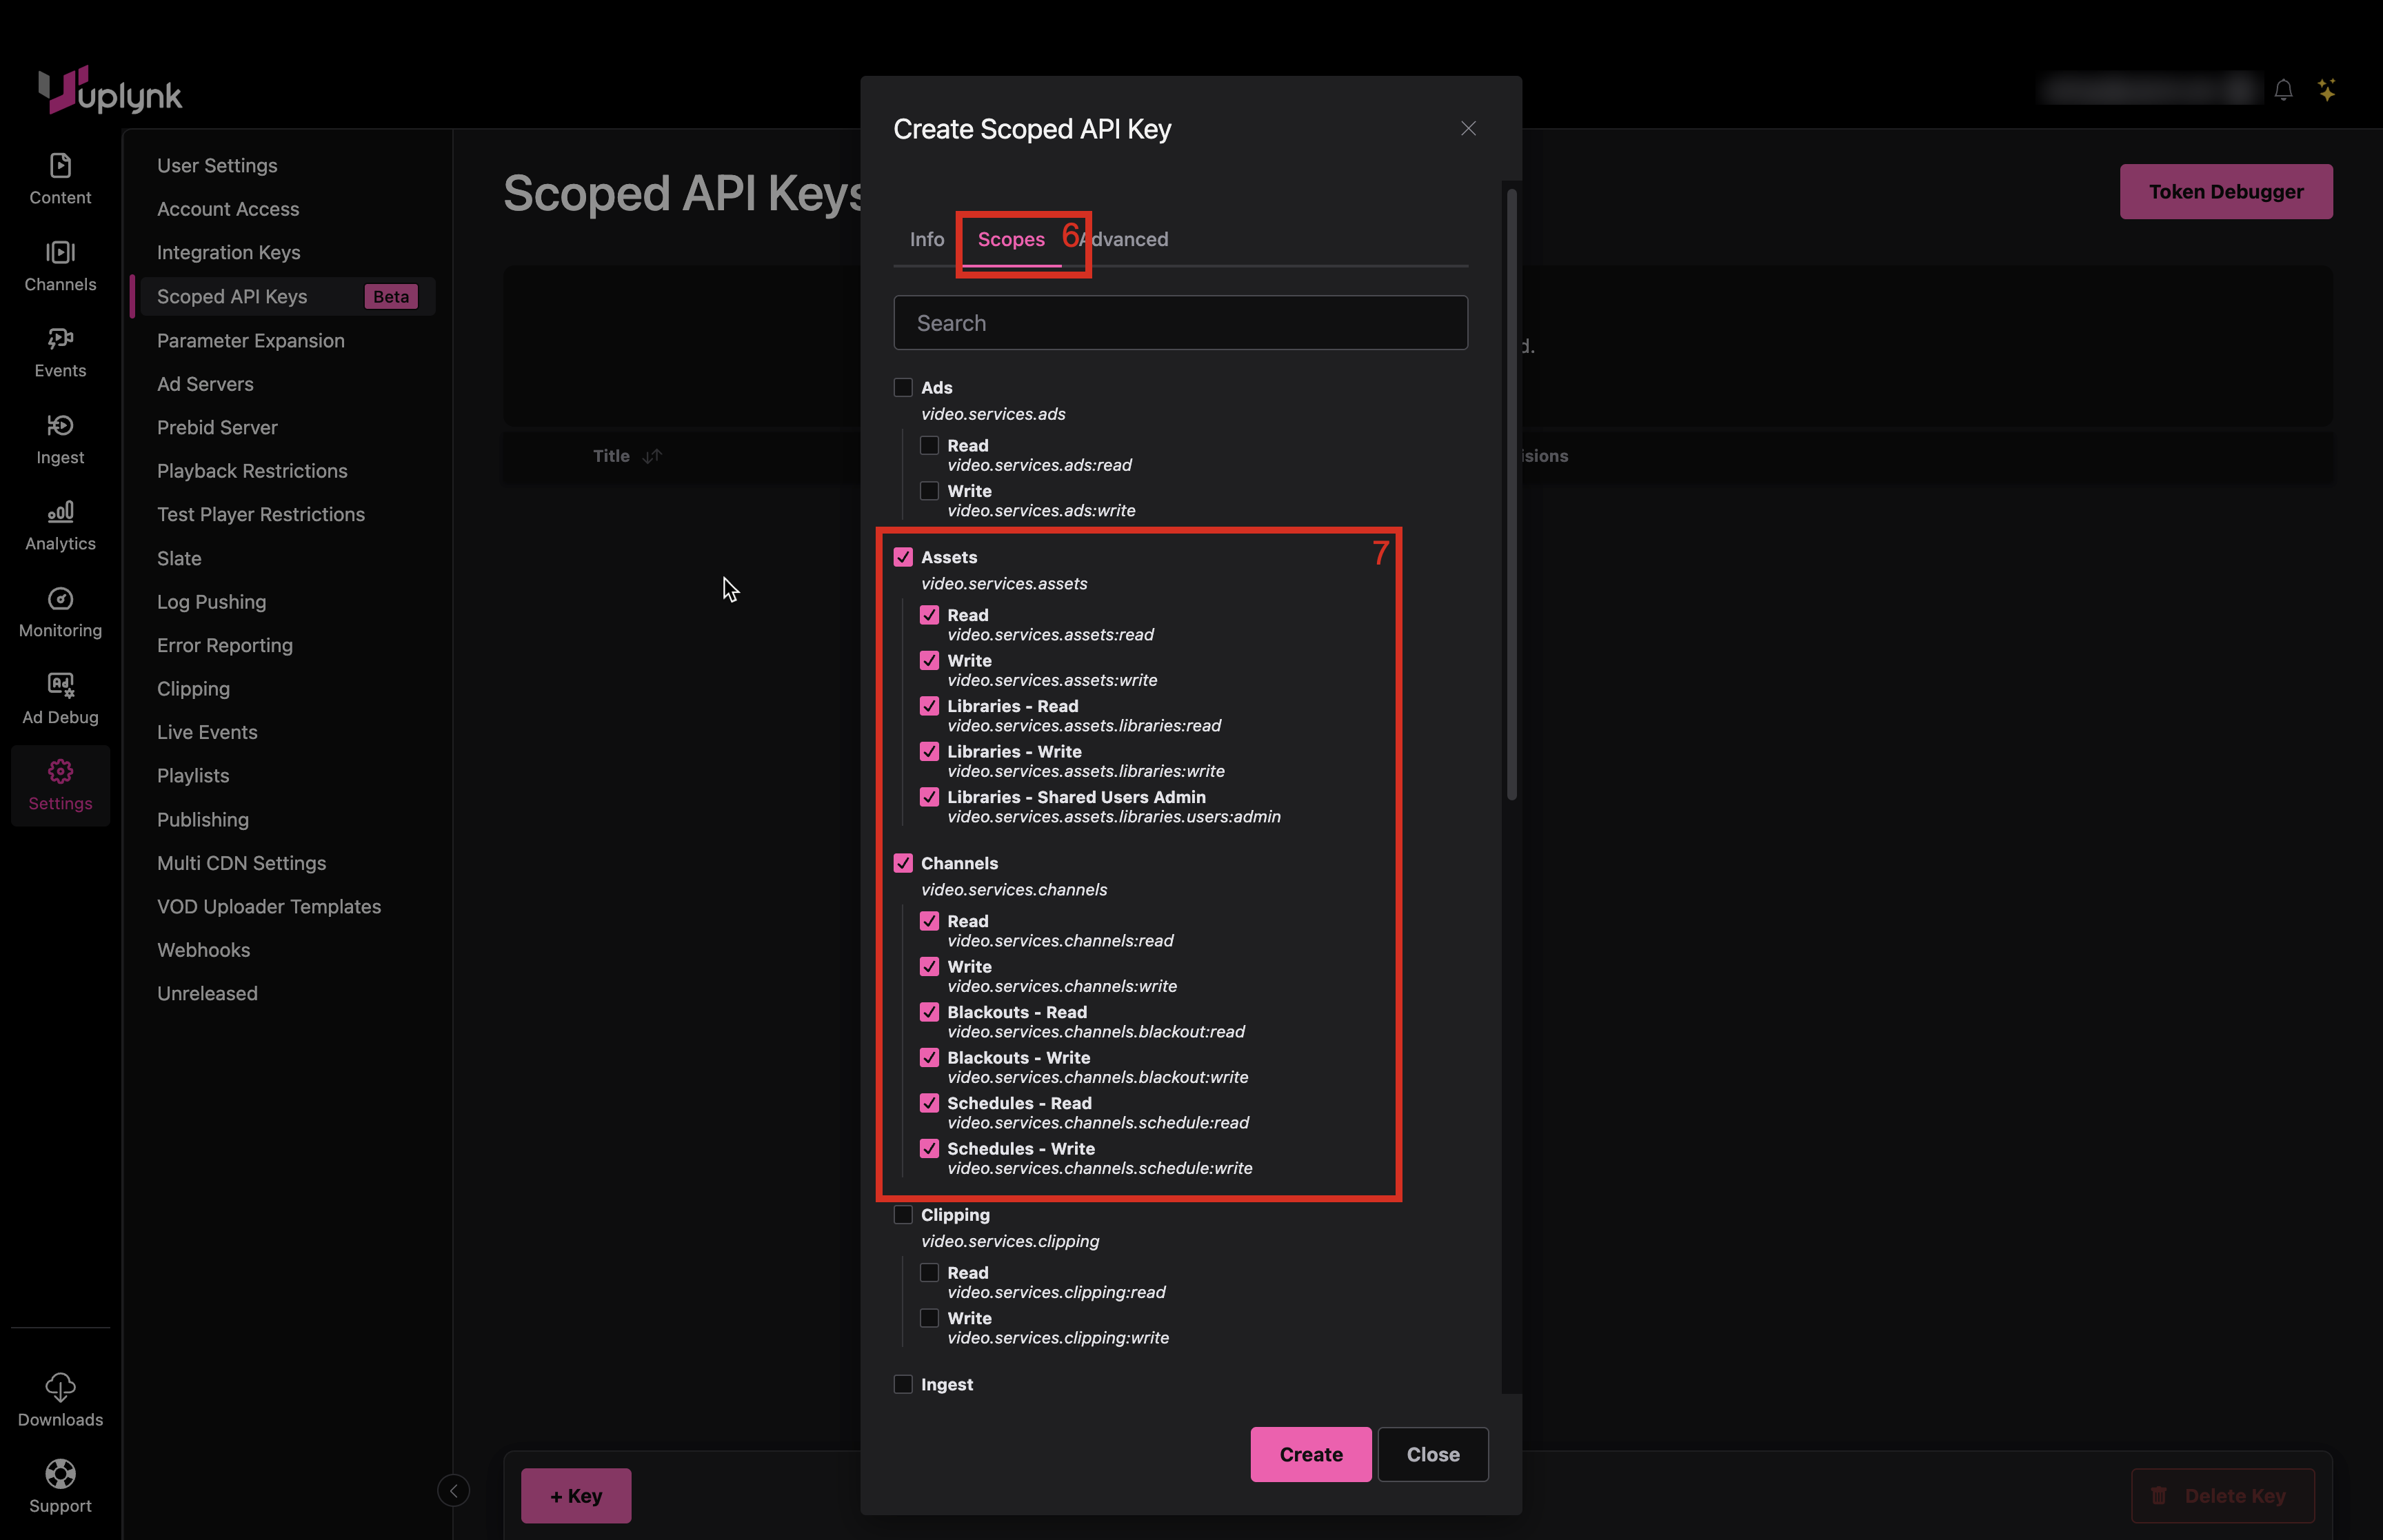
- Click on Scopes tab
- Select the desired permissions for the Scoped API Key
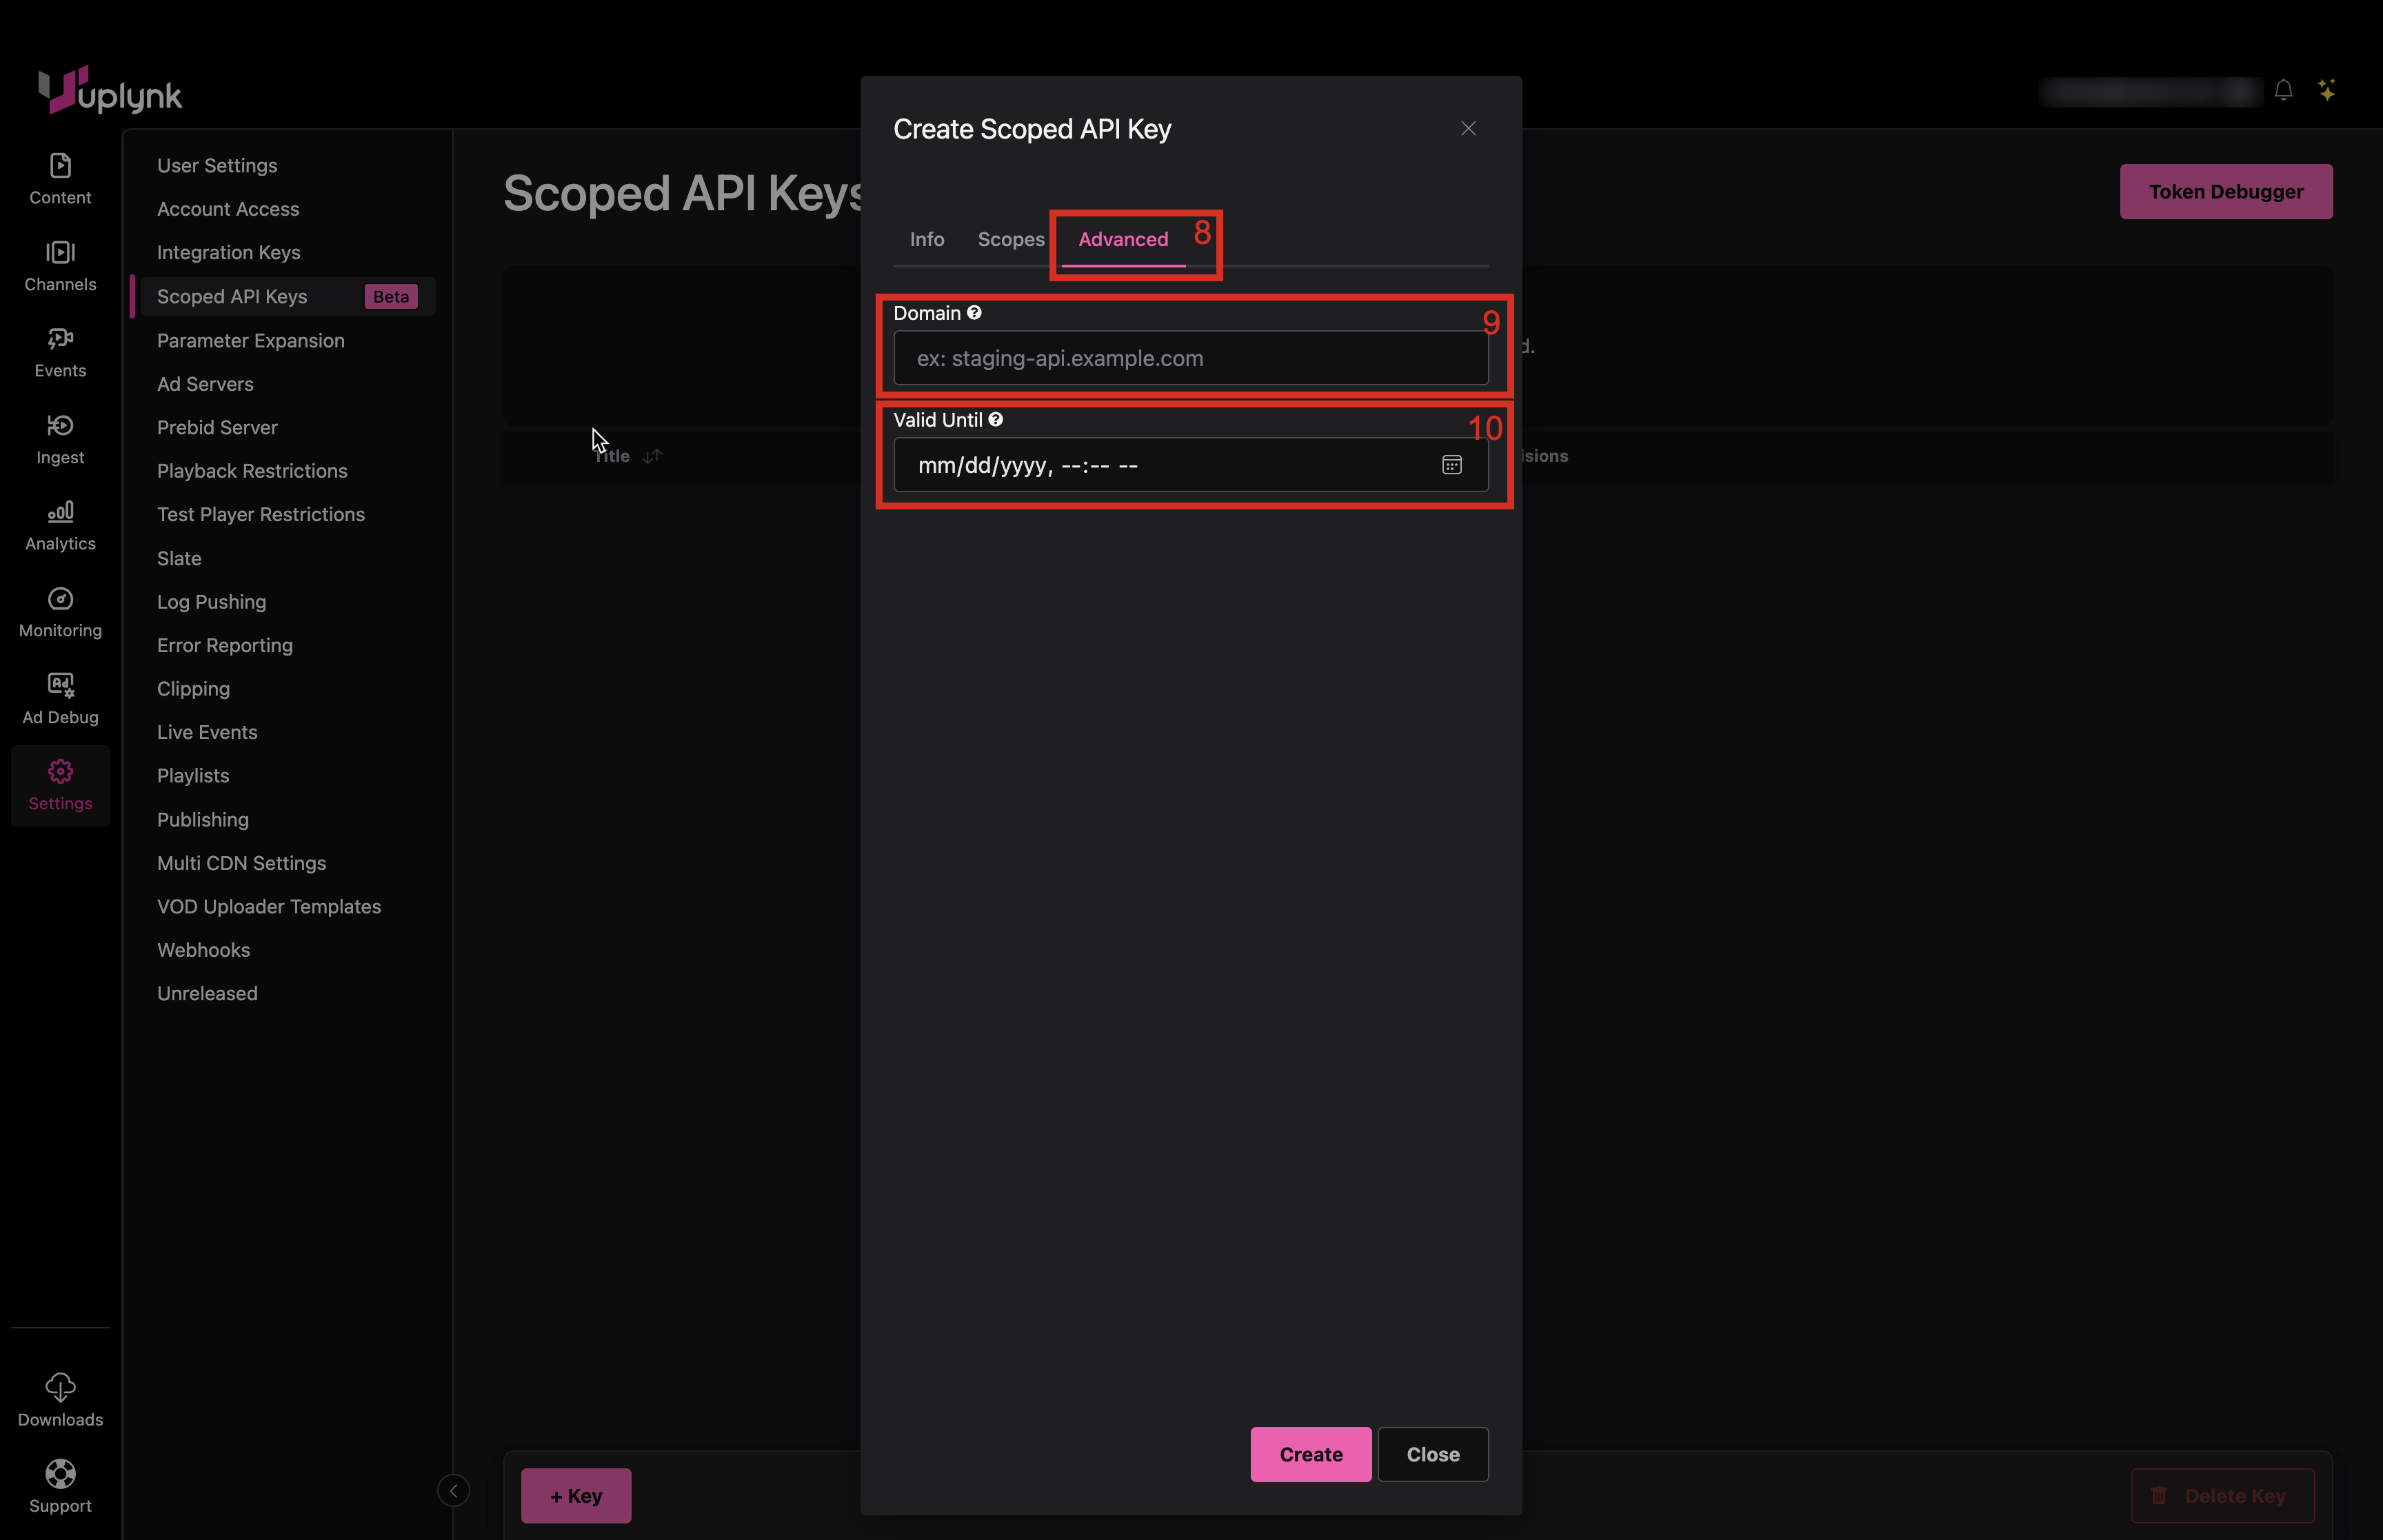
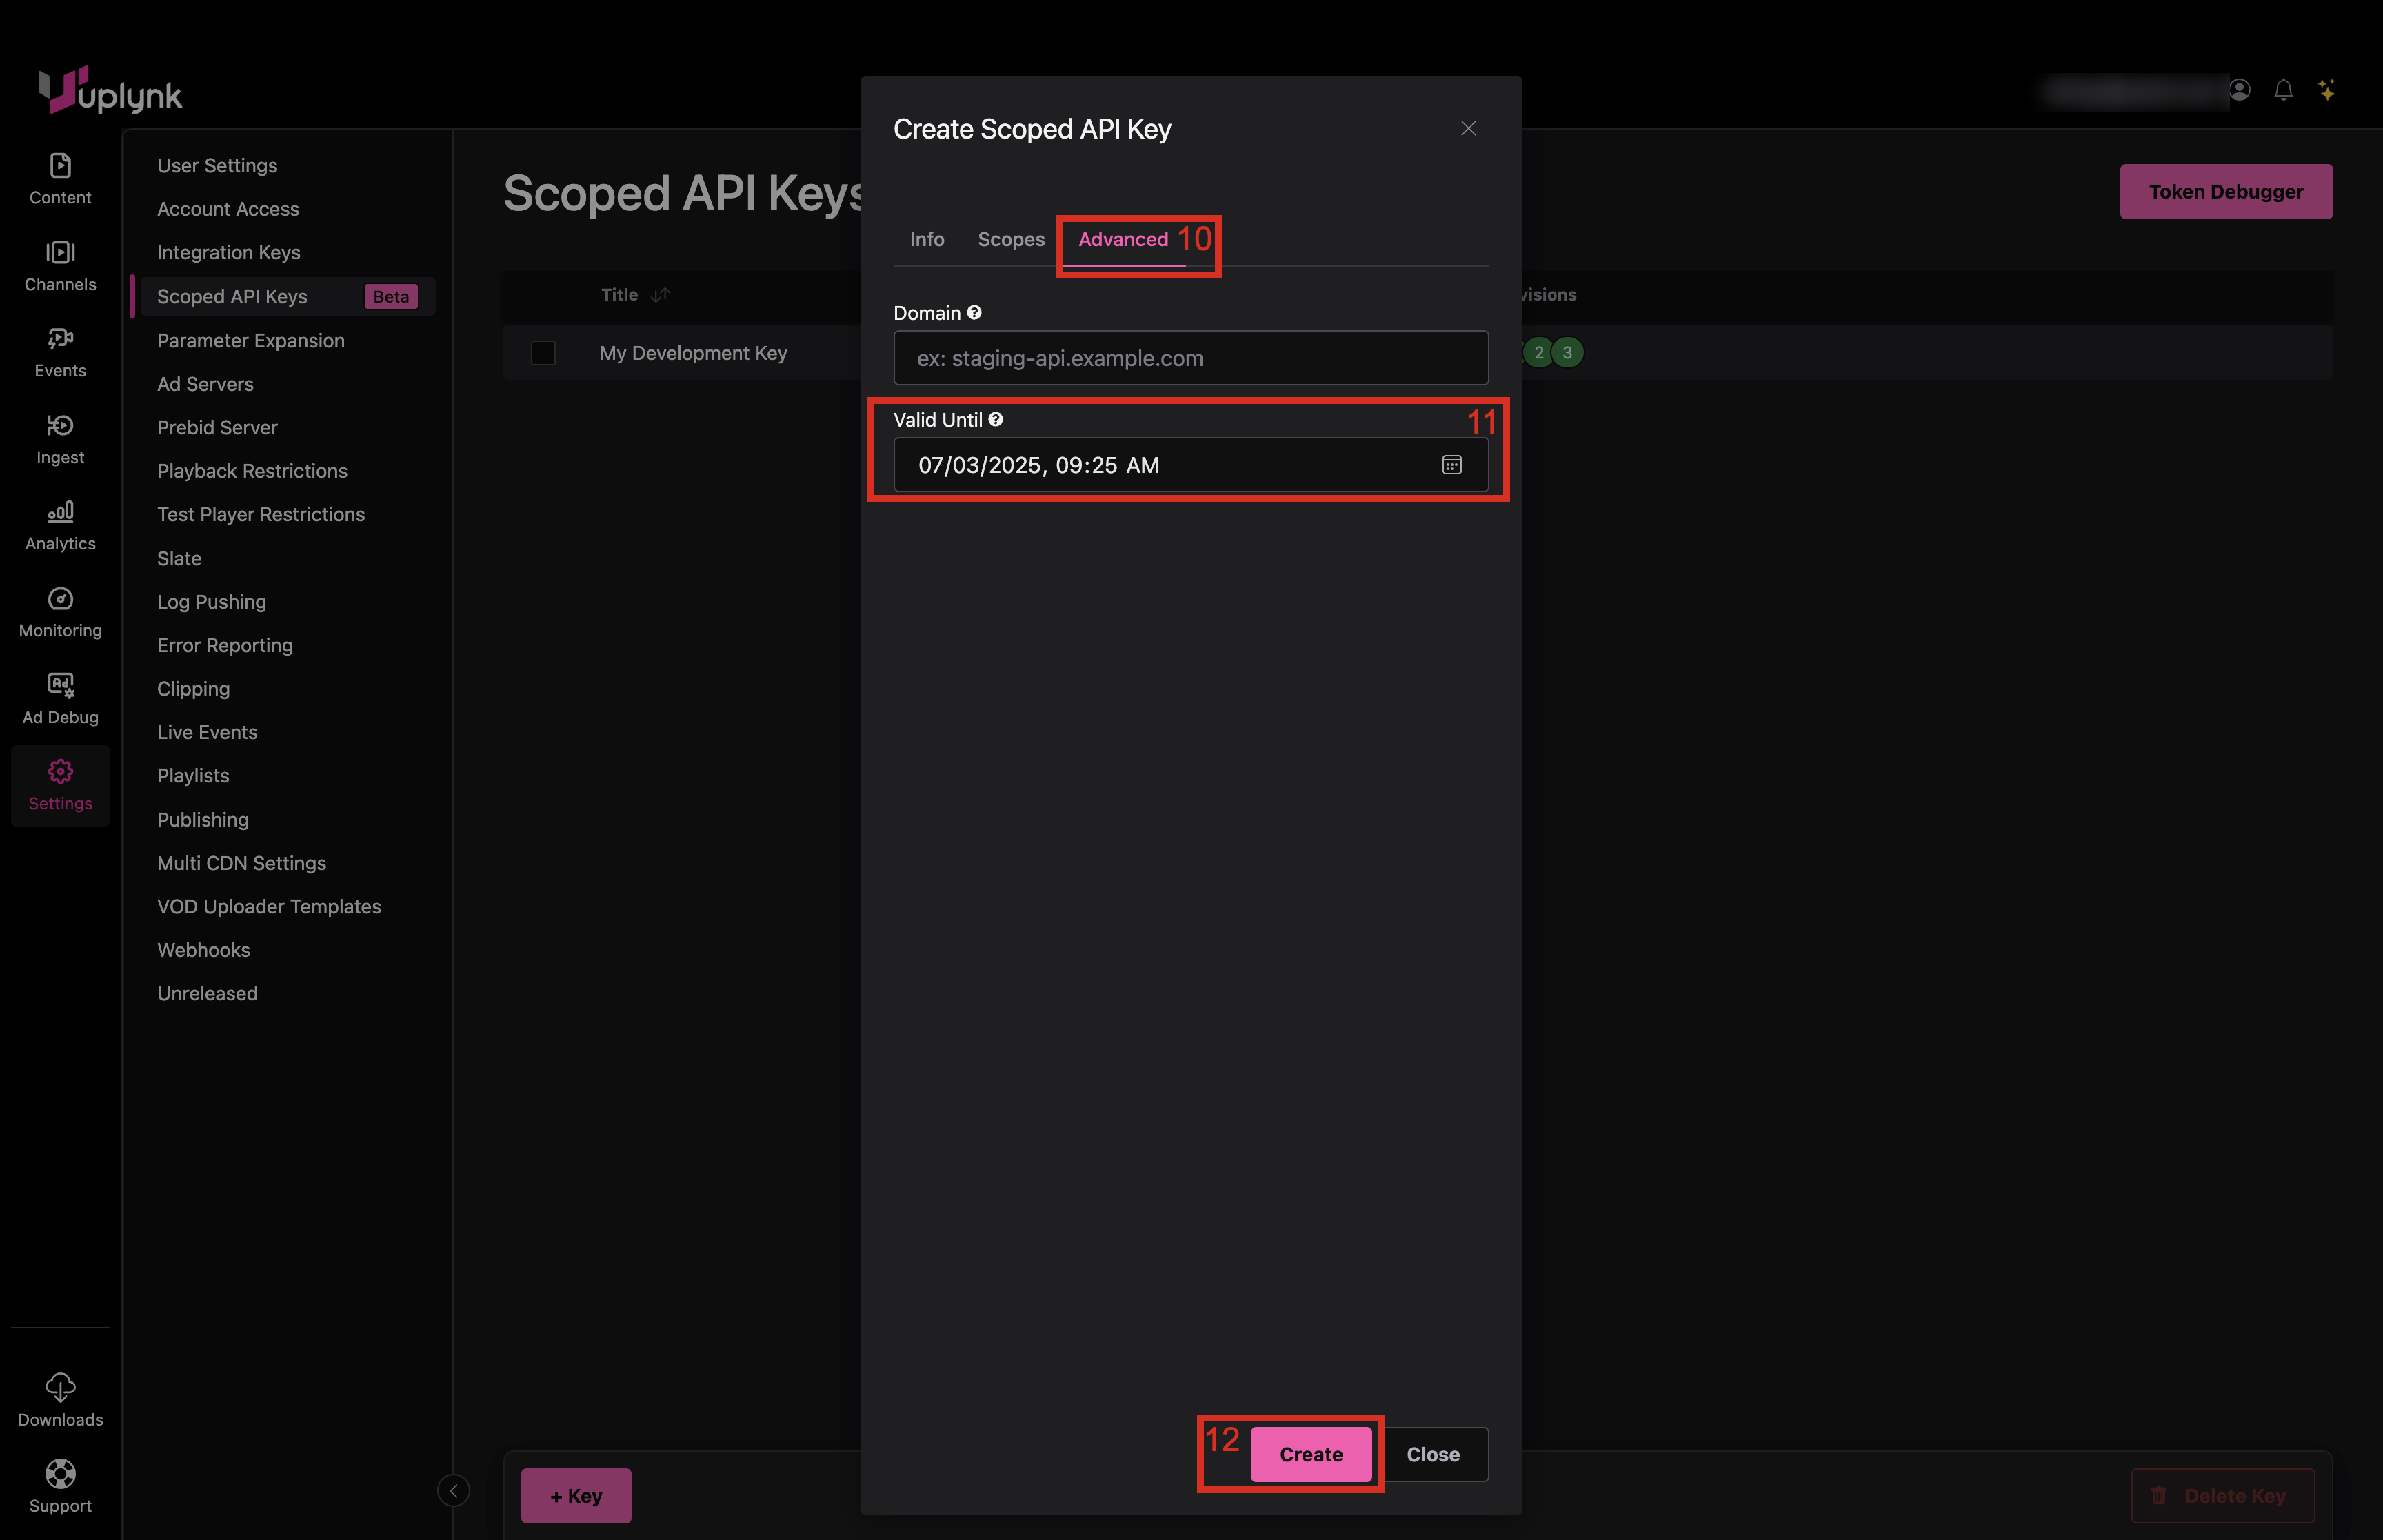
- Click on Advanced tab
- If desired, enter a domain to limit key requests from that domain
- If desired, enter an expiration date for the Scoped API Key
- Click Create
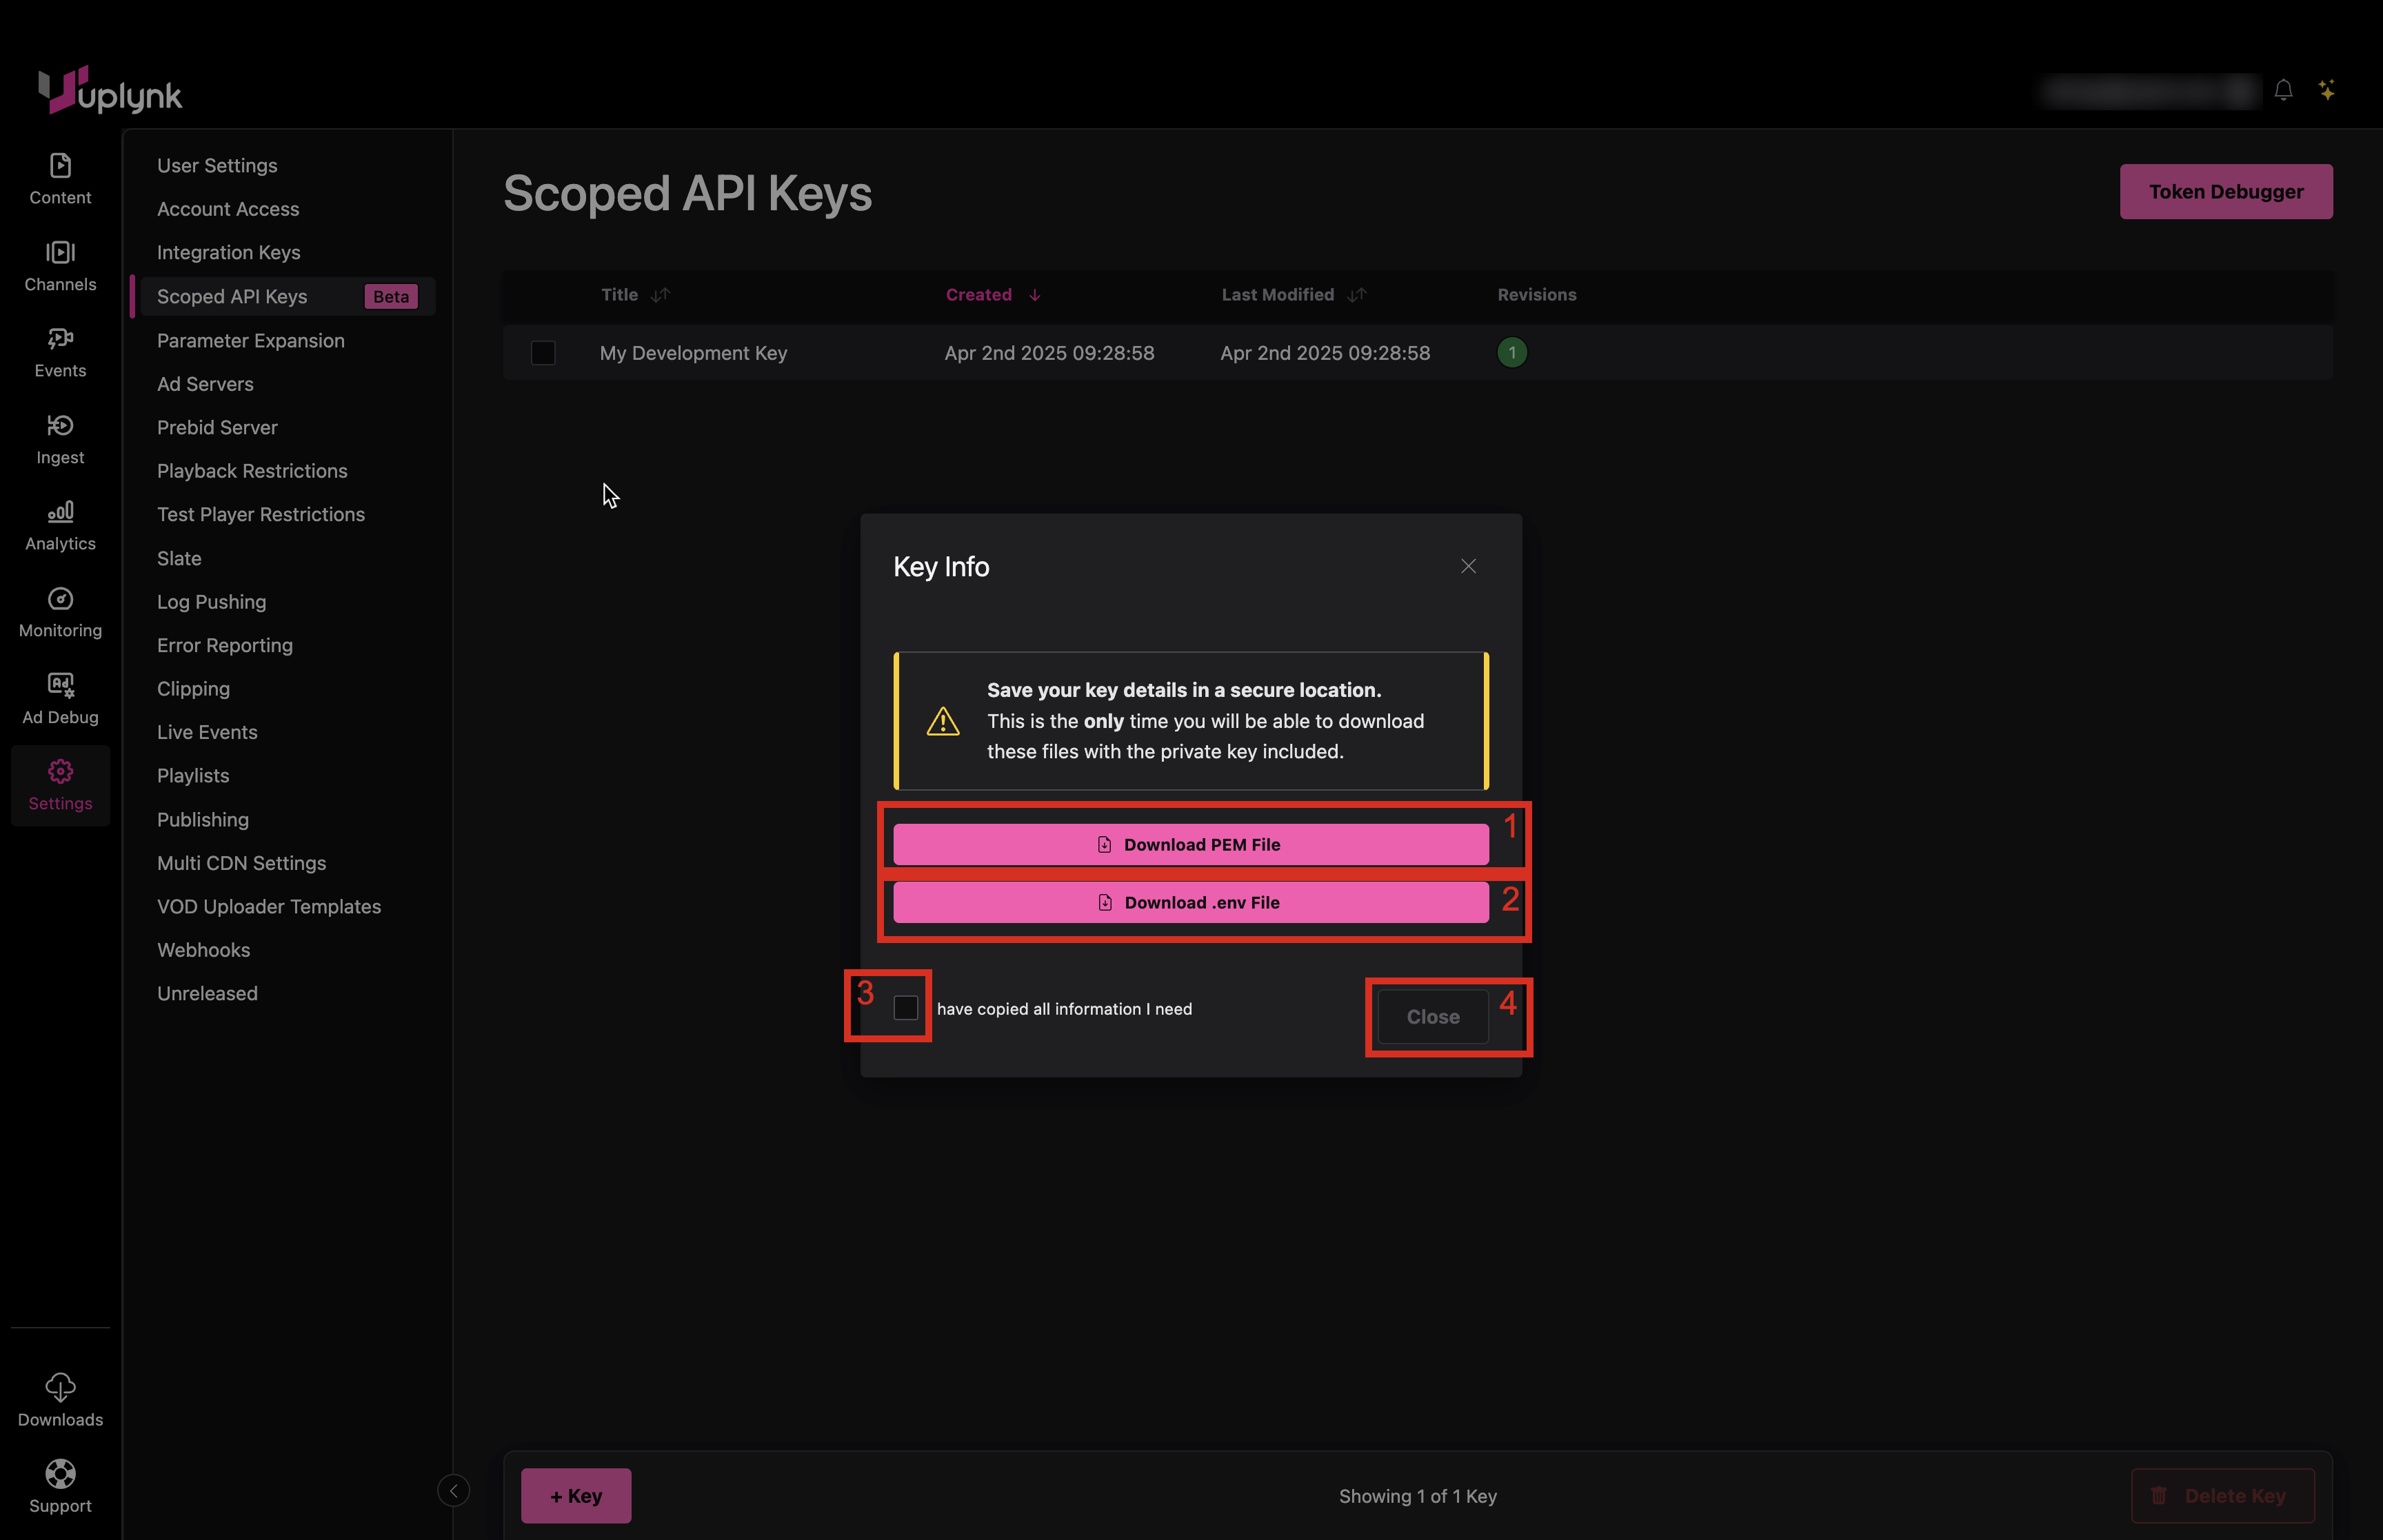
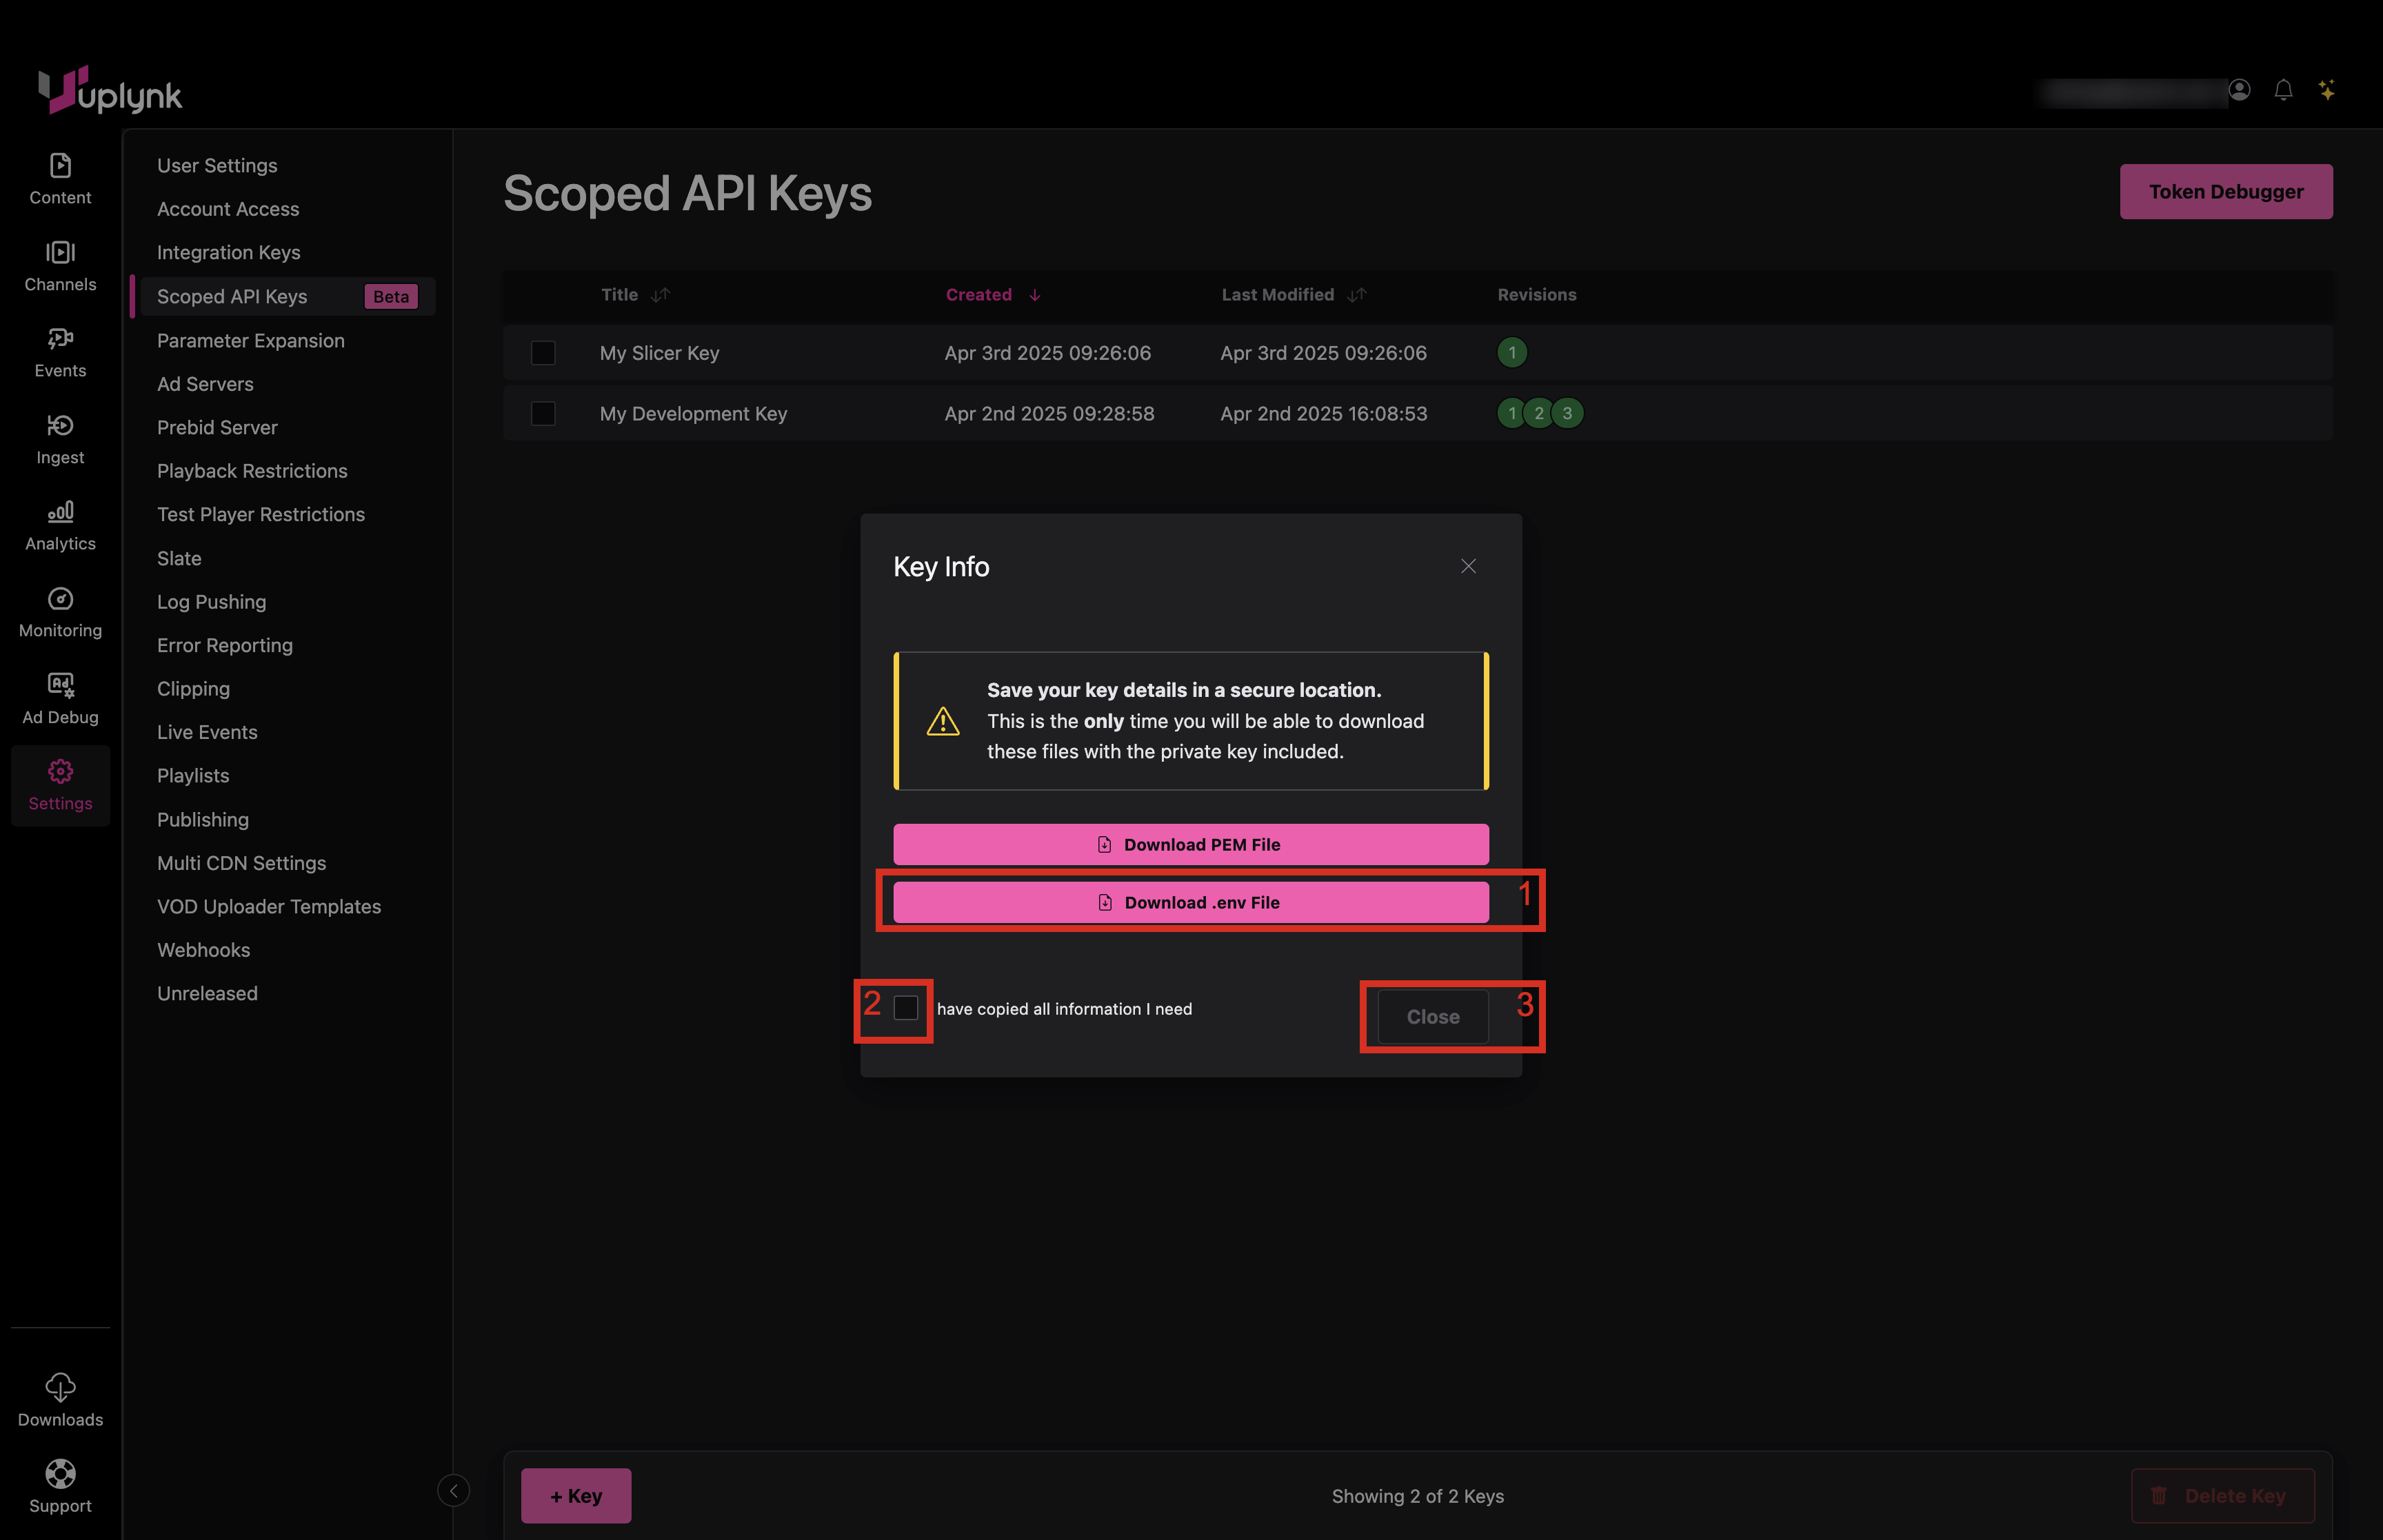
To save the key information:
- Click on Download PEM File to save the public and private encryption keys in a .pem file
- Click on Download .env File to save the public and private encryption keys in cleartext
- After downloading, click the checkbox
- Click Close
Updating a Scoped API Key
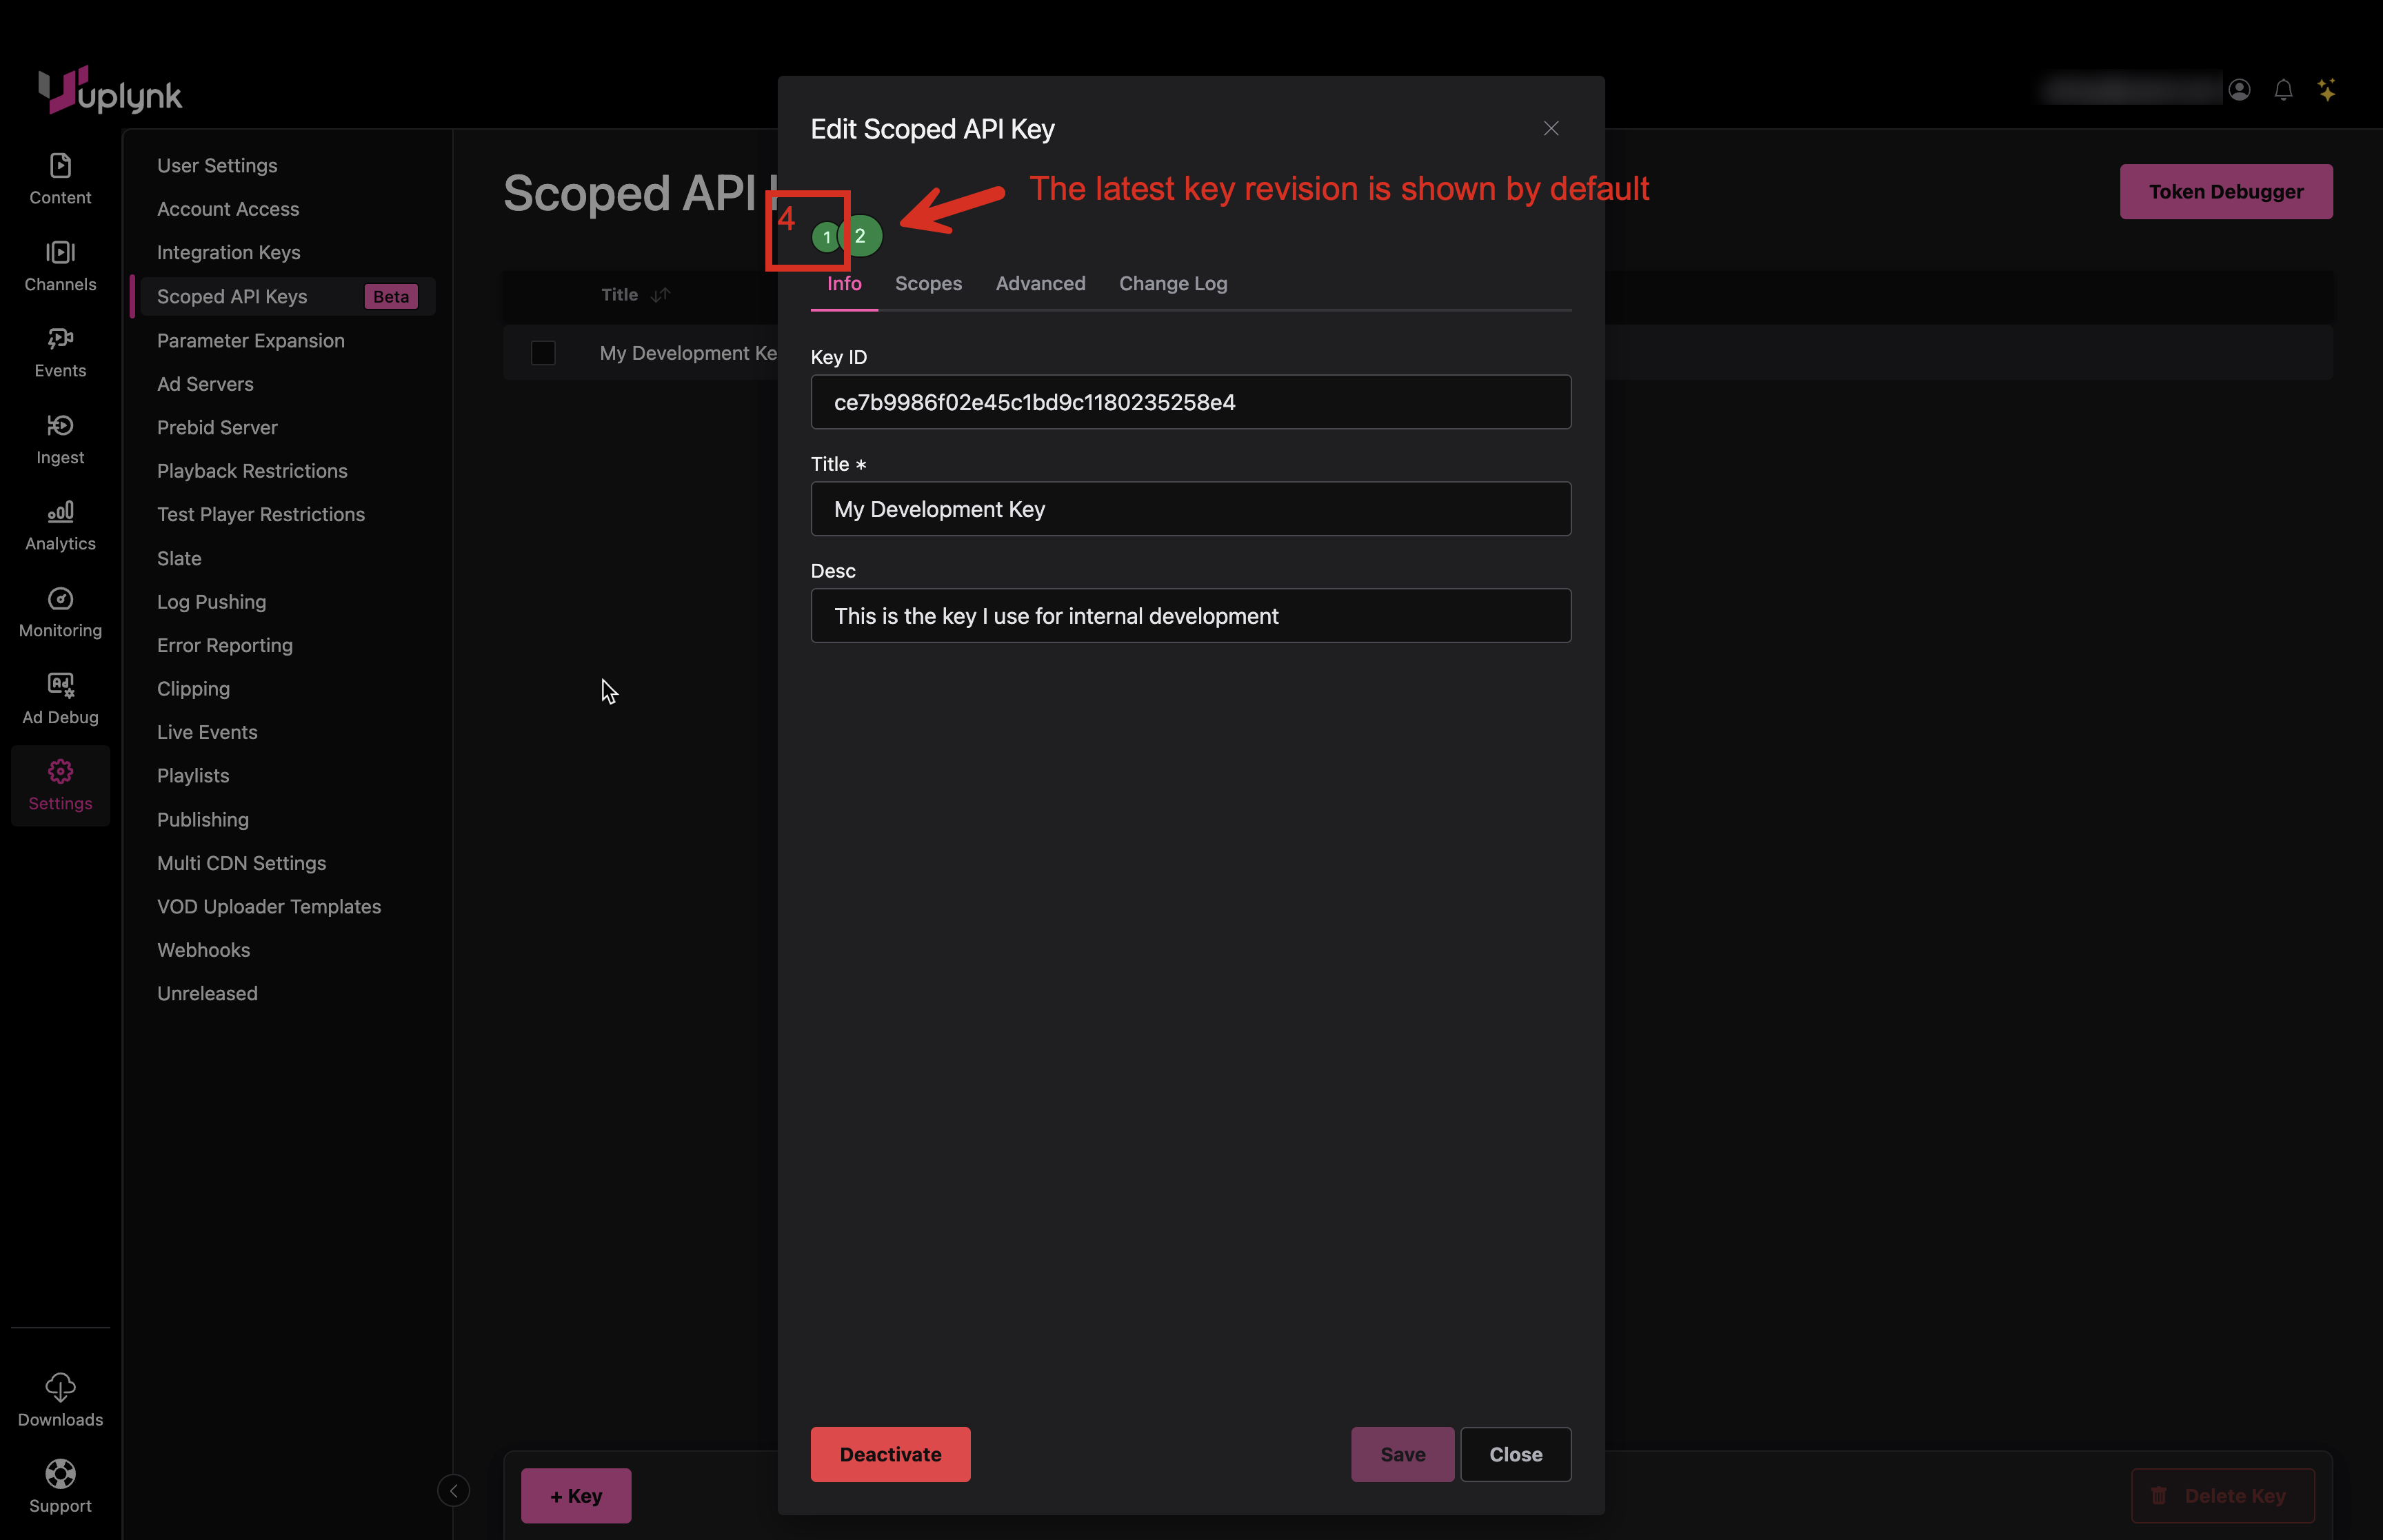
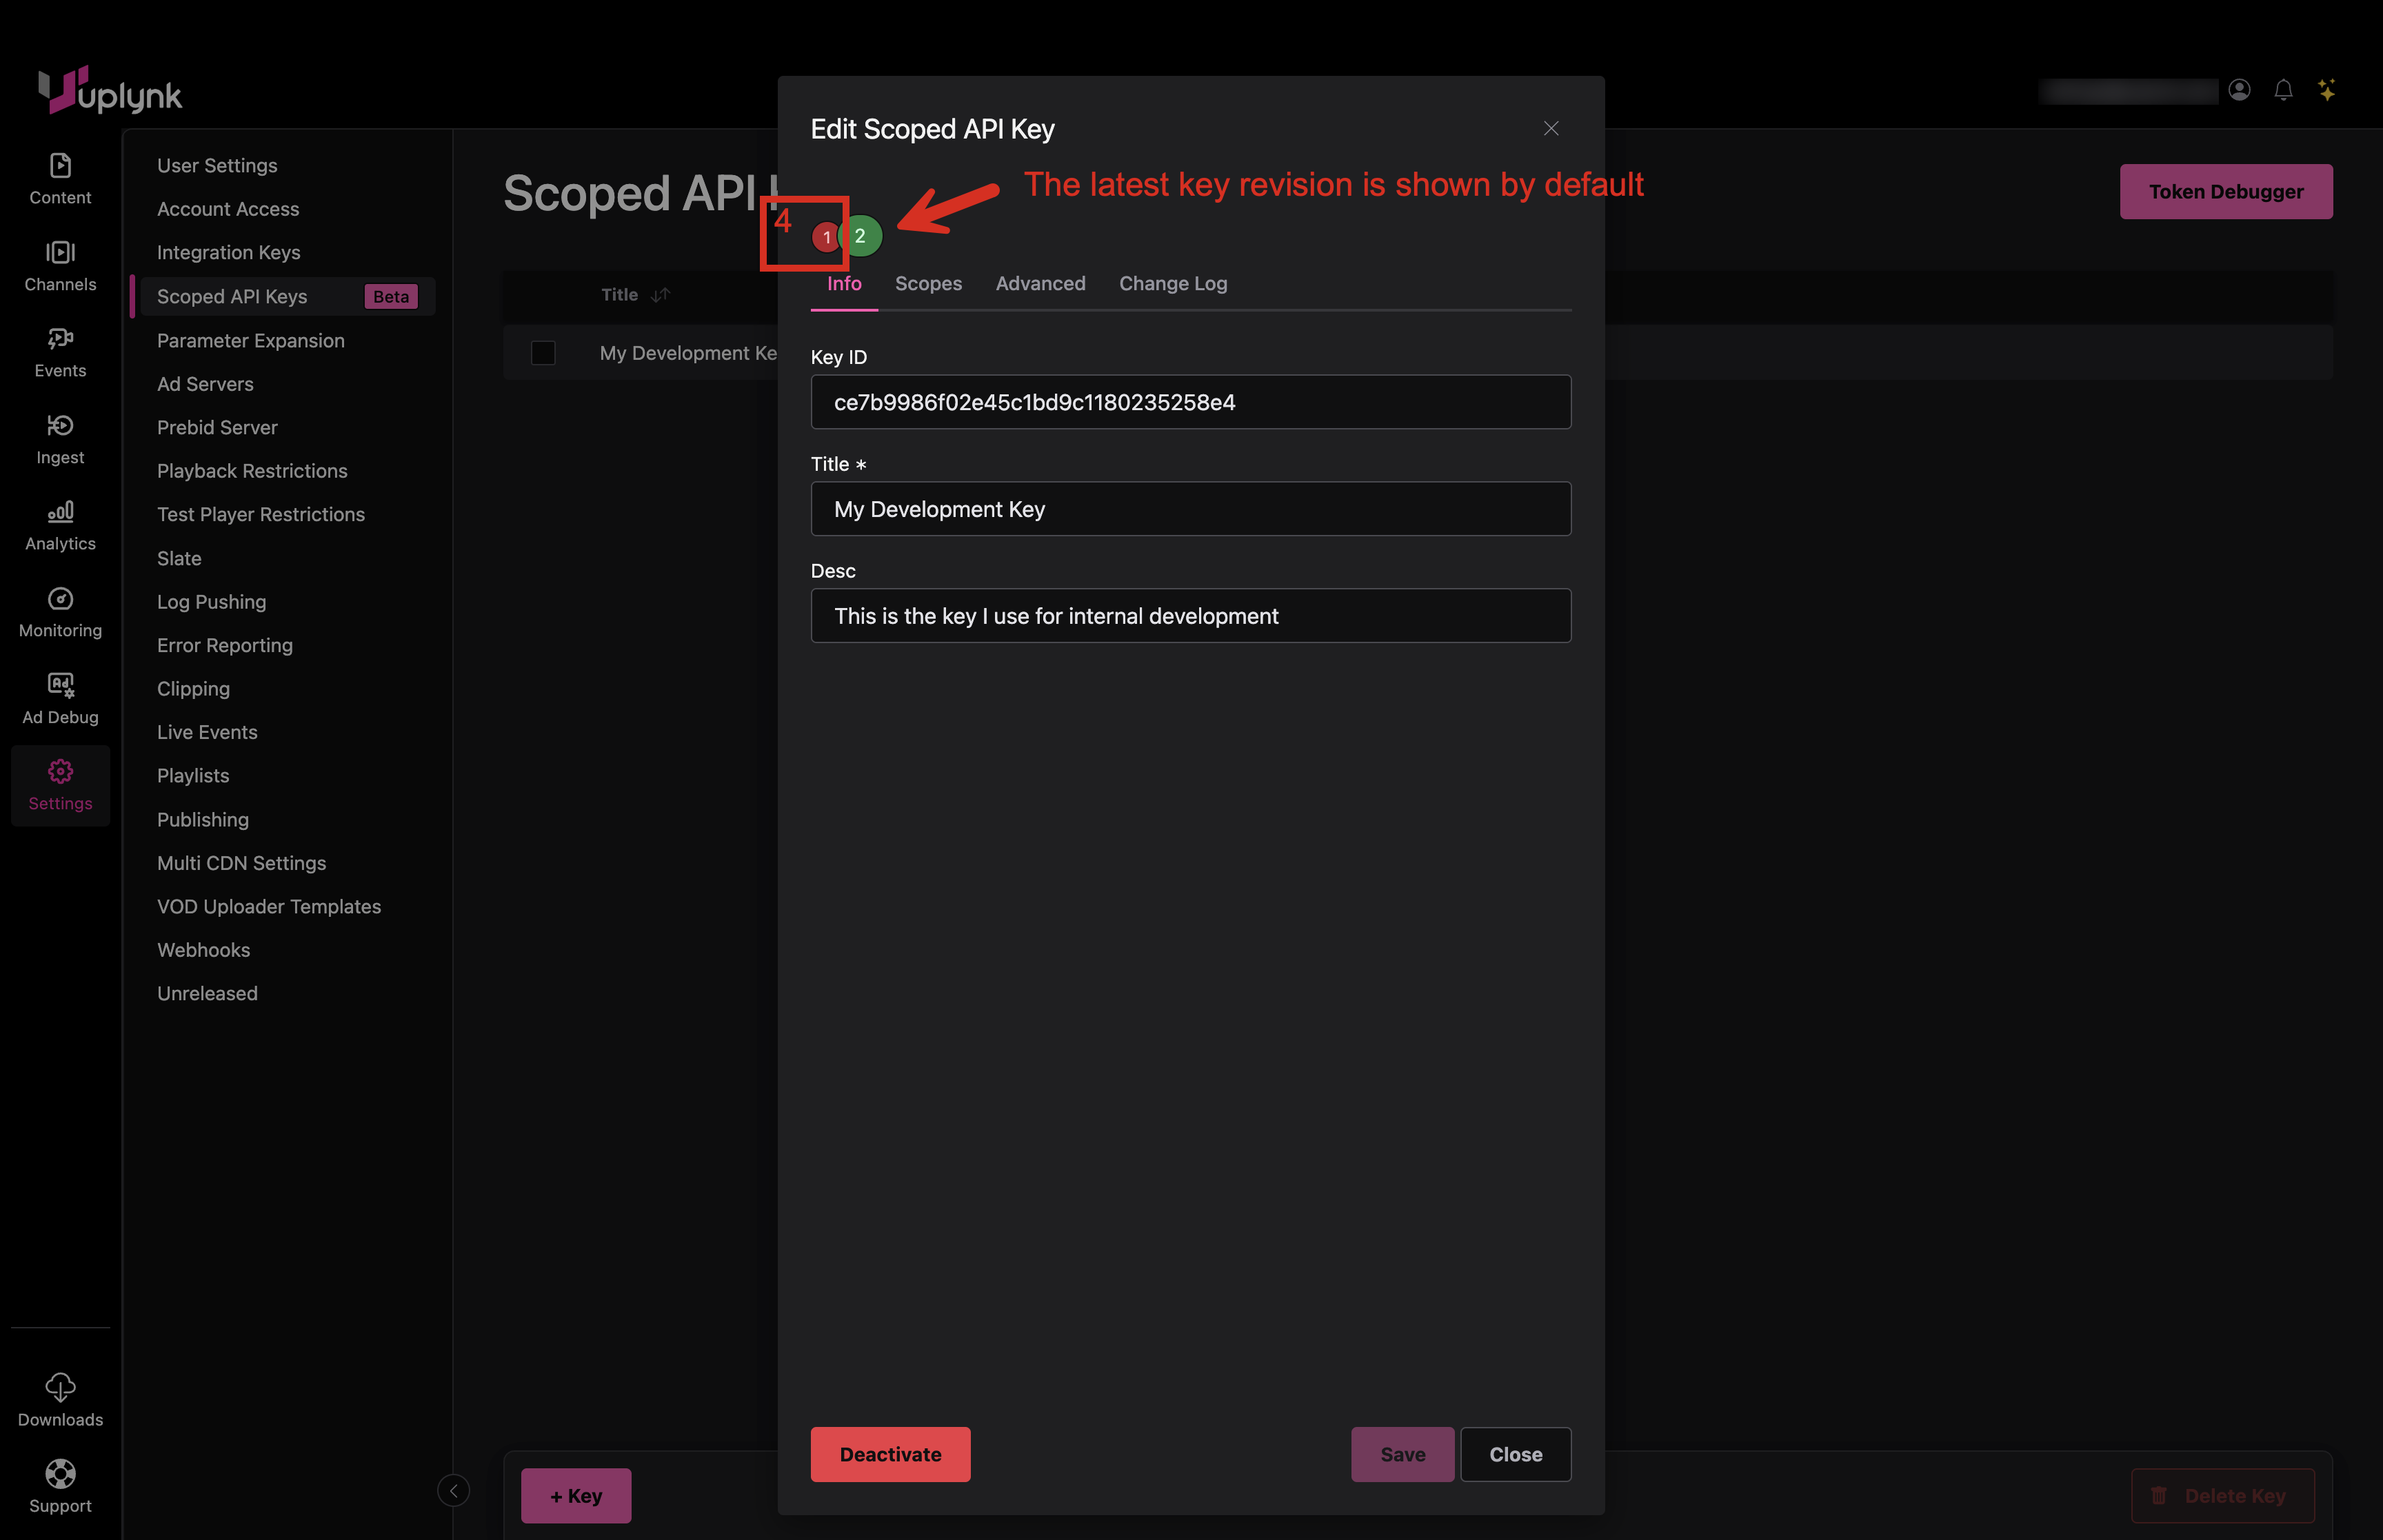
Existing Scoped API Keys can be updated, usually to expand or reduce the scope of allowed access. Multiple revisions of a Scoped API Key can be active at the same time to avoid issues where a key may just stop working for a user.
Individual revisions of a Scoped API Key can be independently activated or deactivated. Individual revisions of a Scoped API Key cannot be deleted – they can just be deactivated.
Up to three active versions of a Scoped API Key are allowed.
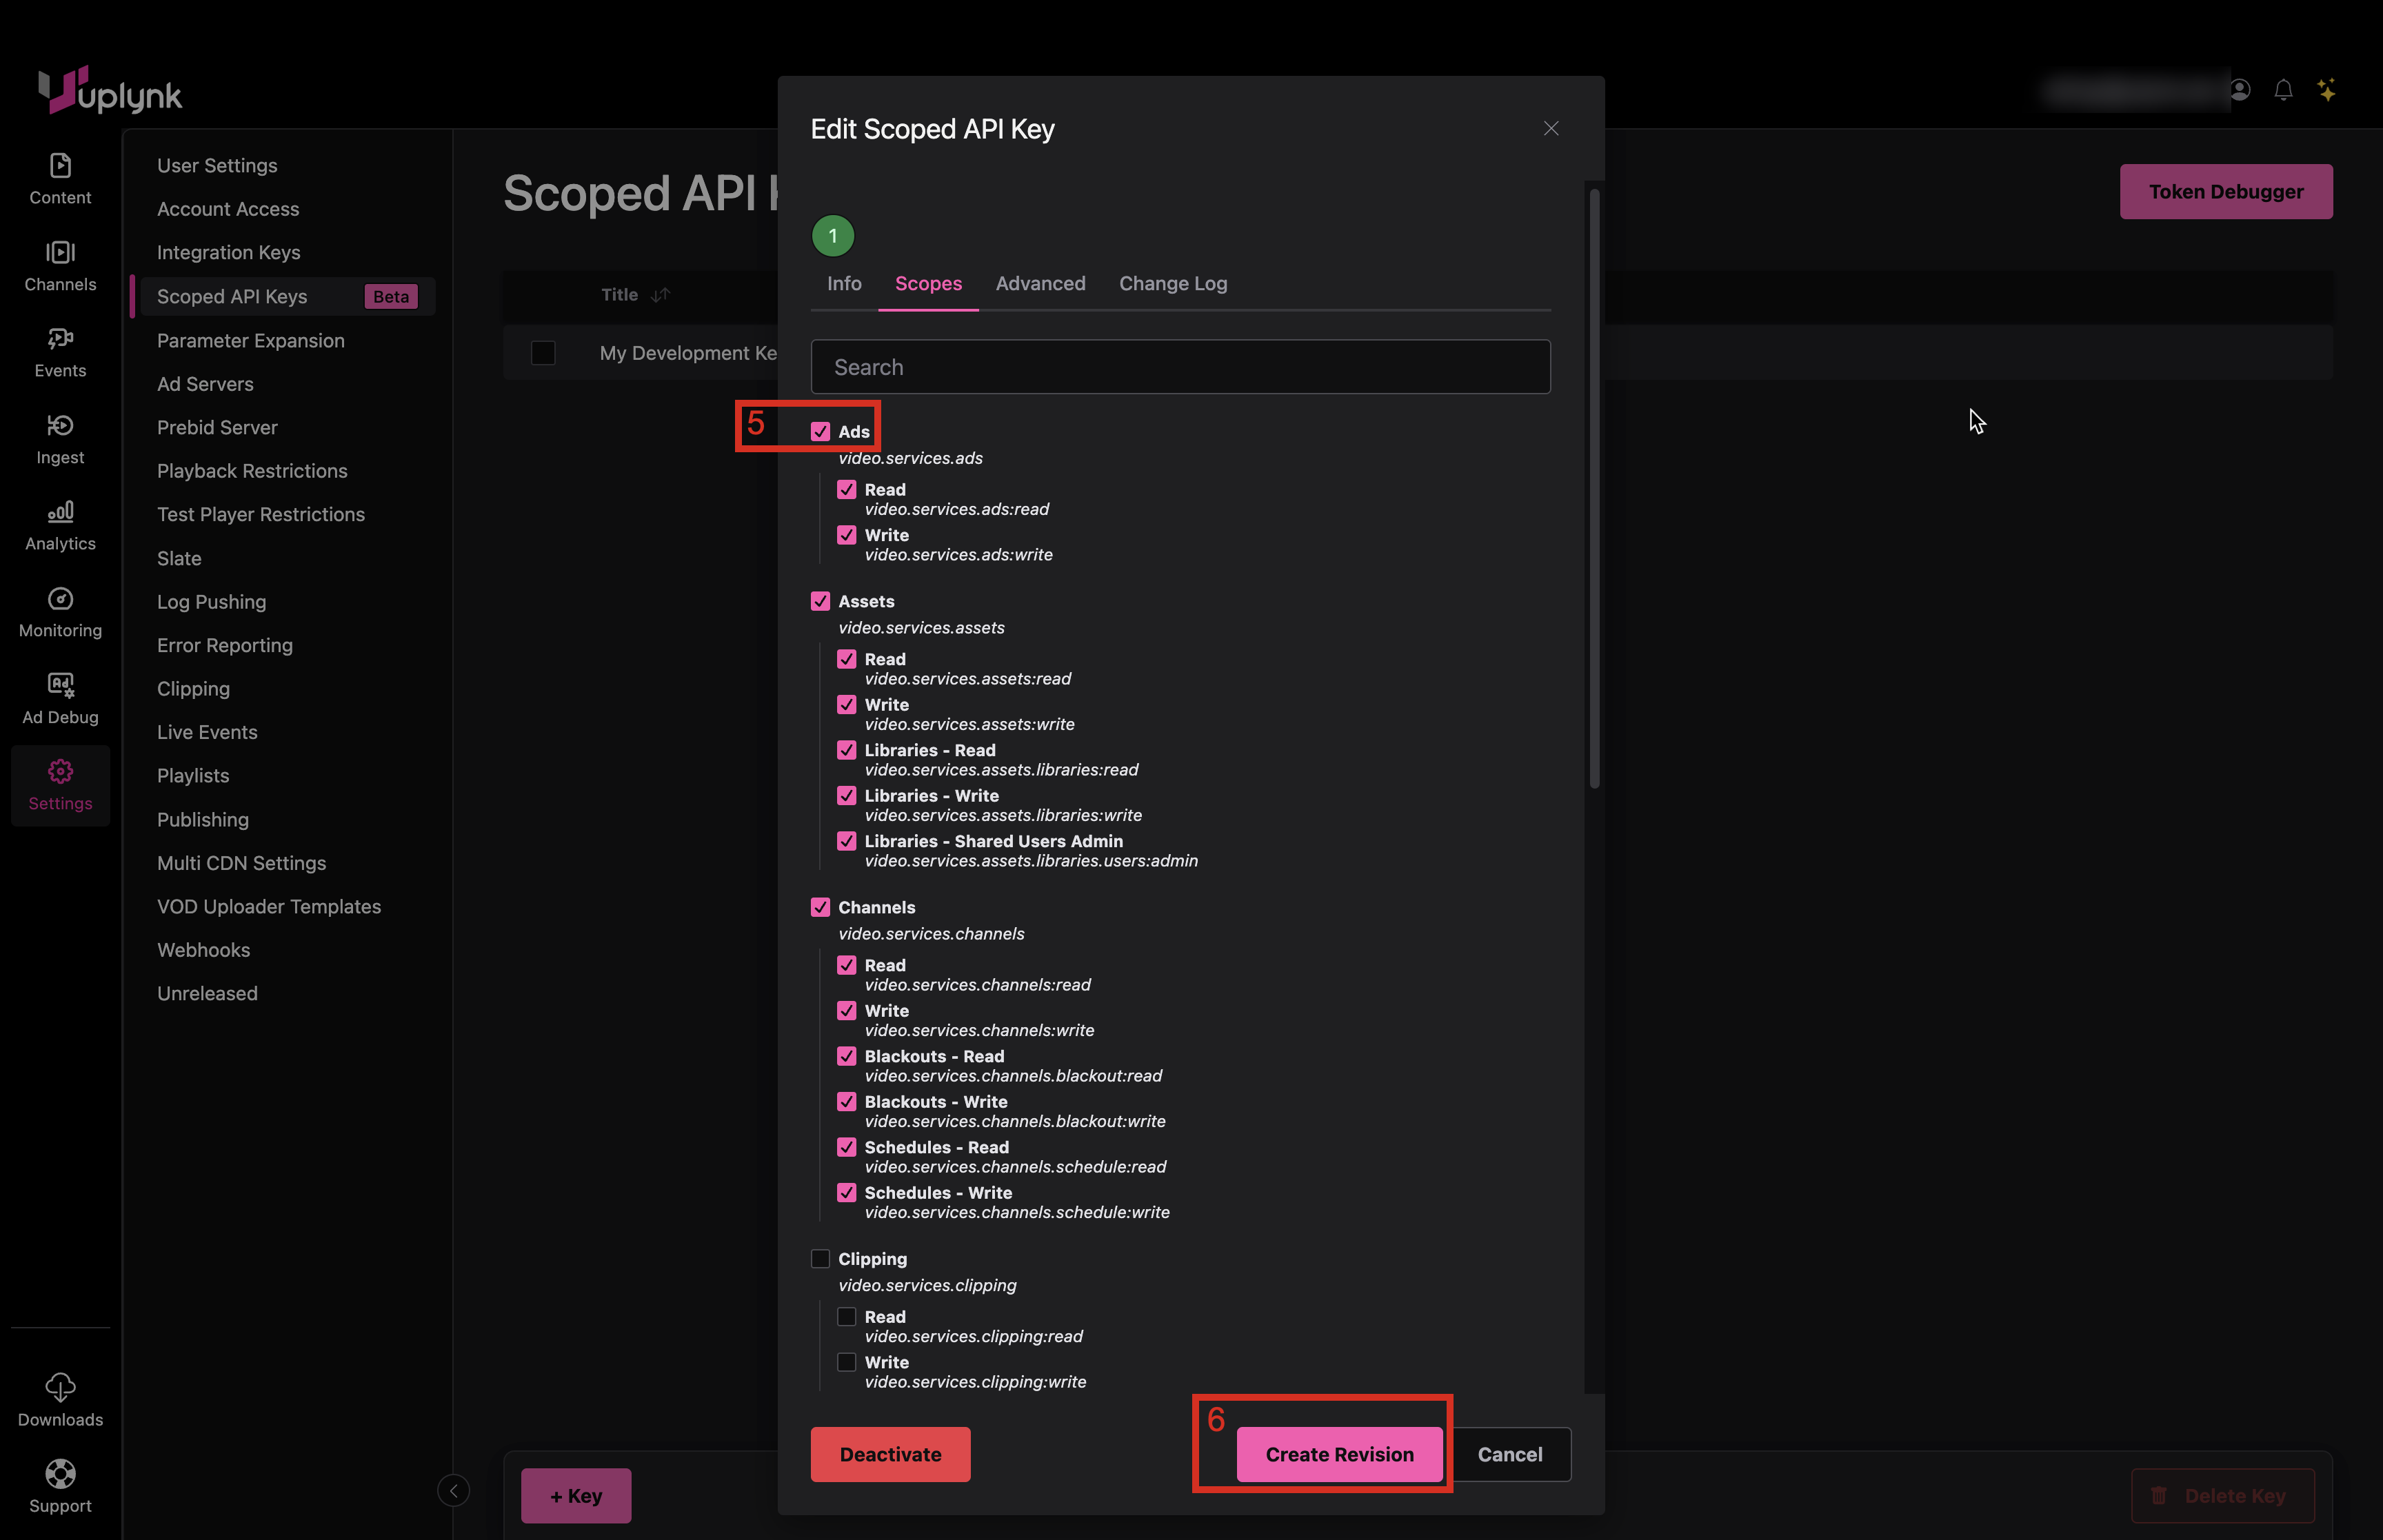
In the following example, the scope of a Scoped API Key will be updated to add more access:
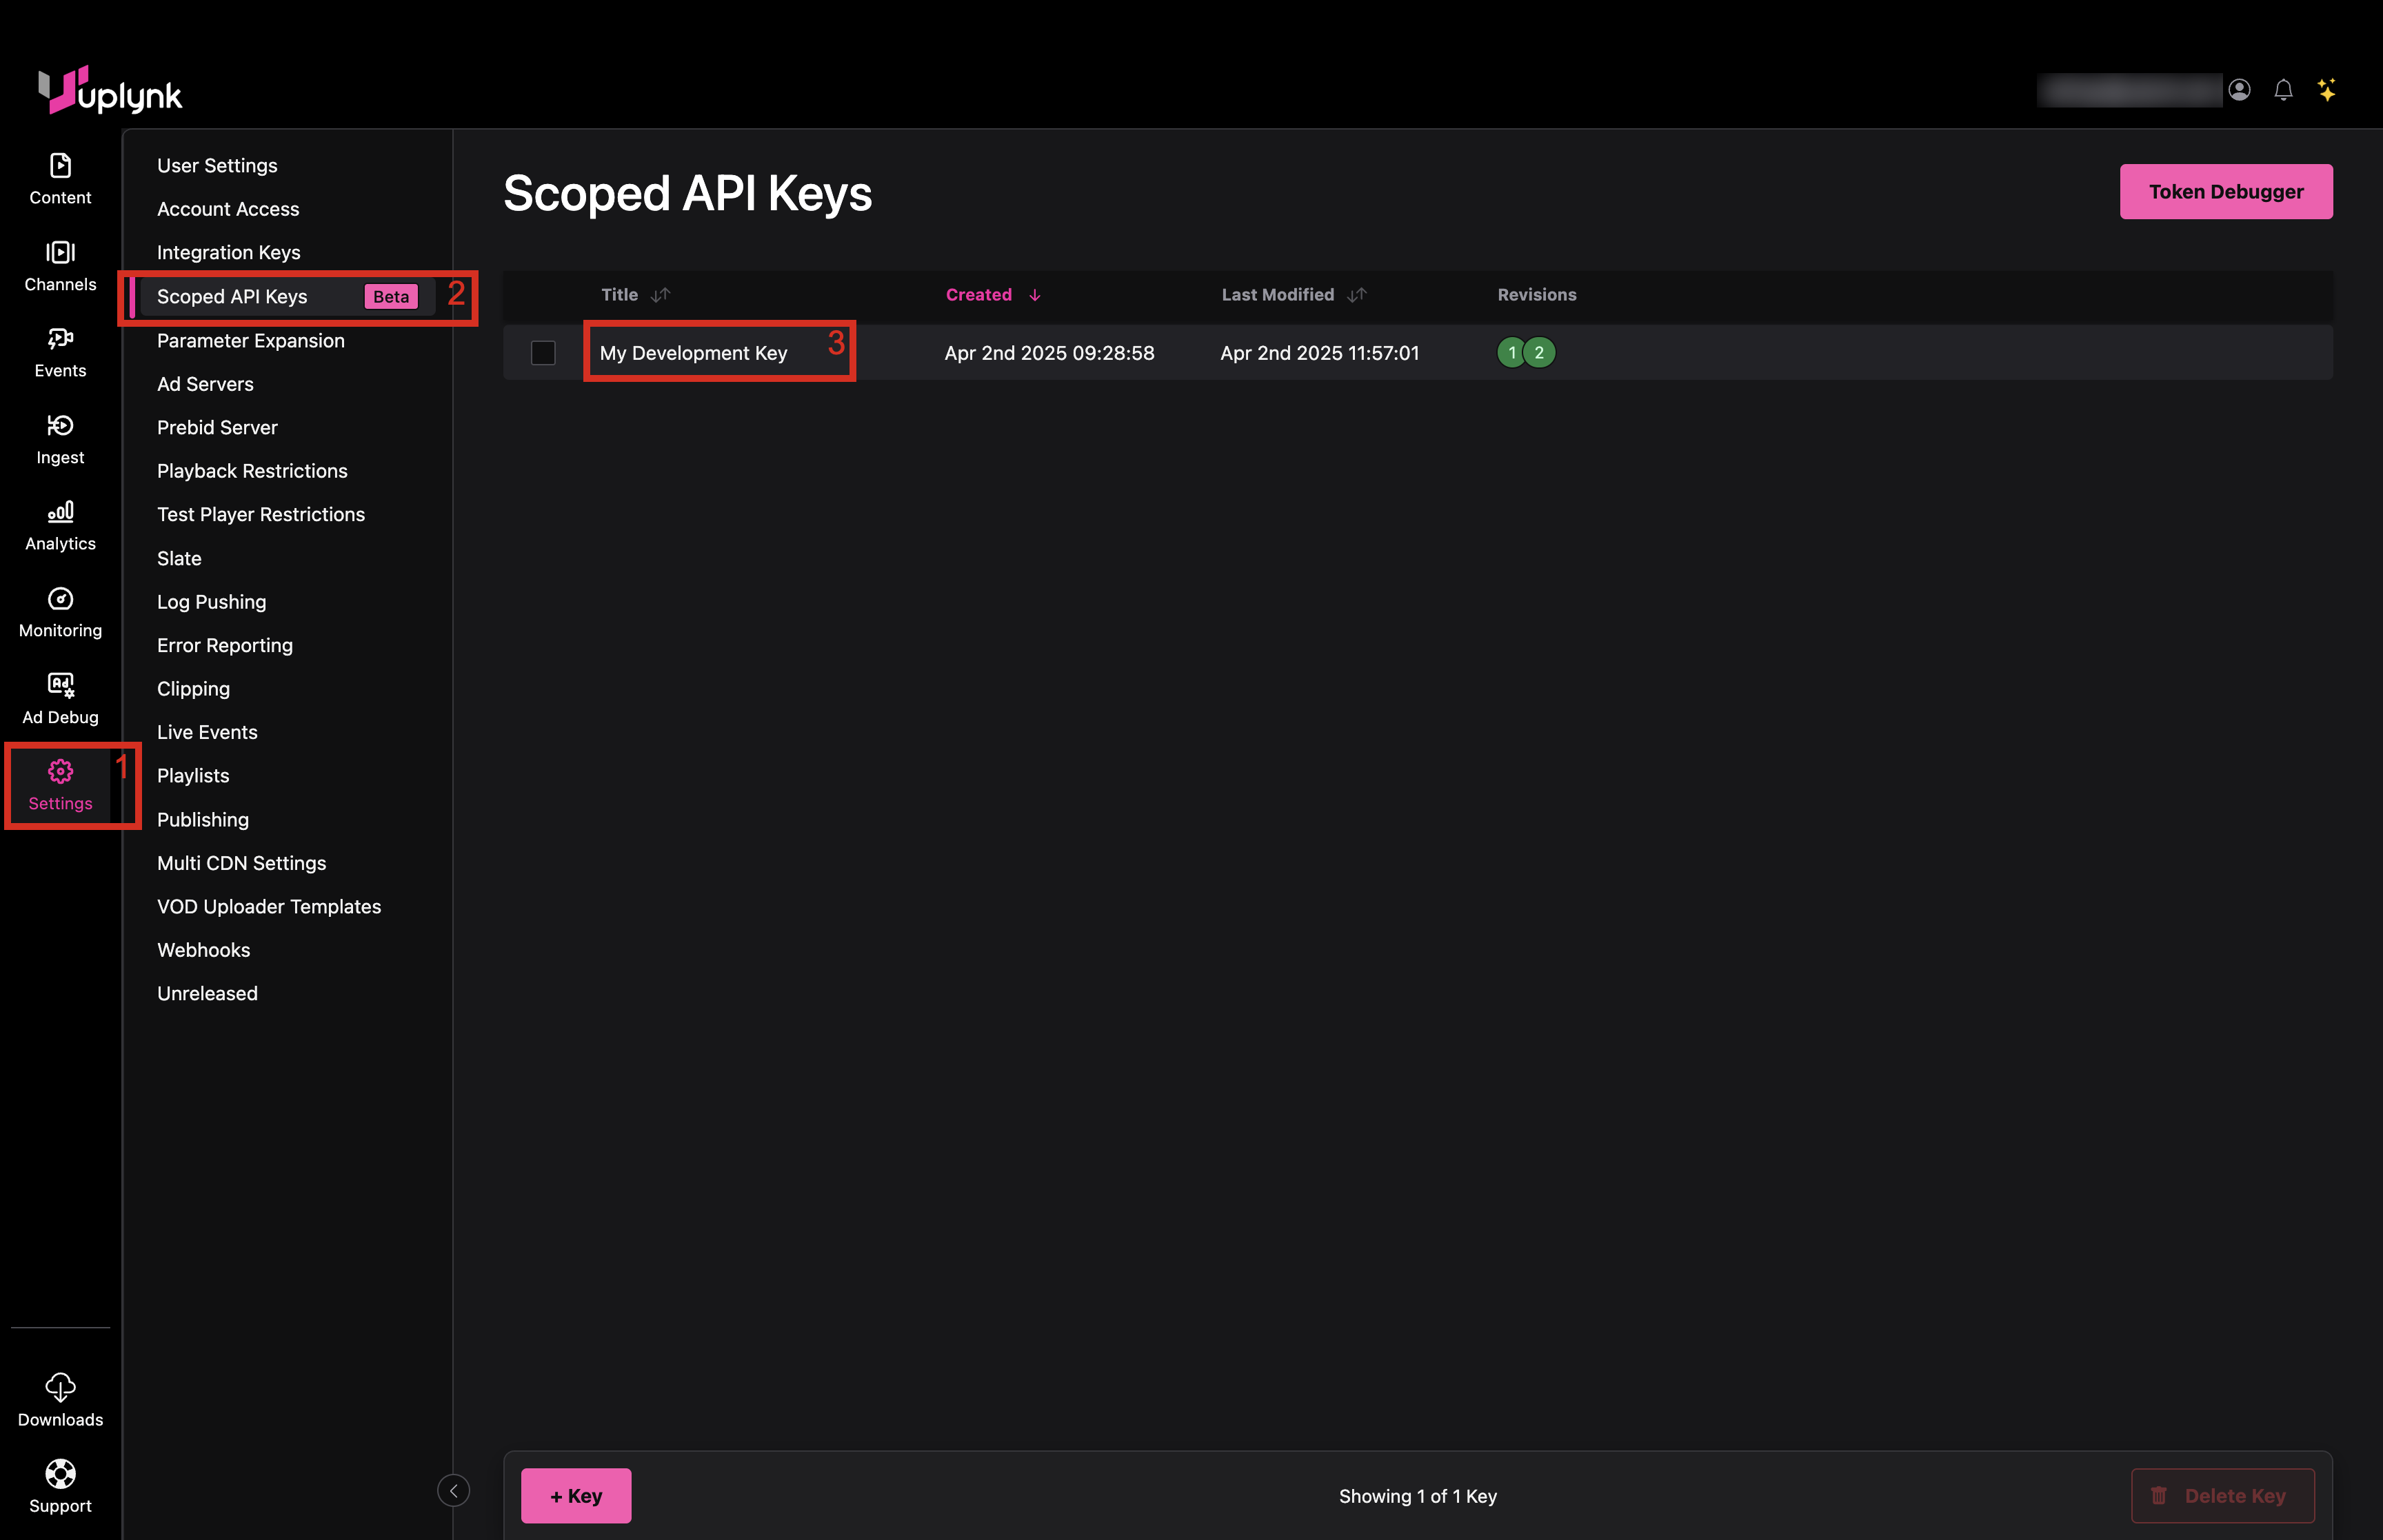
- Go to Settings tab in CMS
- Click Scoped API Keys tab
- Click on the key to edit
- Click Scopes tab
- Click on Ads (or any desired scope) to enable permission to use these APIs
- Click Create Revision
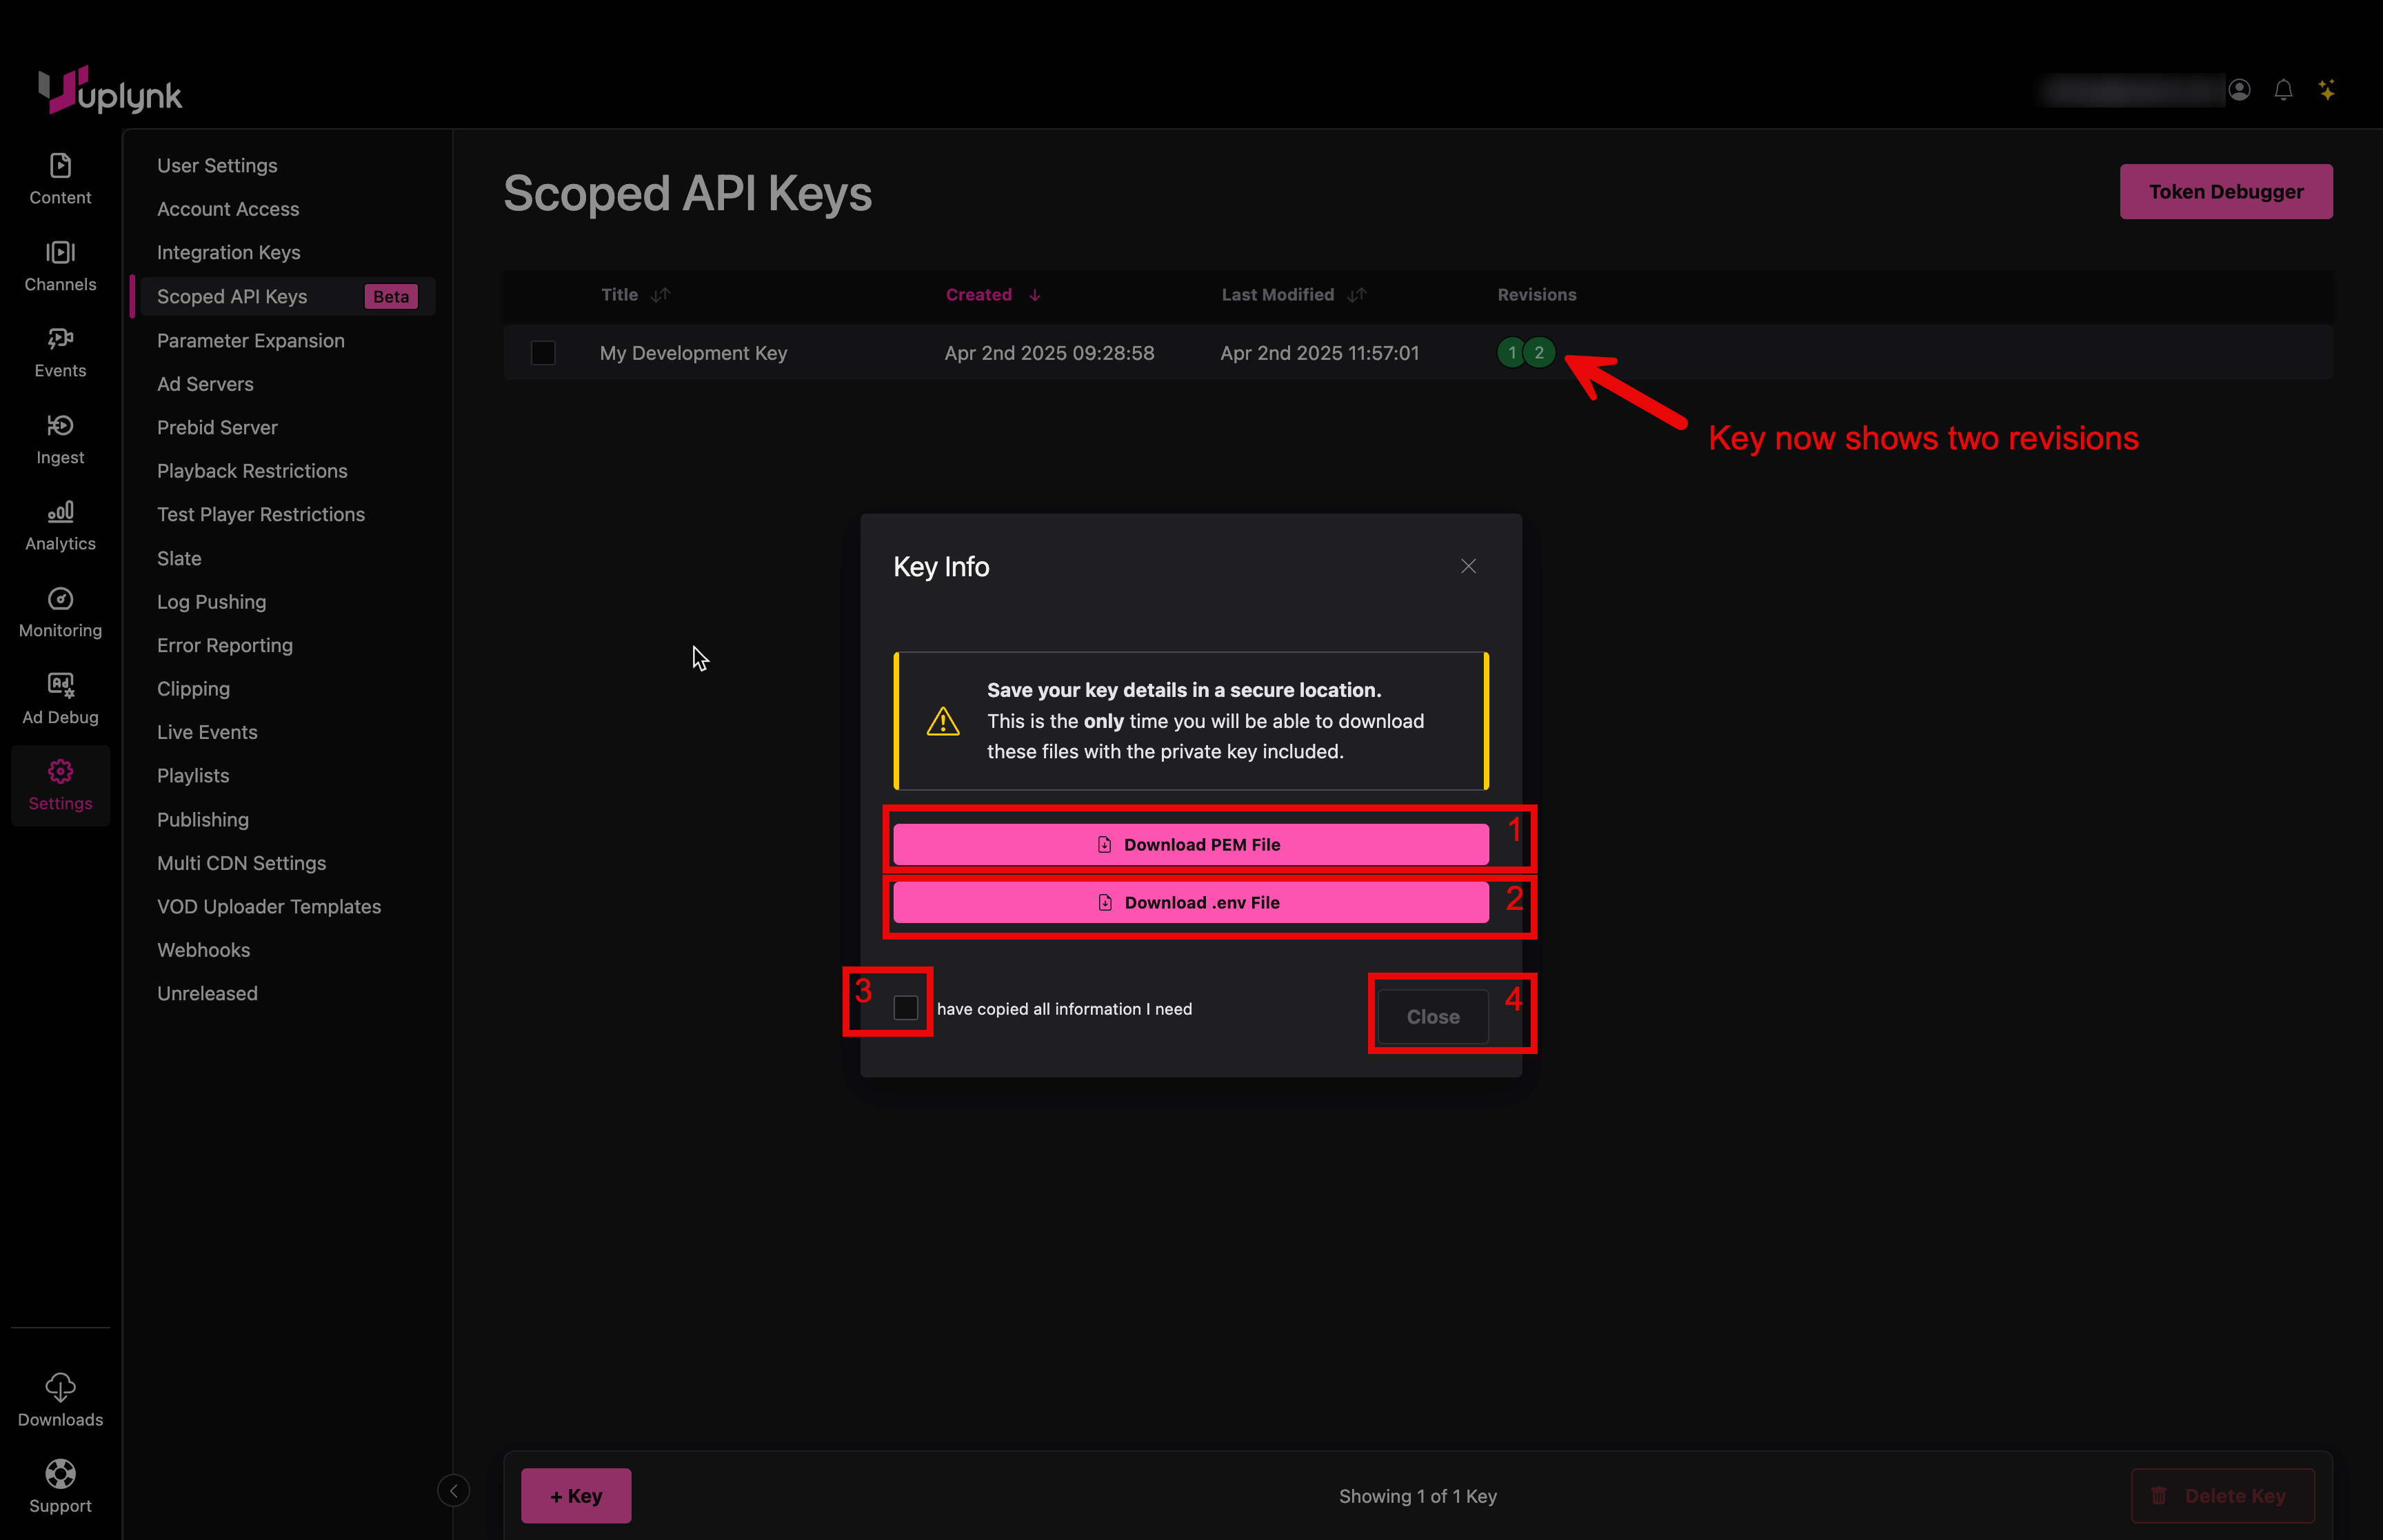
To save the updated key information:
- Click on Download PEM File to save the public and private encryption keys in a .pem file
- Click on Download .env File to save the public and private encryption keys in cleartext
- After downloading, click the checkbox
- Click Close
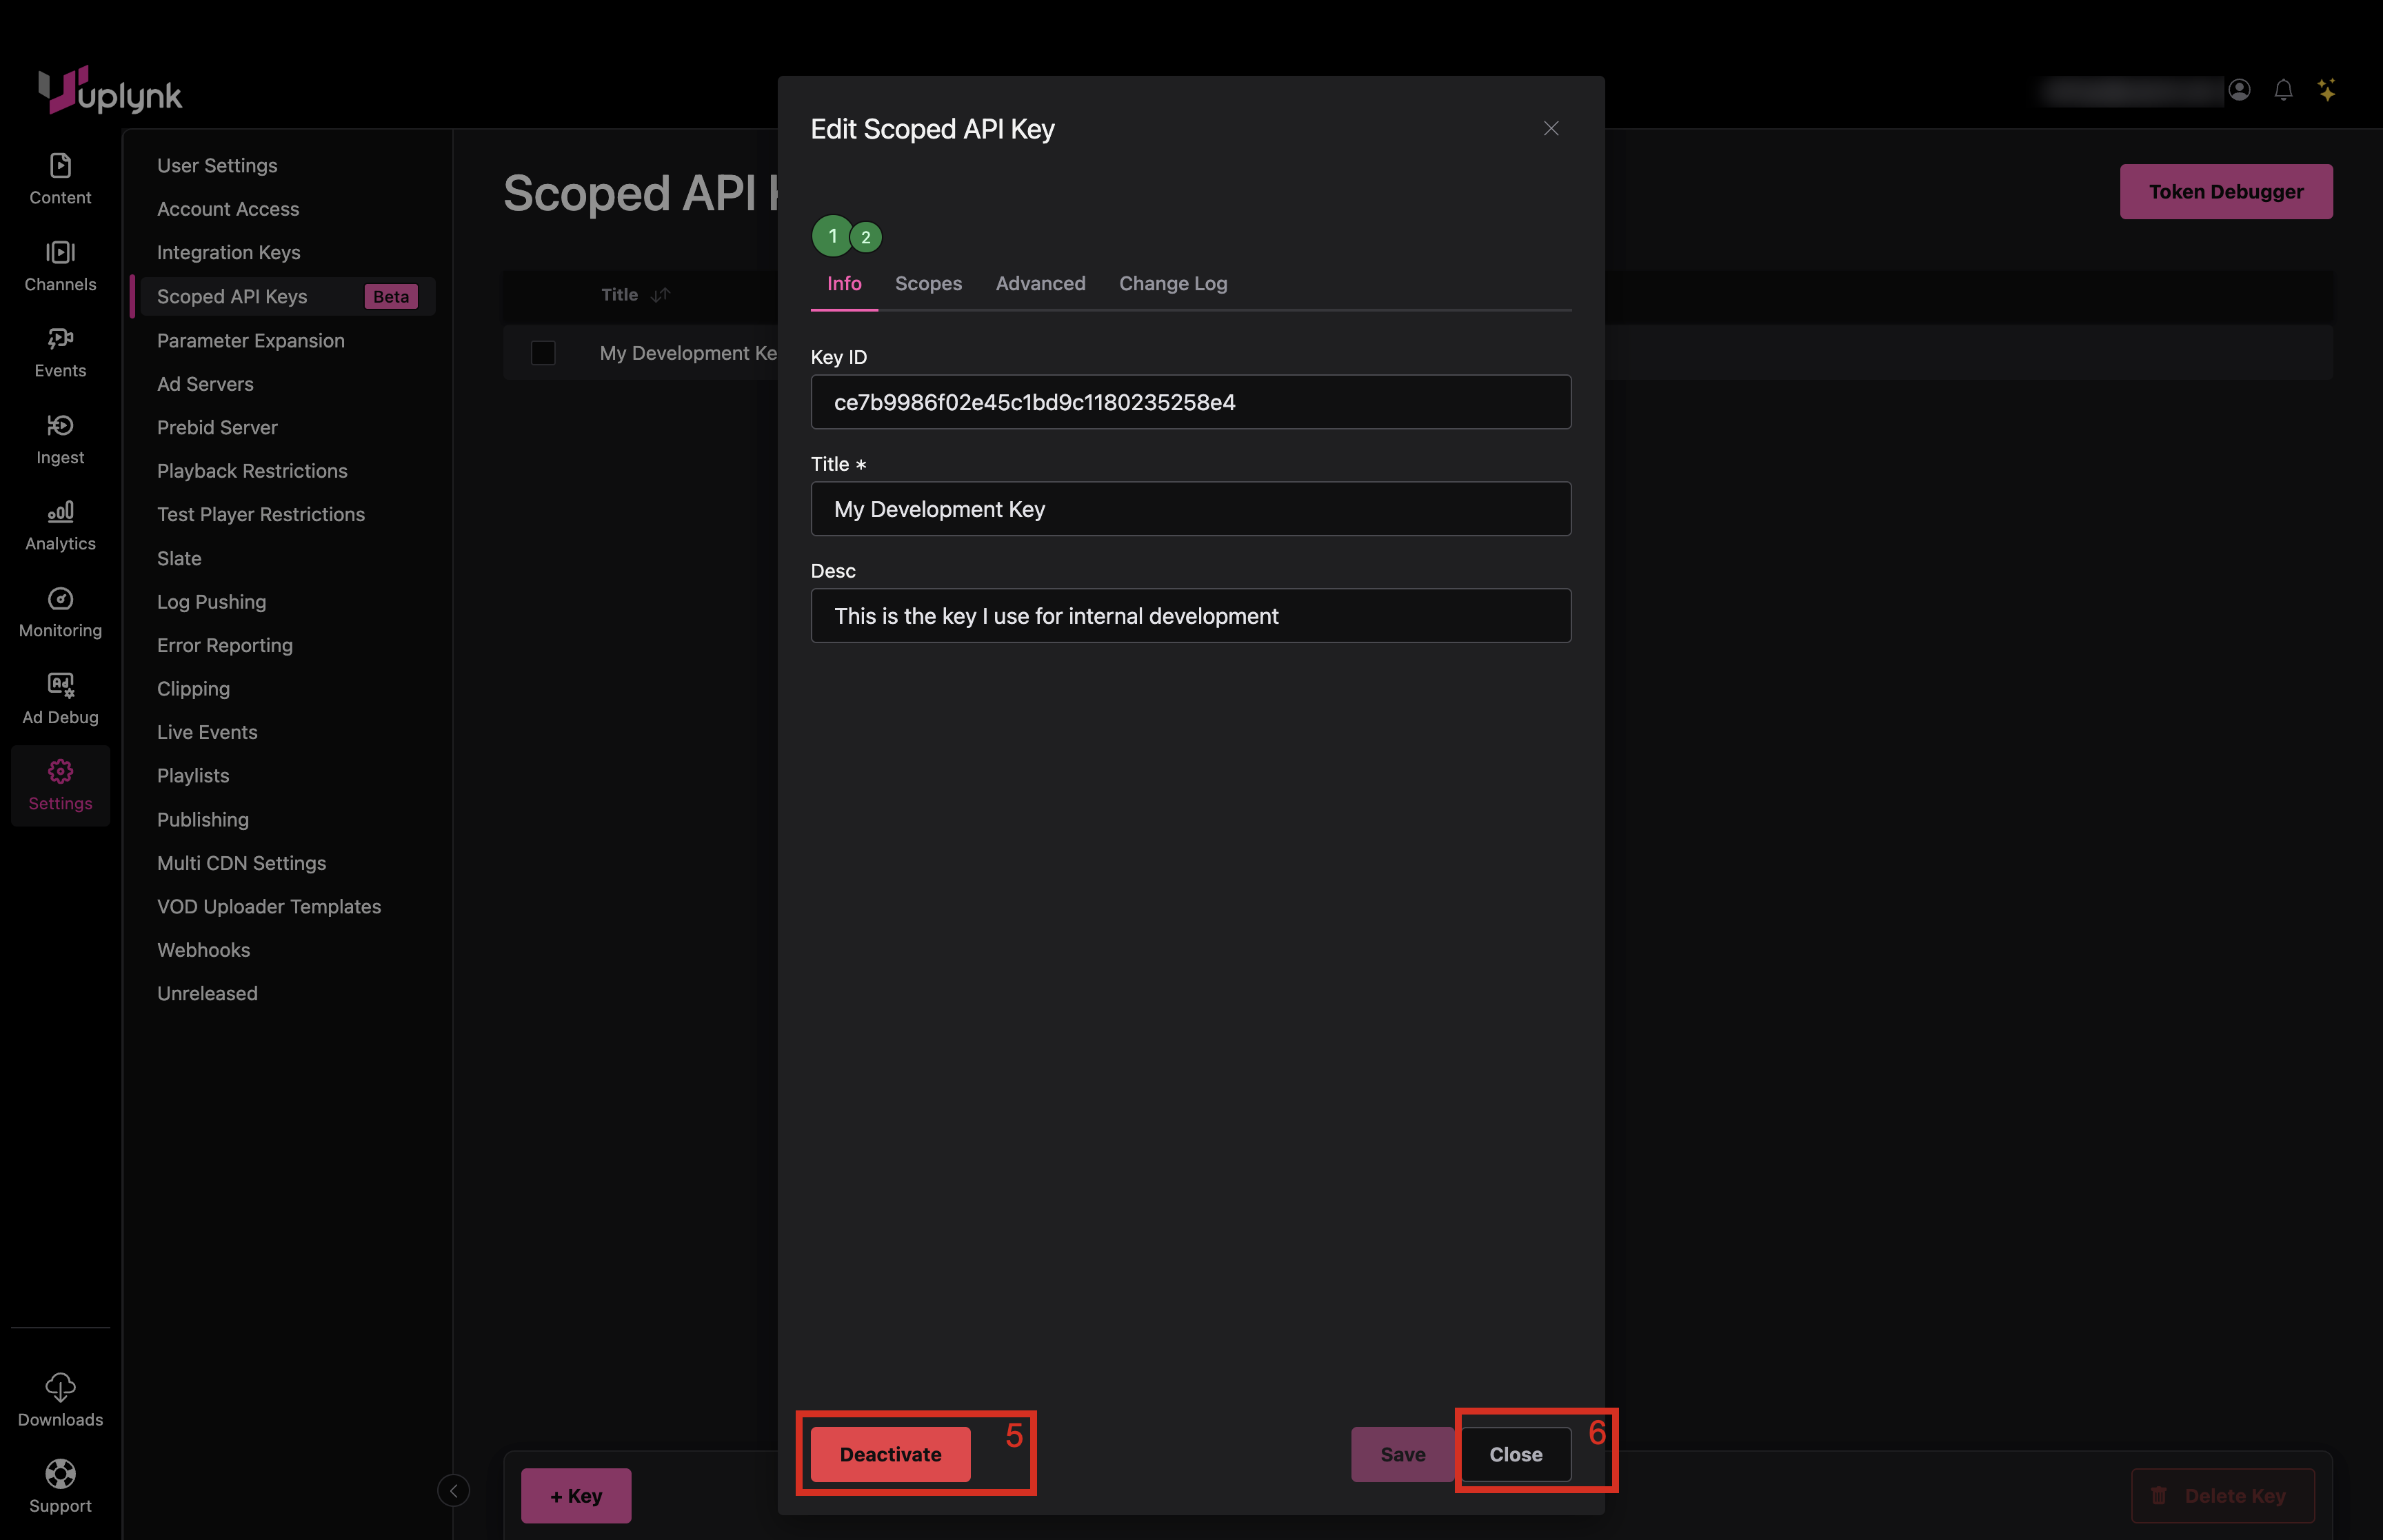
Deactivating a Scoped API Key Revision
- Go to Settings tab in CMS
- Click Scoped API Keys tab
- Click on the key to edit
- Click on the revision to deactivate (e.g., 1)
- Click Deactivate and the revision number will turn red
- Click Close
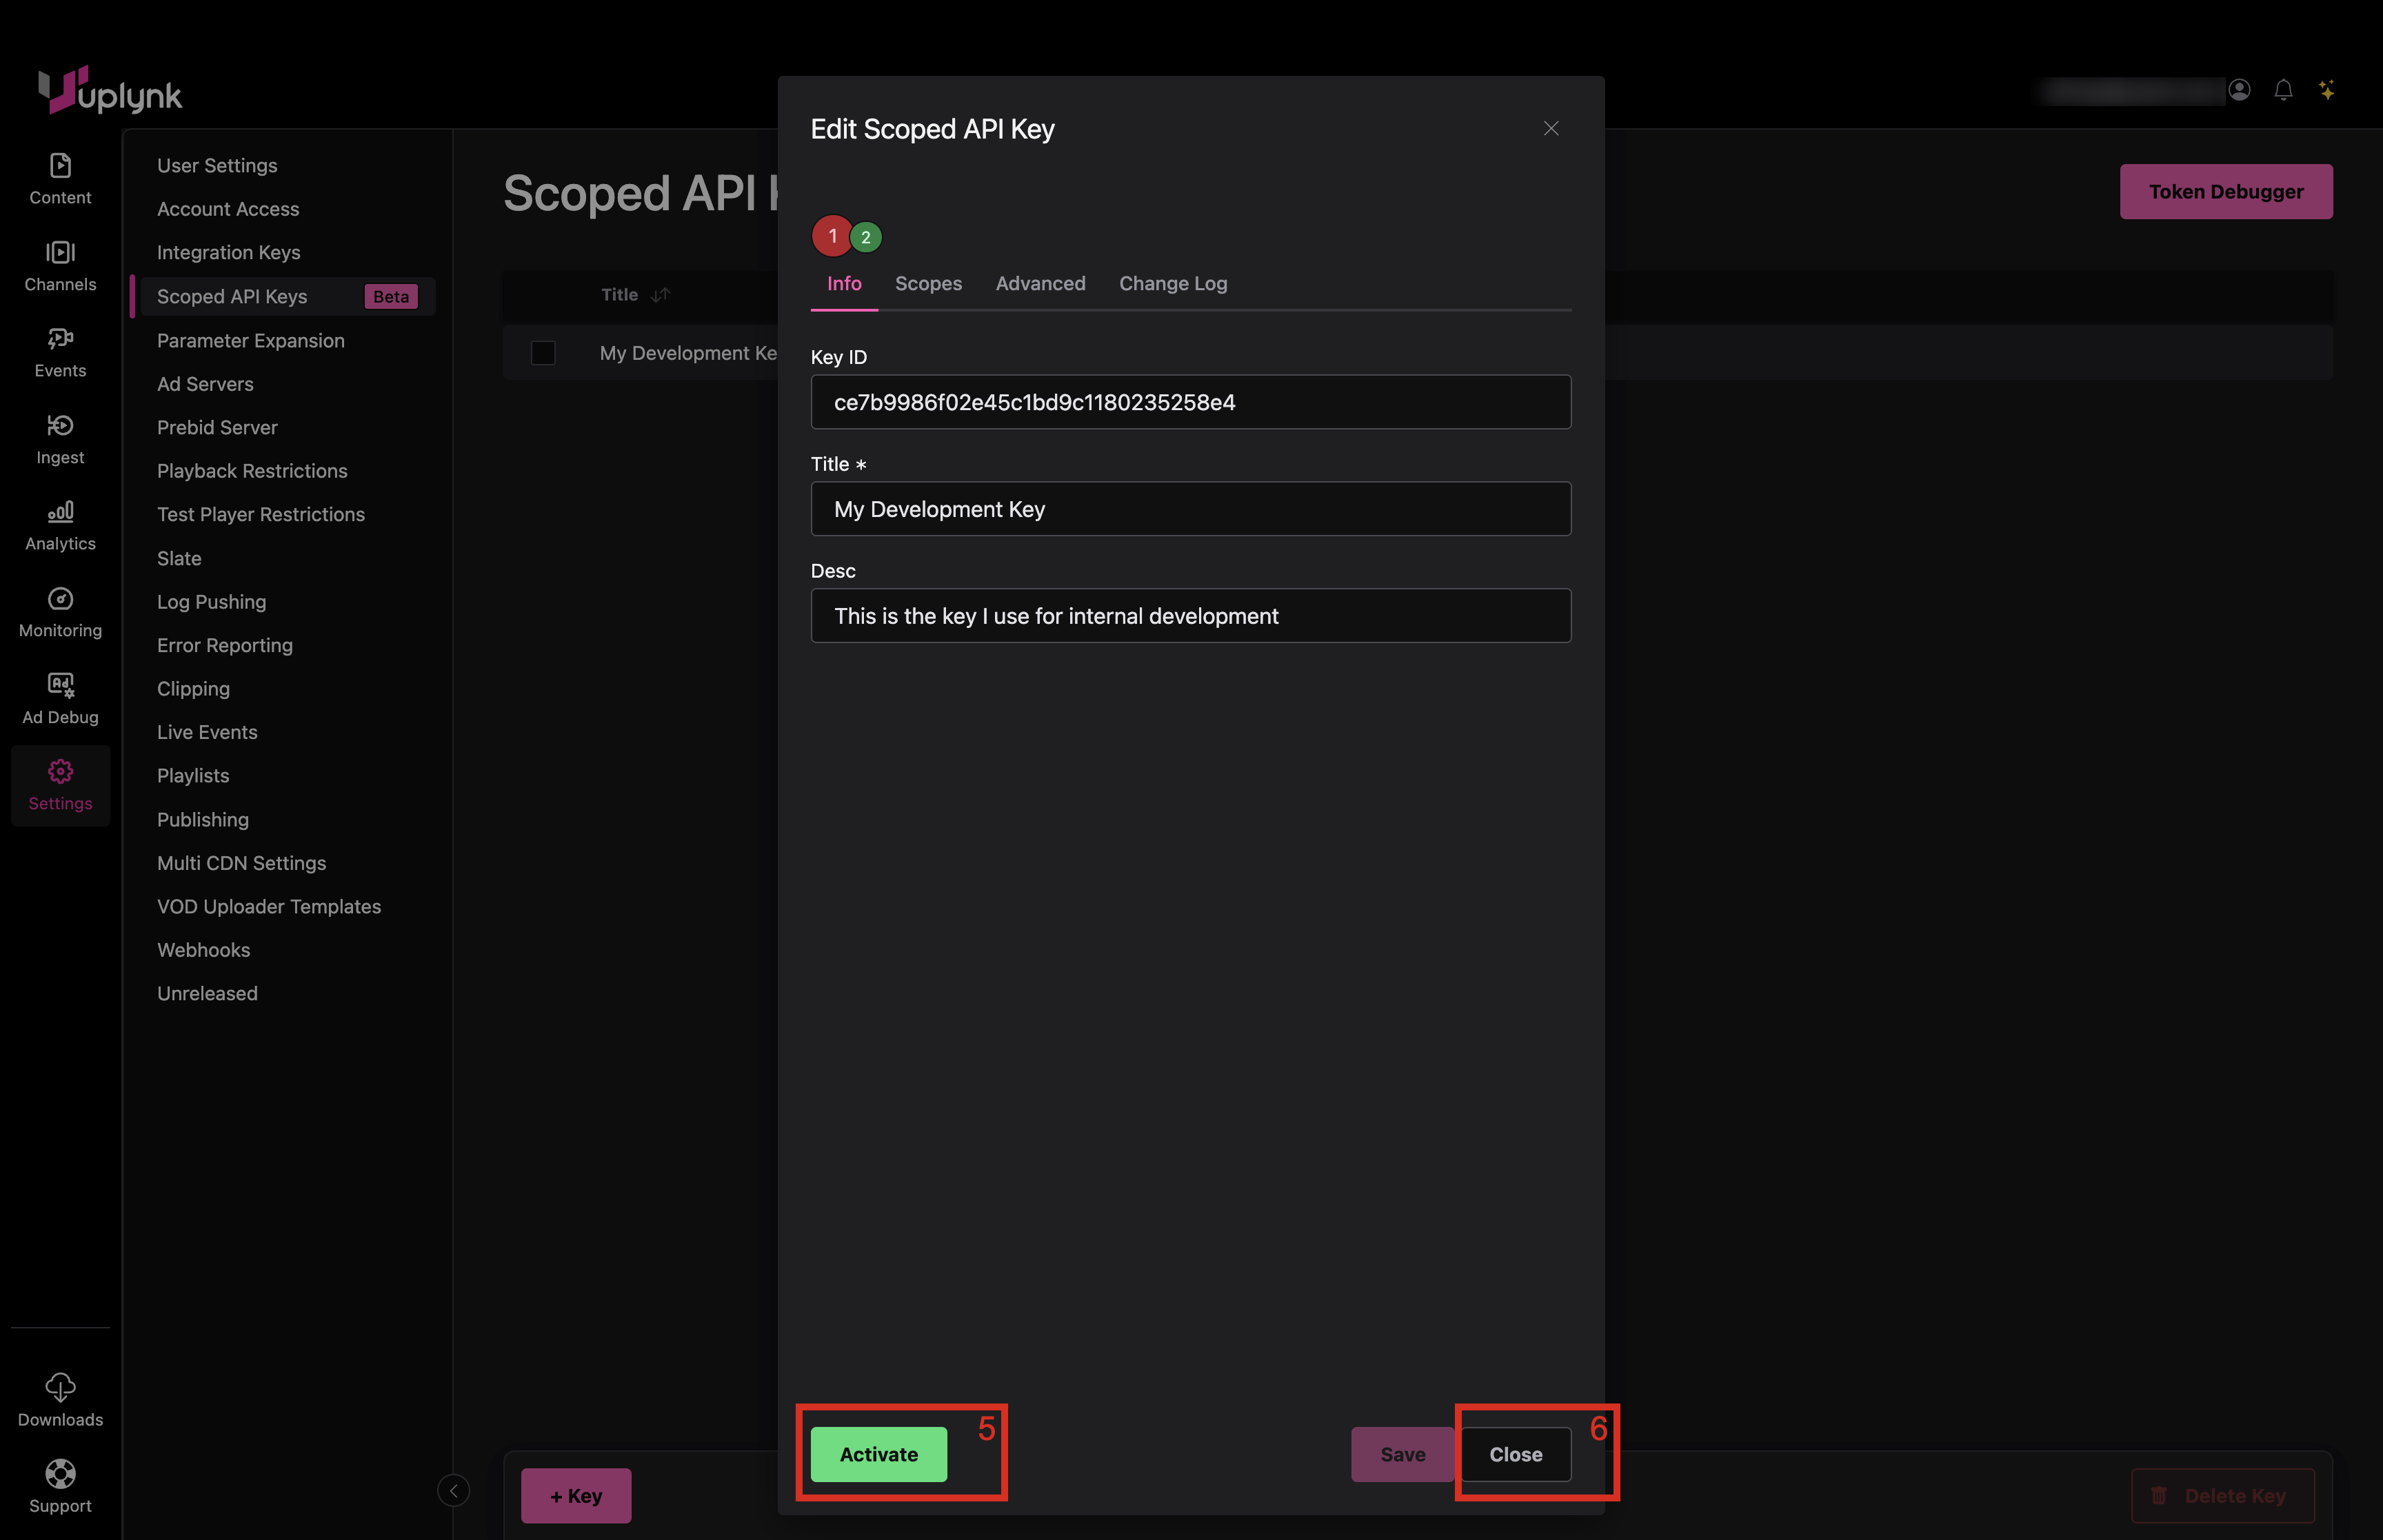
Reactivating a Scoped API Key Revision
- Go to Settings tab in CMS
- Click Scoped API Keys tab
- Click on the key to edit
- Click on the revision to reactivate (e.g., 1)
- Click Activate and the revision number will turn green
- Click Close
Contents of the JWT
The JWT which is included in REST API calls to Uplynk is included in the X-Auth-Uplynk-Jwt header. The JWT is created using the information contained in either the .env file or .pem file downloaded when creating an API key.
There is a header and a payload in the JWT, with the header containing information on the JWT and the payload containing “claims”. Claims are essentially name/value pairs containing the entitlements allowed for a user as well as additional metadata.
Examples of claims include the token expiration time, the allowed scopes, and the timestamp at which the token was created. There are both required and optional claims.
Header
kid- (required) - Key IDalg- (required) - The algorithm used for encoding/decoding the key, default is "ES256"typ- (required) - The key type, default is "JWT"
Payload
- Required:
- exp - timestamp - Token Expiration (not used when creating a net token)
- iat - timestamp - Issued at Time (Timestamp at which the token was created)
- sub - string - Subject (Owner ID)
- scp - string array - Scope (String list of request scopes)
- Optional:
iss- string - Issuer (domain that the token originated from)nbf- timestamp - Not Before Time (token will not be valid until after this time)net- boolean - Non-Expirable Token (Token will not expire, do not include the exp claim when set to True)msg- object - used when interacting with api2 endpoints that require data
Python Sample Code
Prerequisites
- Sample code for Python is for Python 3.9 and later
- Need to install the following modules via
pip3 install:- Pyjwt (Version 2.8.0 or later)
- python-dotenv (Version 0.14.0 or later)
- Requests (Version 2.32.3 or later)
- cryptography (Version 43.0.1 or later)
- Rename the .env file downloaded from the Uplynk CMS to be “.env” and this file must reside in the same directory as the sample code
Required Files
Three files are required for running the code utilizing XAuth authentication with JWTs:
- uplynk_api.py
- demo.py
- The .env file containing the information needed to build the JWT sent with REST API calls to Uplynk
Using the uplynk_api.py Module
The uplynk_api.py module provides a class called UplynkApi with a functions used for calling Uplynk APIs. For v2 APIs, there is a Call function similar to that used in Uplynk documentation for v2 APIs. For v4 APIs, there are the following functions:
GetPostPutPatchDelete
If the JWT sent in the API call does not have the proper scope, an error will be returned indicating this.
The uplynk_api.py module is at:
Sample Code (demo.py)
The sample code shows the initialization of the UplynkApi class as well as v2 and v4 API calls.
The parameters for using UplynkApi are in the .env file which has to be named “.env”.
This is the demo.py code:
import sys
from dotenv import load_dotenv
from pprint import PrettyPrinter
from os import getenv
from uplynk_api import UplynkApi
pp = PrettyPrinter().pprint
if not(load_dotenv()):
pp("ERROR: .env file not found!")
sys.exit(-1)
PRIVATE_B64 = getenv("PRIVATE_B64")
KID = getenv("KID")
SUB = getenv("SUB")
SCP = getenv("SCP").split(",")
ROOT_URL = getenv("ROOT_URL")
ul_api = UplynkApi(SUB, KID, PRIVATE_B64, SCP, host=ROOT_URL)
# Call v2 apis
pp(ul_api.Call("/api2/cloudslicer/jobs/list"))
pp(ul_api.Call("/api2/library/get", id="584f328723e043849eb46420441d92c0"))
# Call v4 apis
pp(ul_api.Get("/api/v4/libraries"))
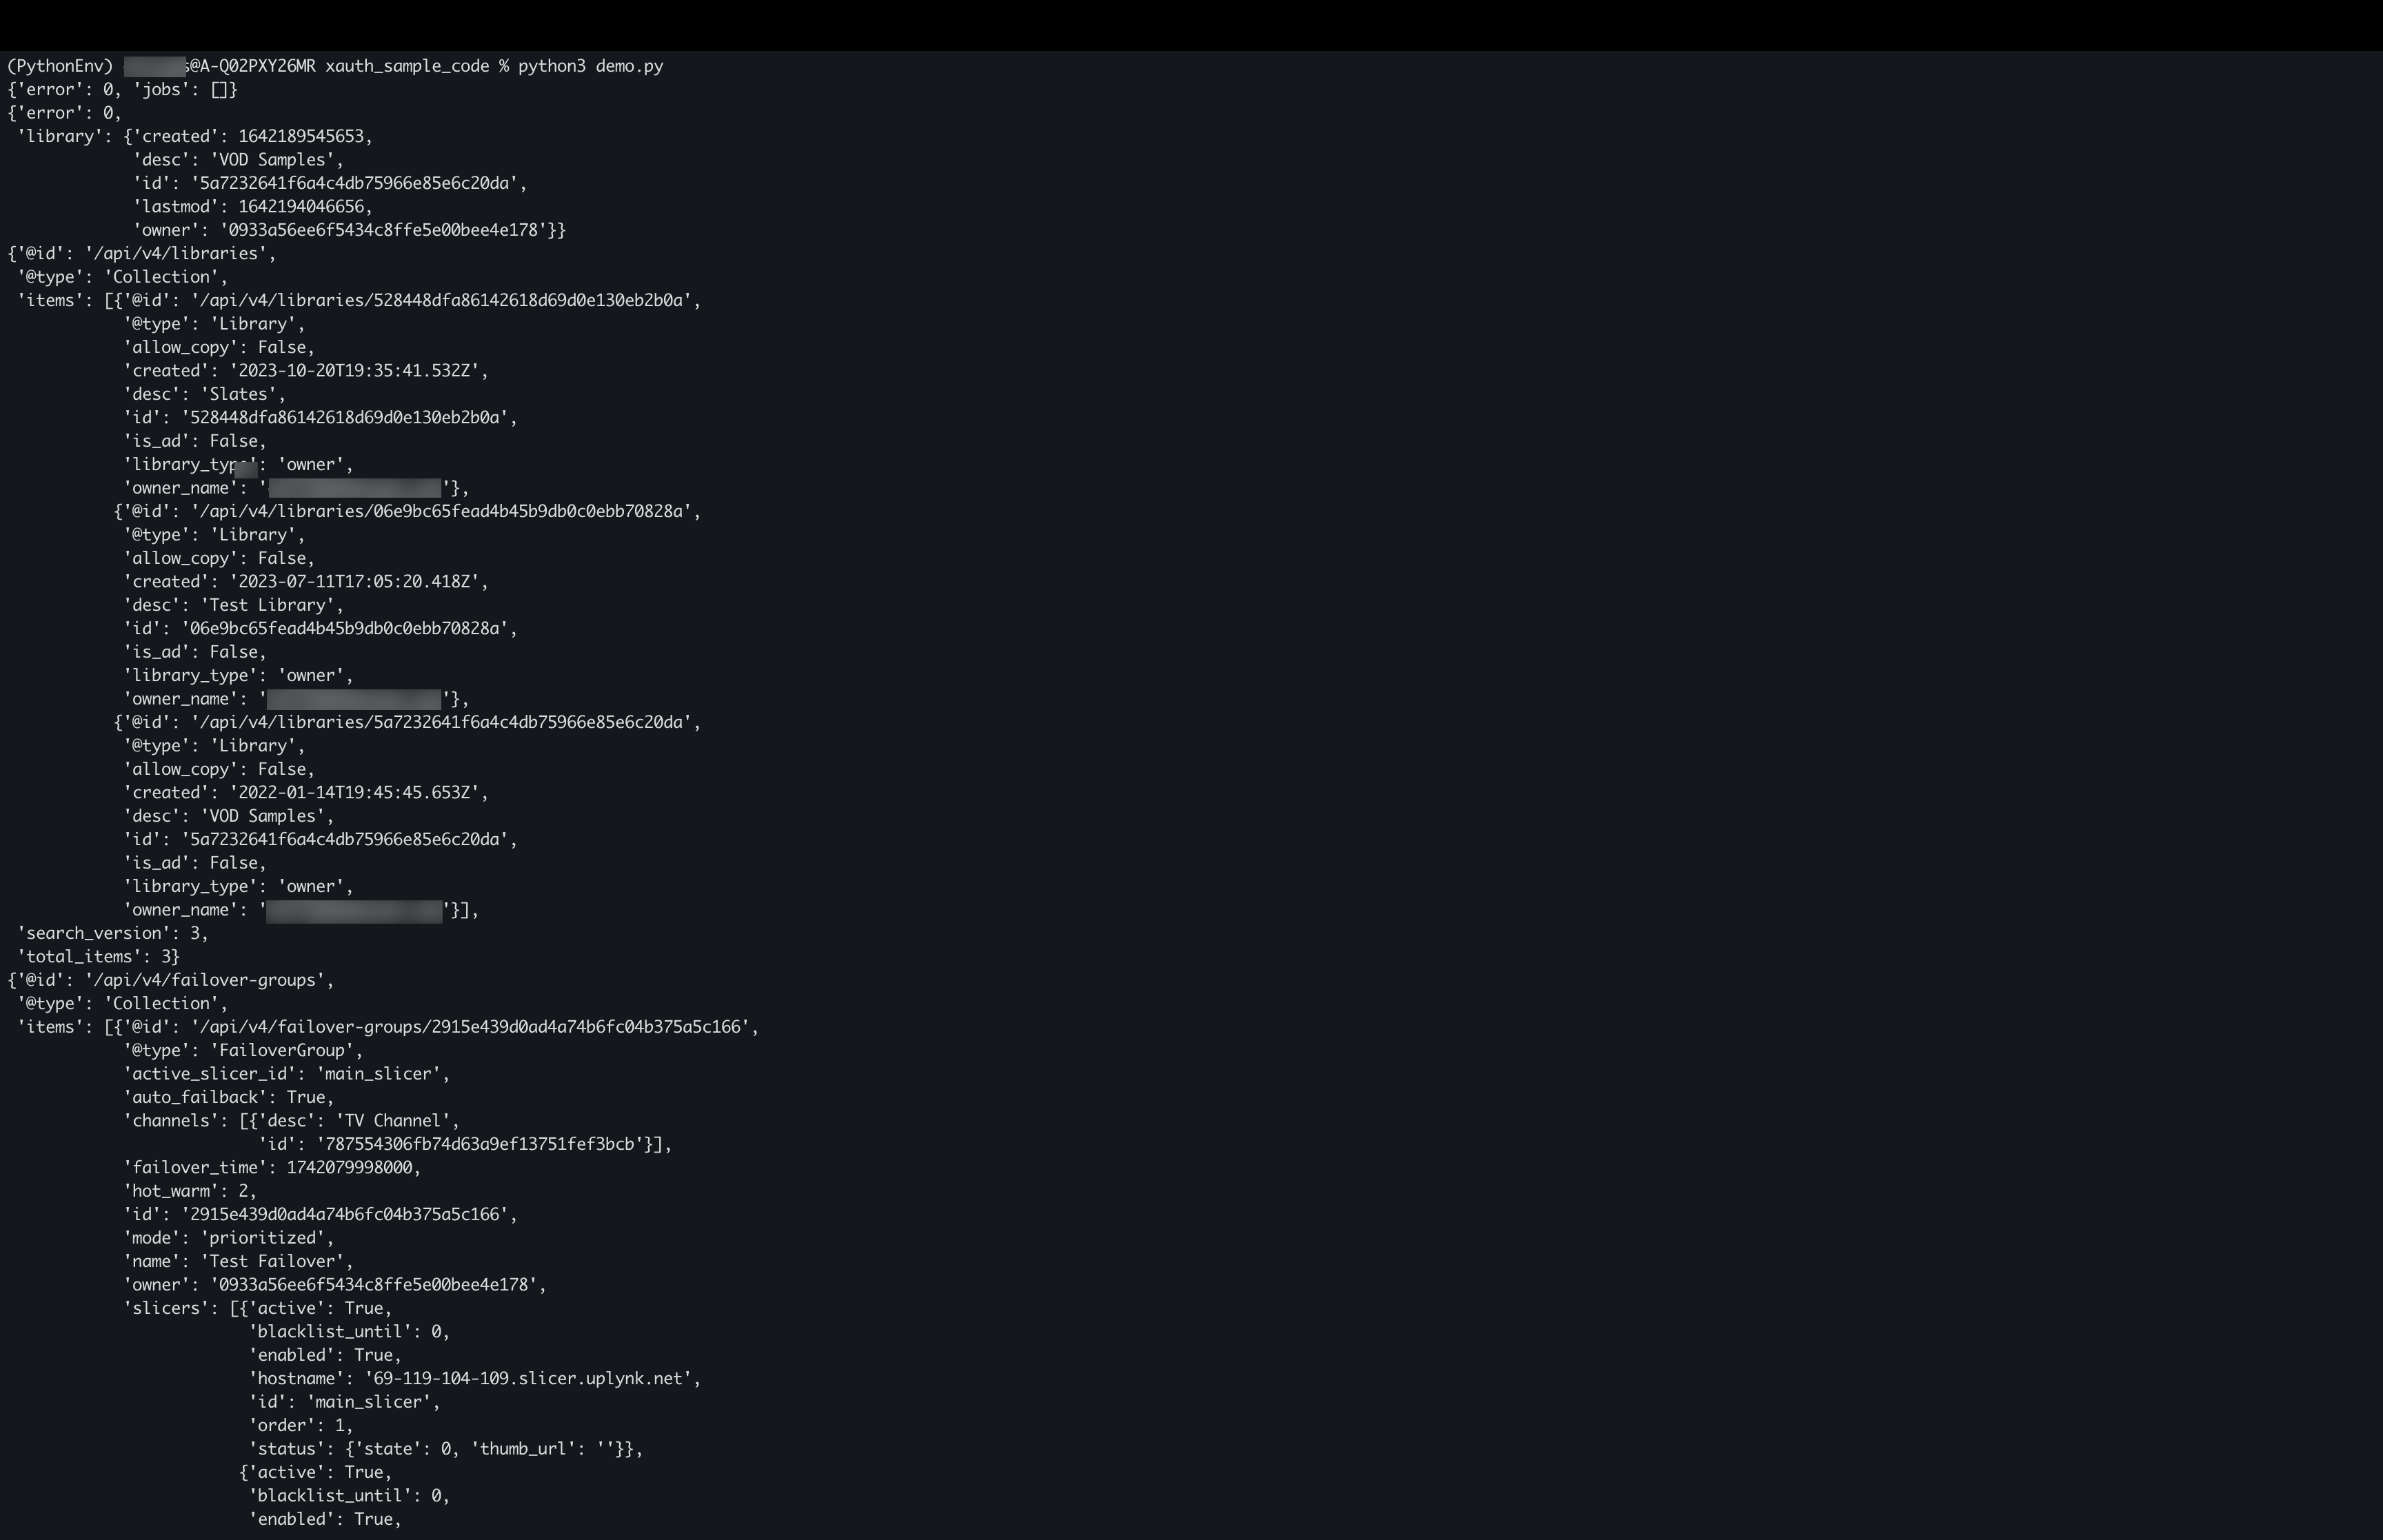
pp(ul_api.Get("/api/v4/failover-groups"))Running the Sample Code
The files uplynk_api.py, demo.py, and .env need to be in the same directory. The prerequisite Python version and libraries need to be installed.
Type the following at the command-prompt followed by Enter:
$python3 demo.py
The output of the sample code will look similar to that below. The actual results depends on the the contents of your Uplynk account.
Token Debugger
The Token Debugger allows for viewing and modifying the information contained in the JWT used for authentication. Using the Token Debugger is not required for using Uplynk’s XAuth API authentication and is provided as an advanced feature.
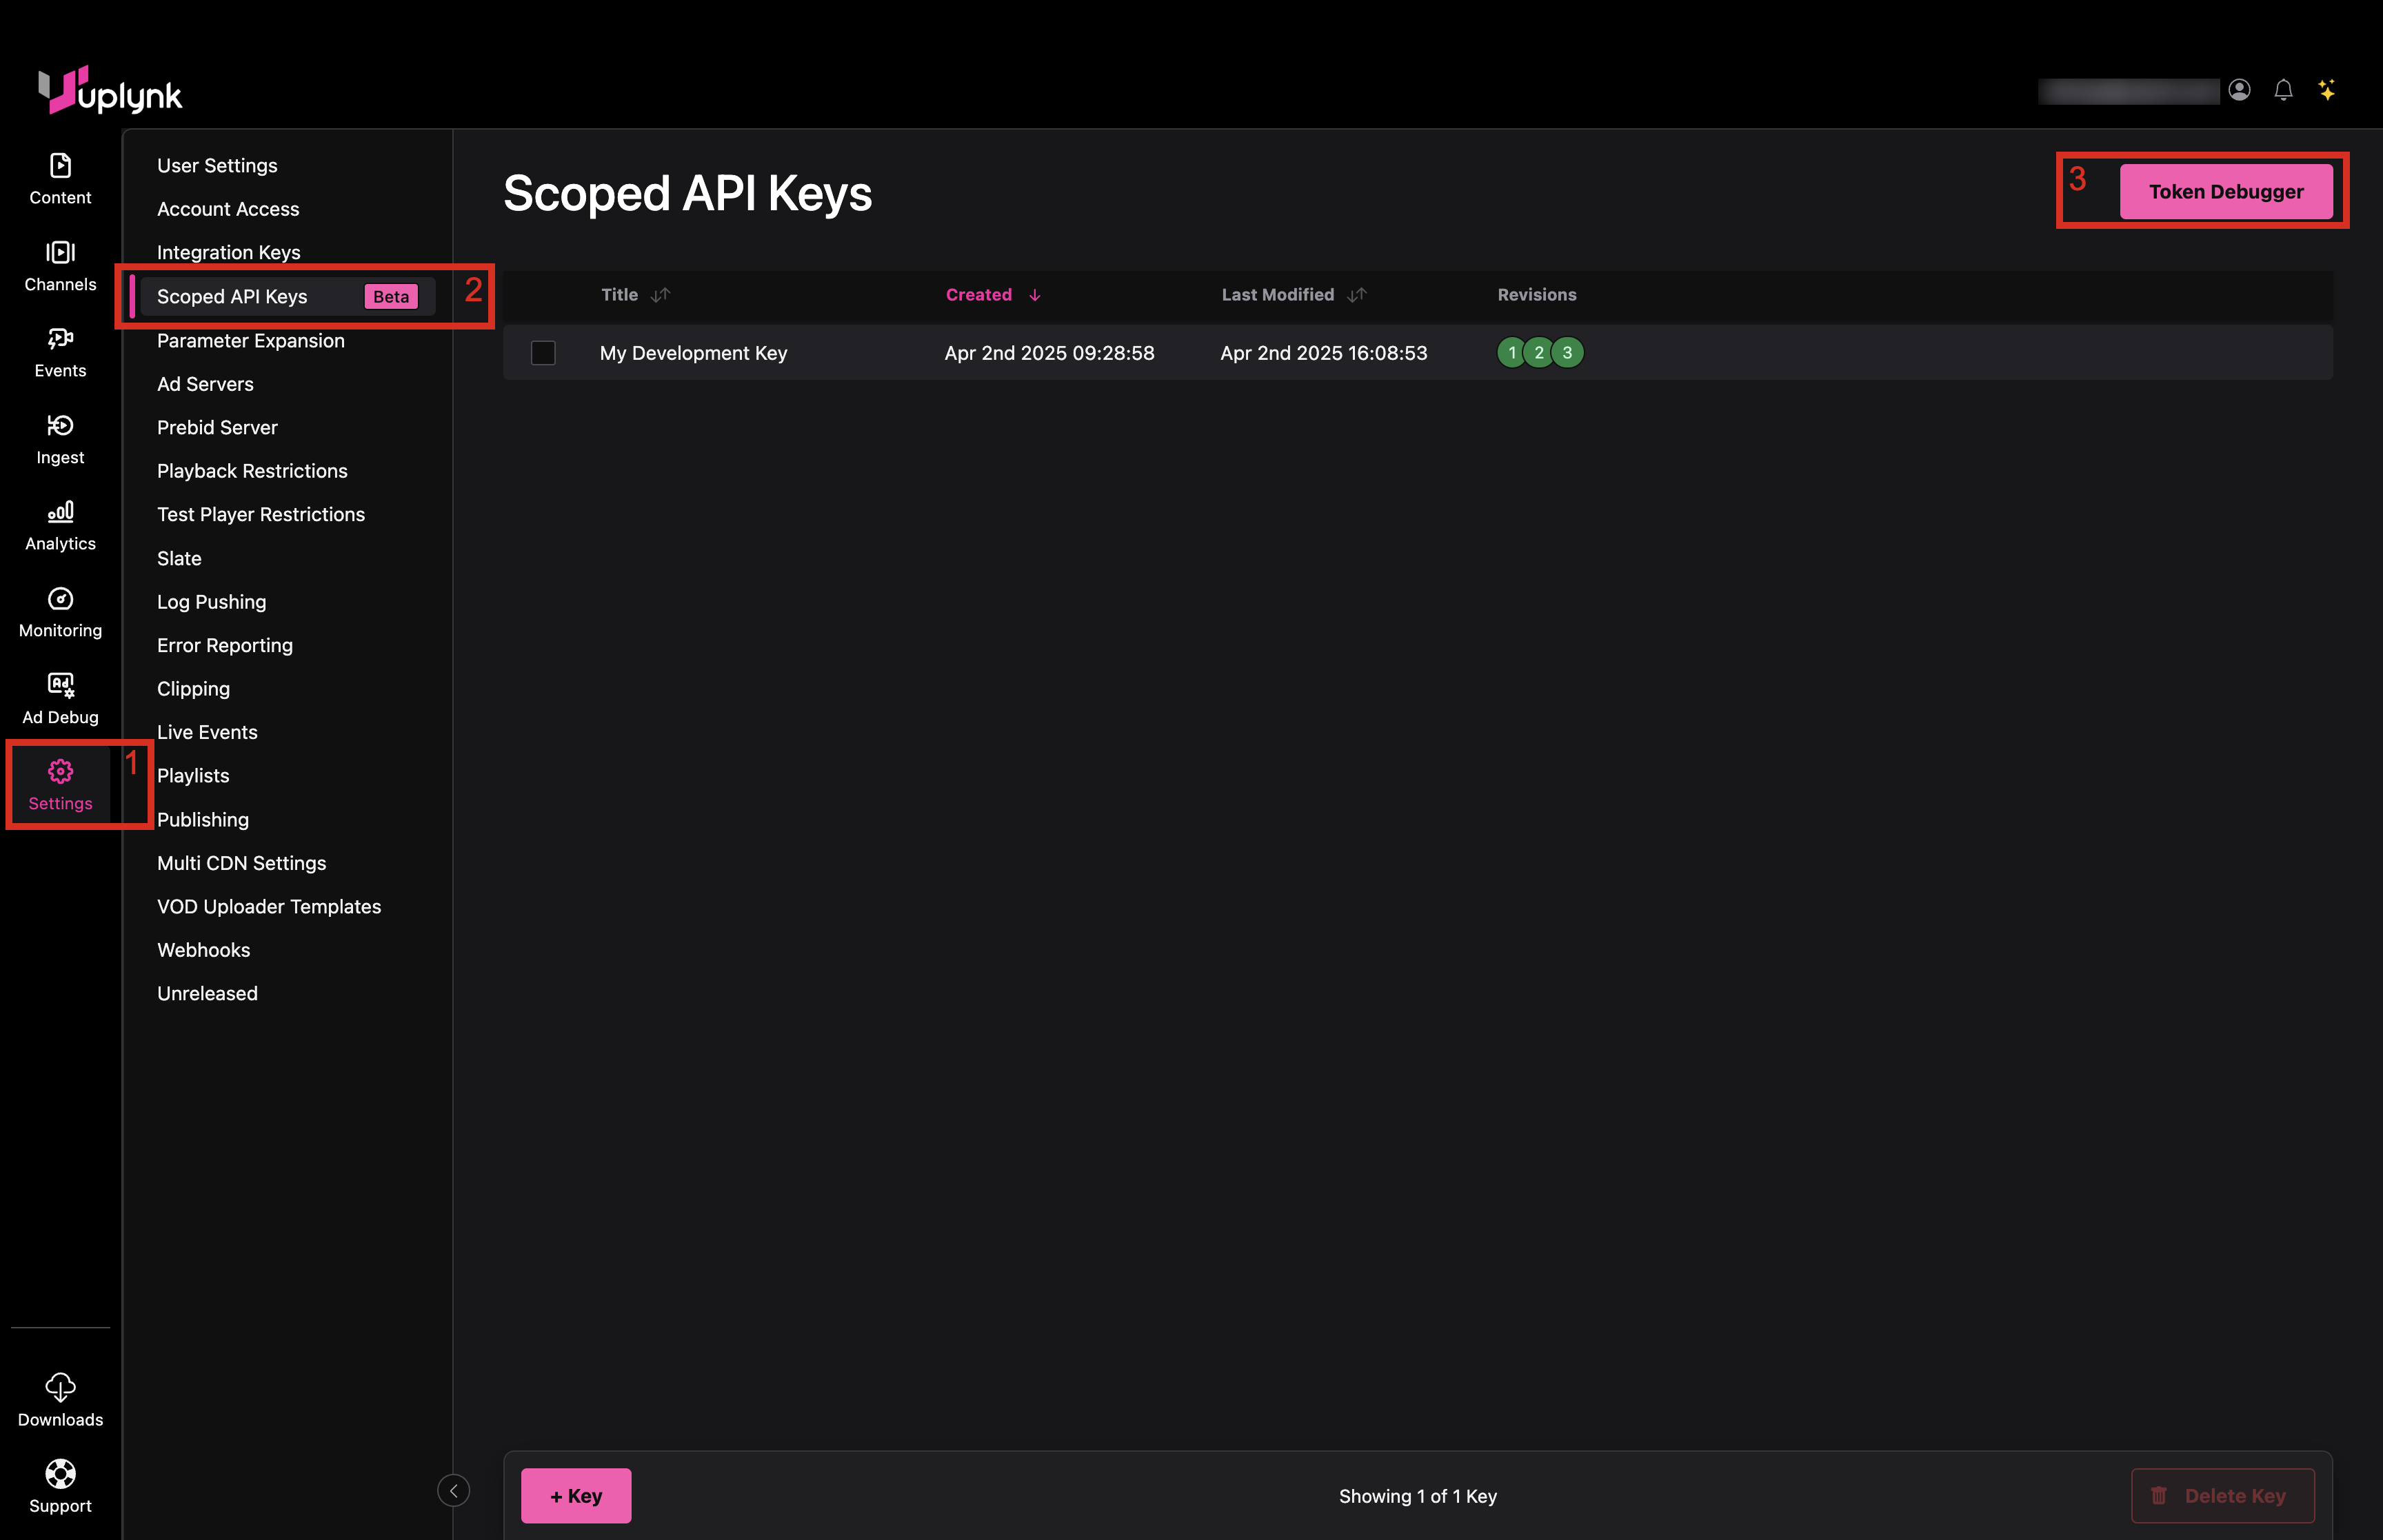
To use the Token Debugger:
- Go to Settings tab in CMS
- Click Scoped API Keys tab
- Click on Token Debugger
- While debugging your code, capture the JWT contained in the
X-Auth-Uplynk-Jwtheader being sent with the Uplynk API call - Paste in the JWT contained in the
X-Auth-Uplynk-Jwtheader being sent with the Uplynk API call - Click Read Token
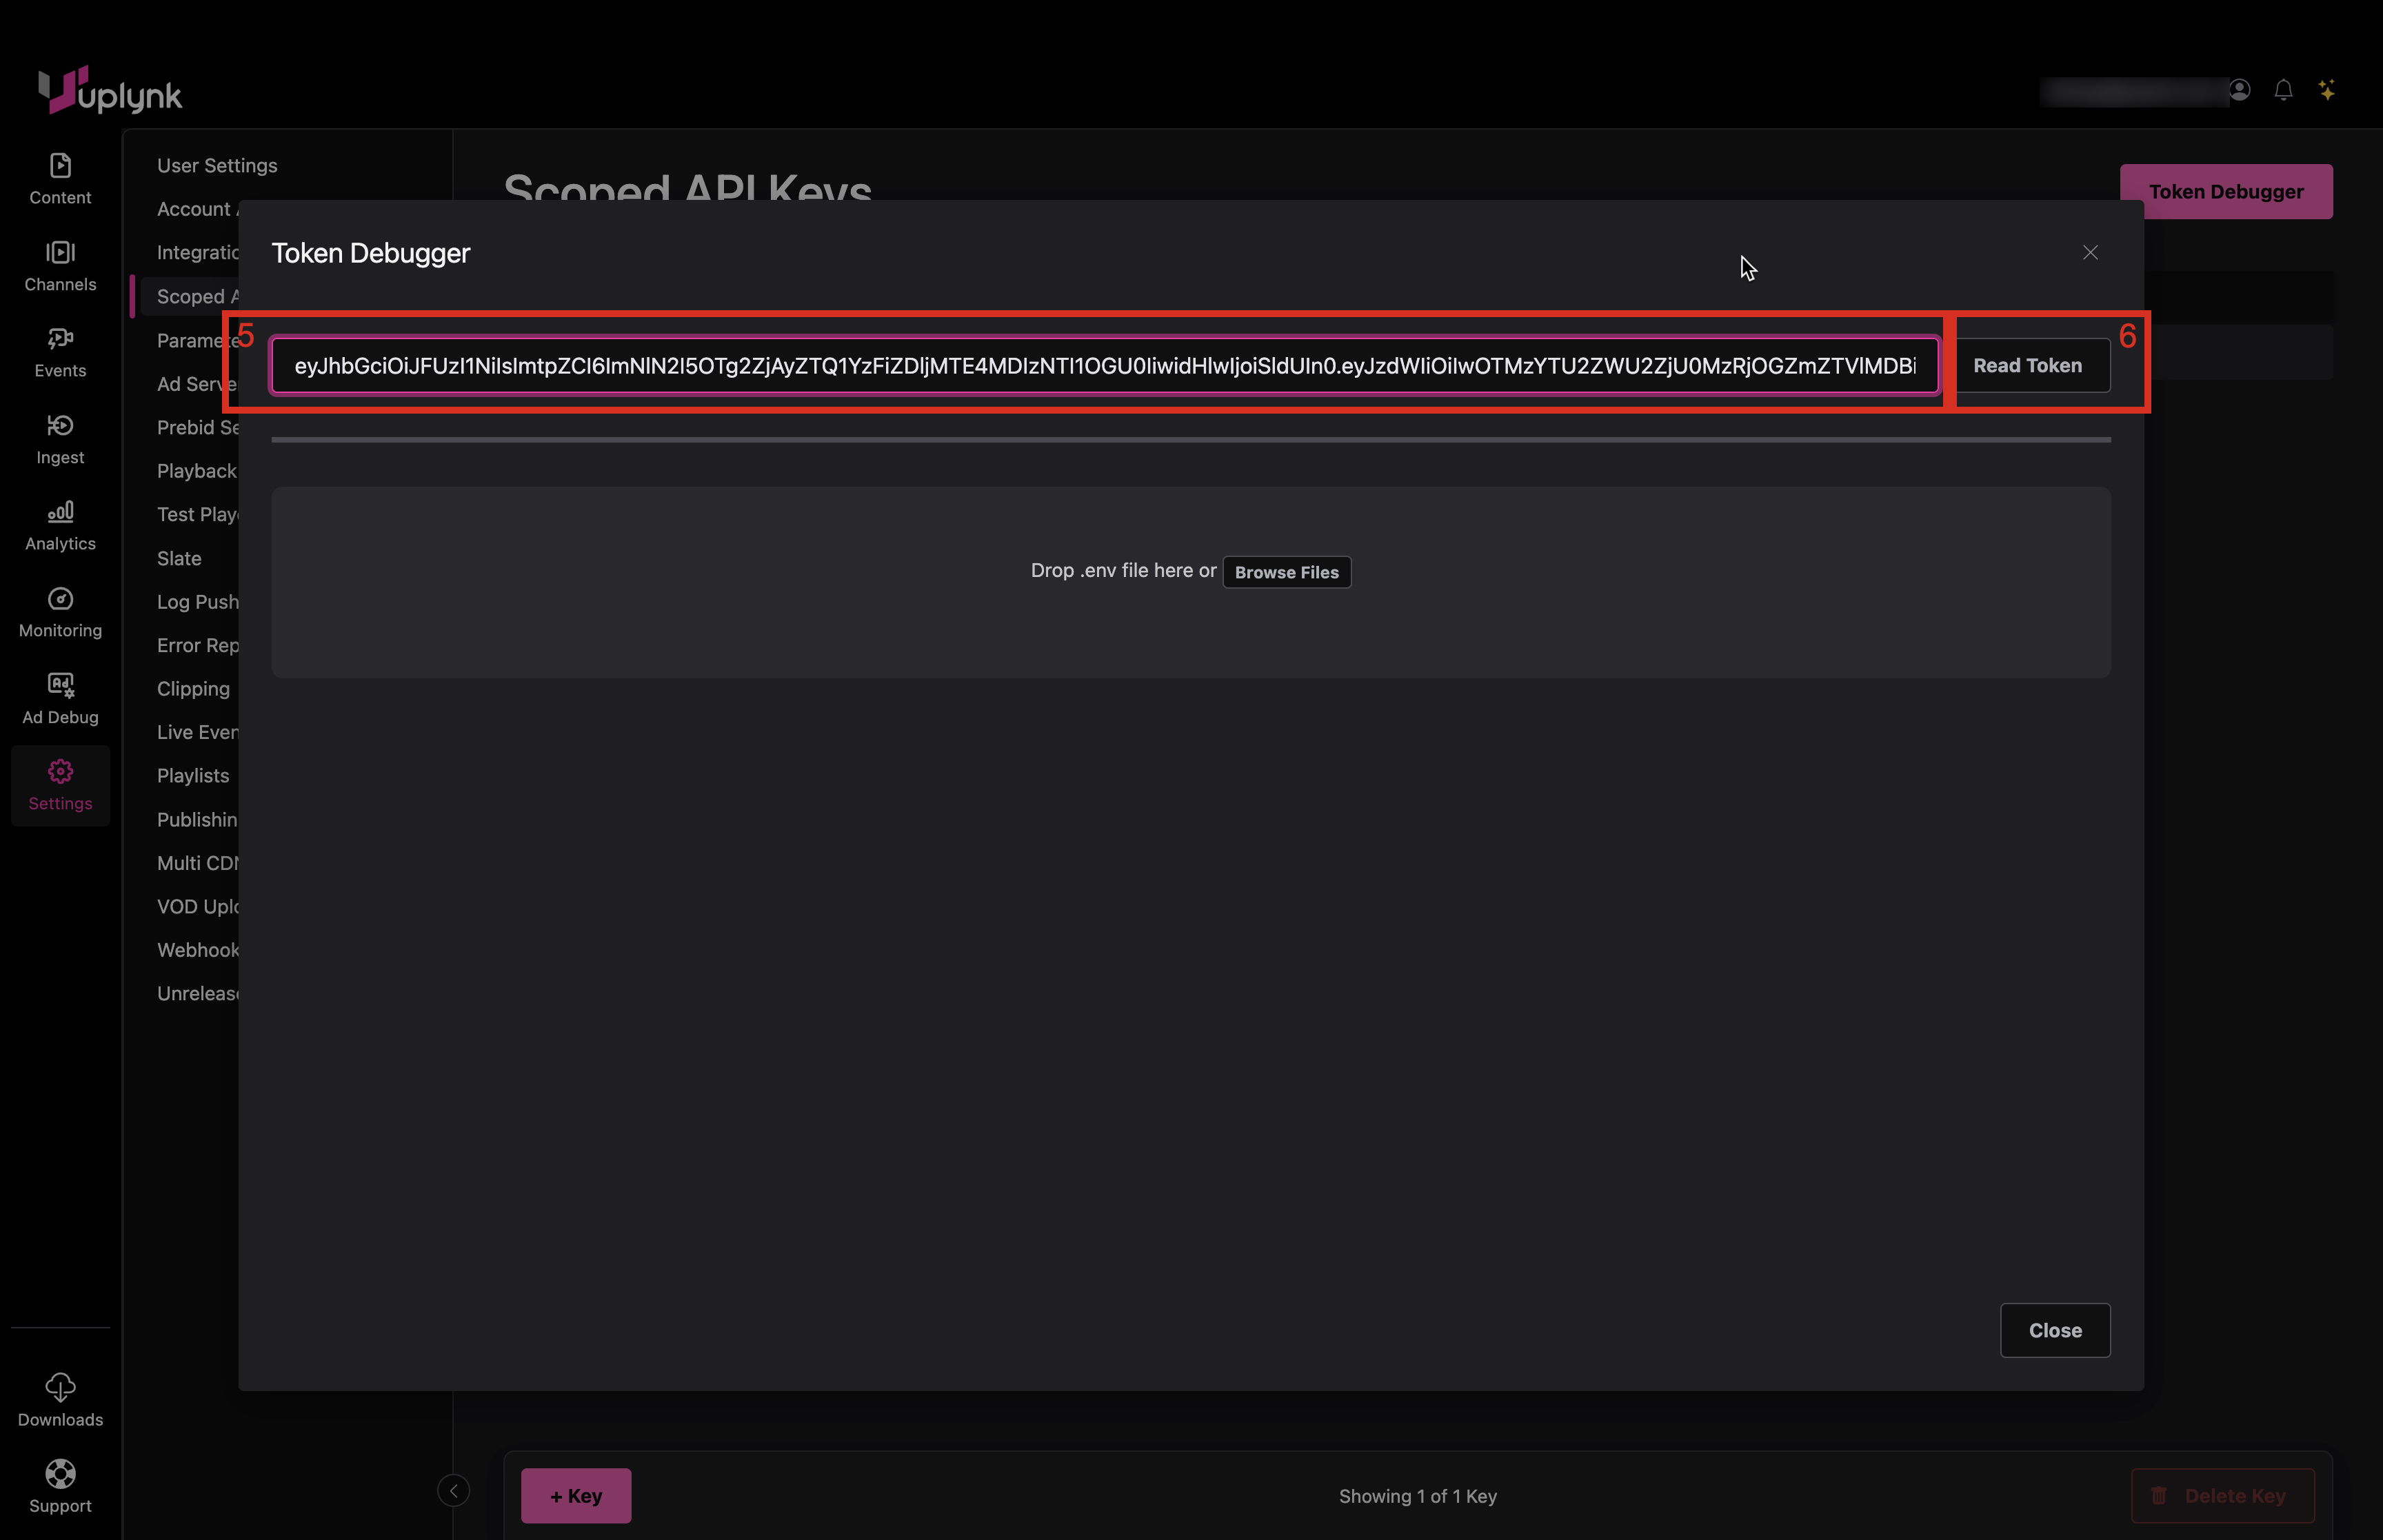
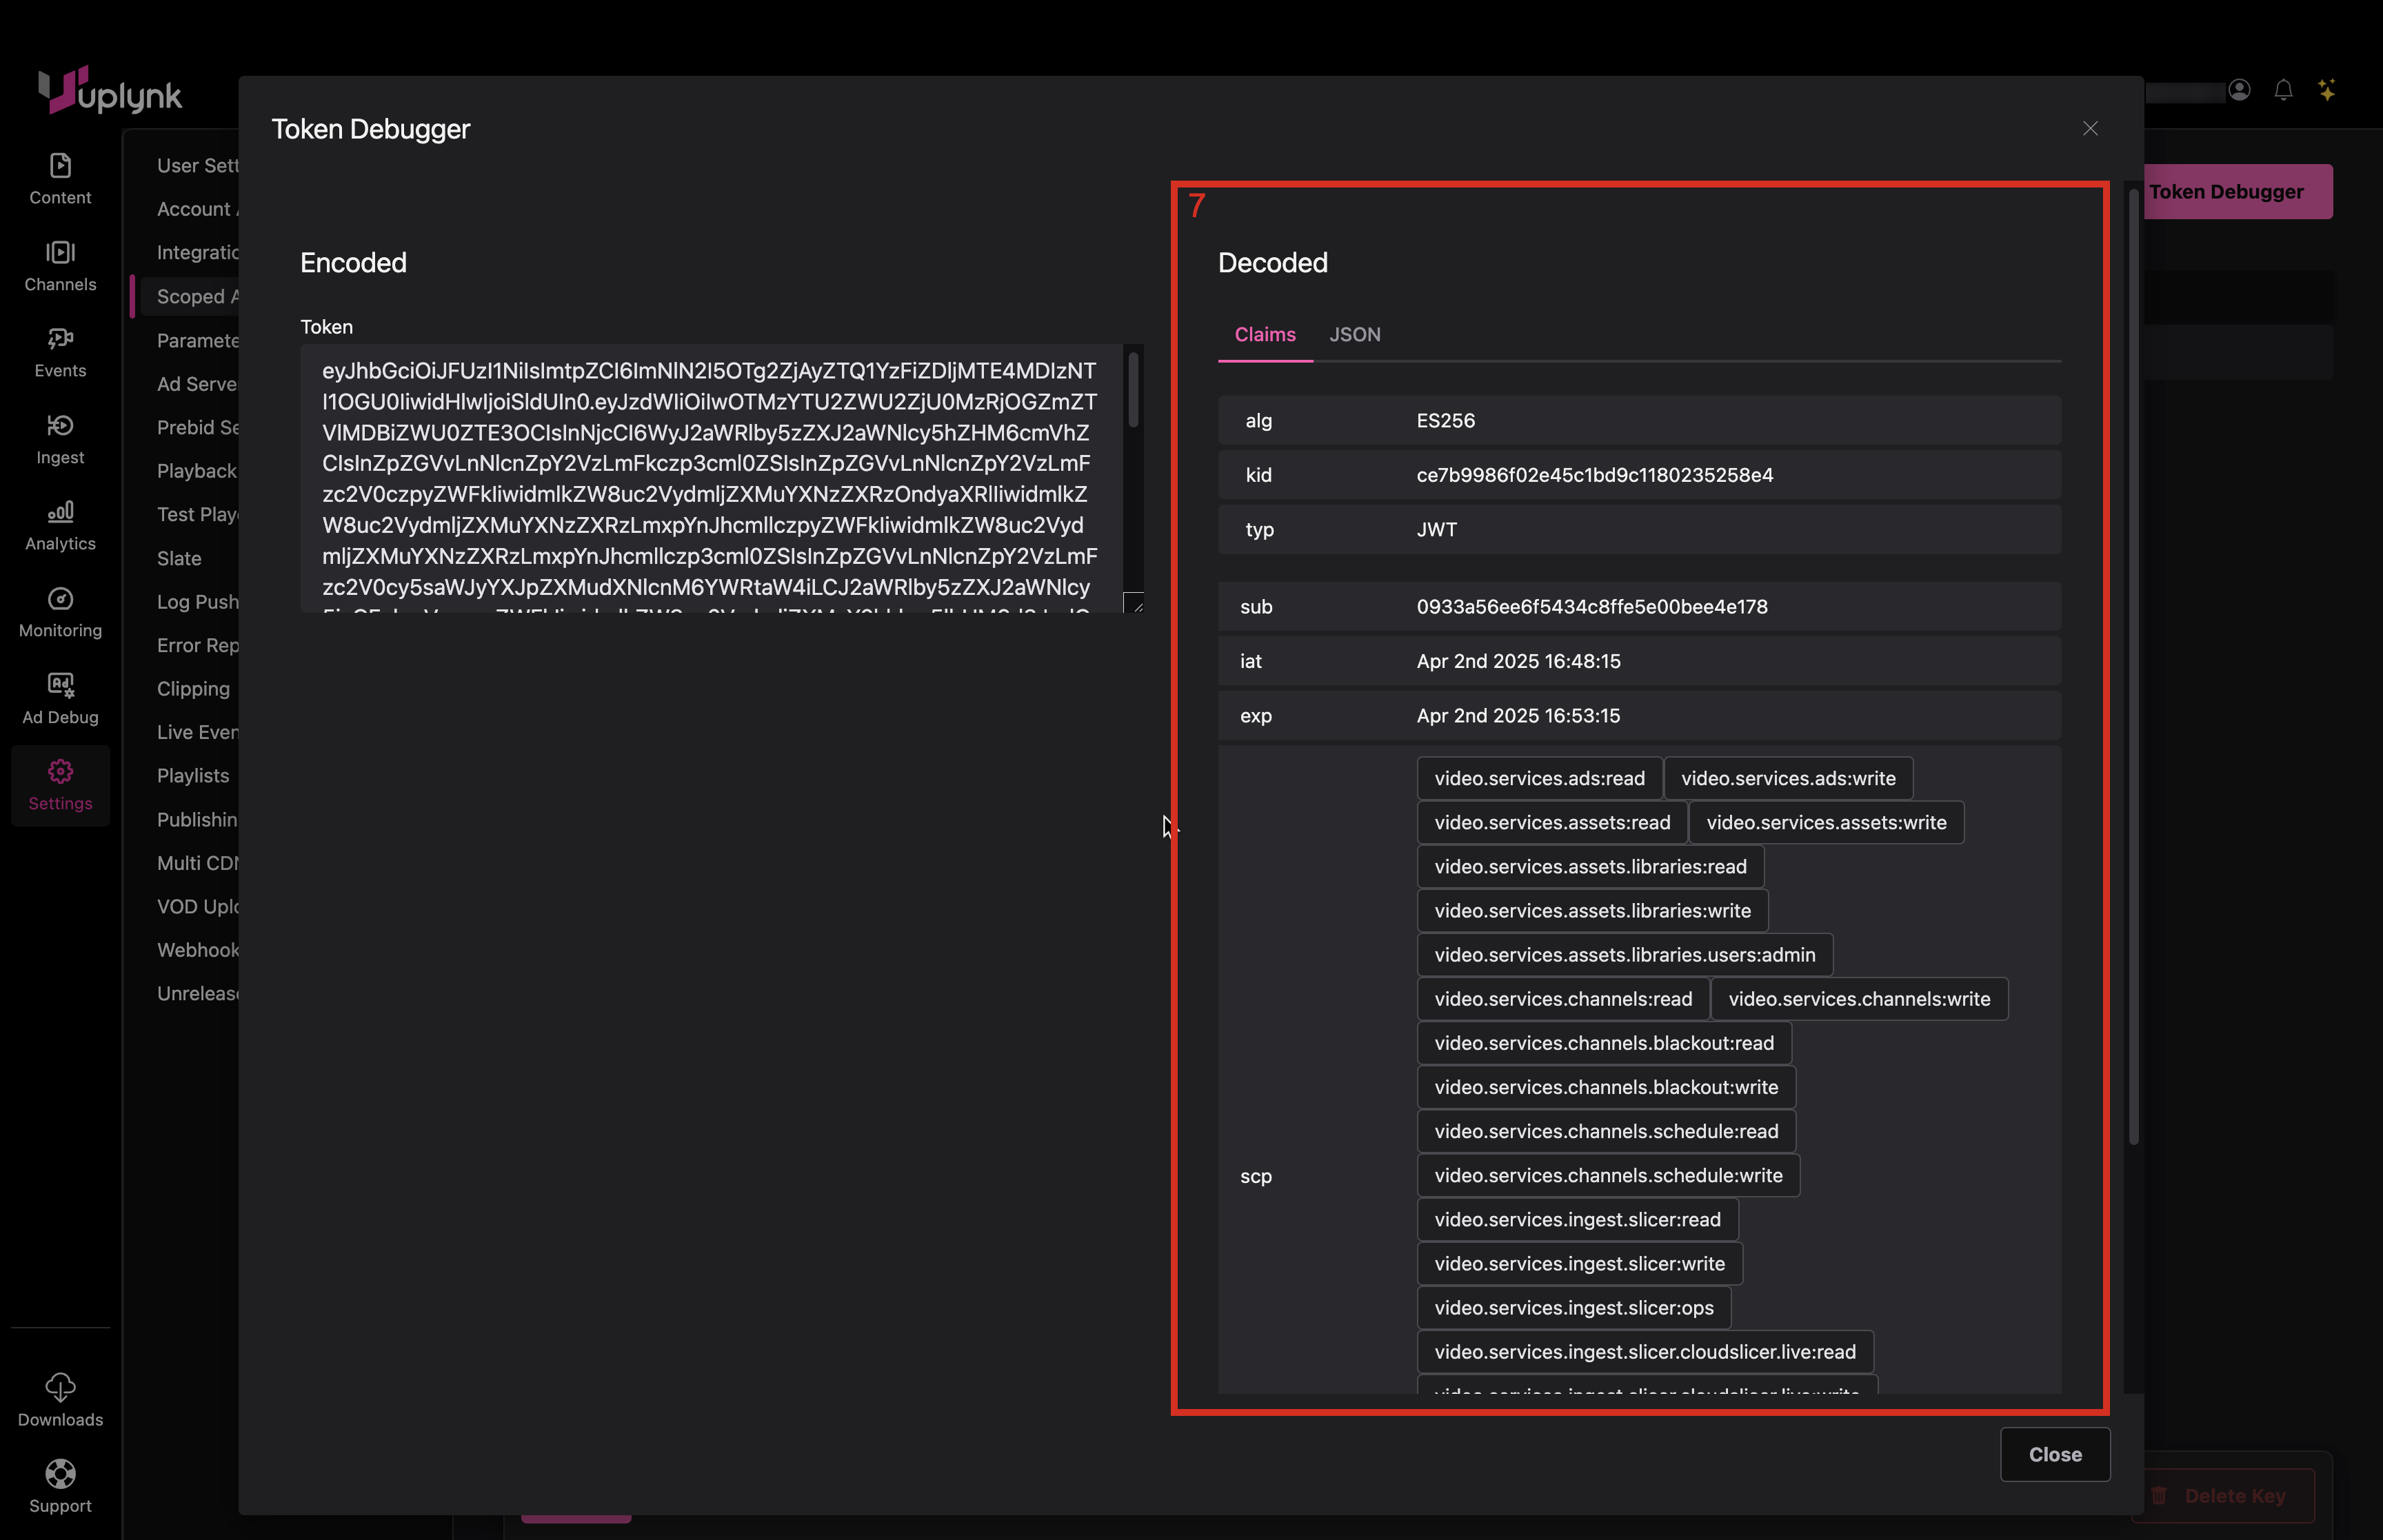
- Observe the decoded JWT
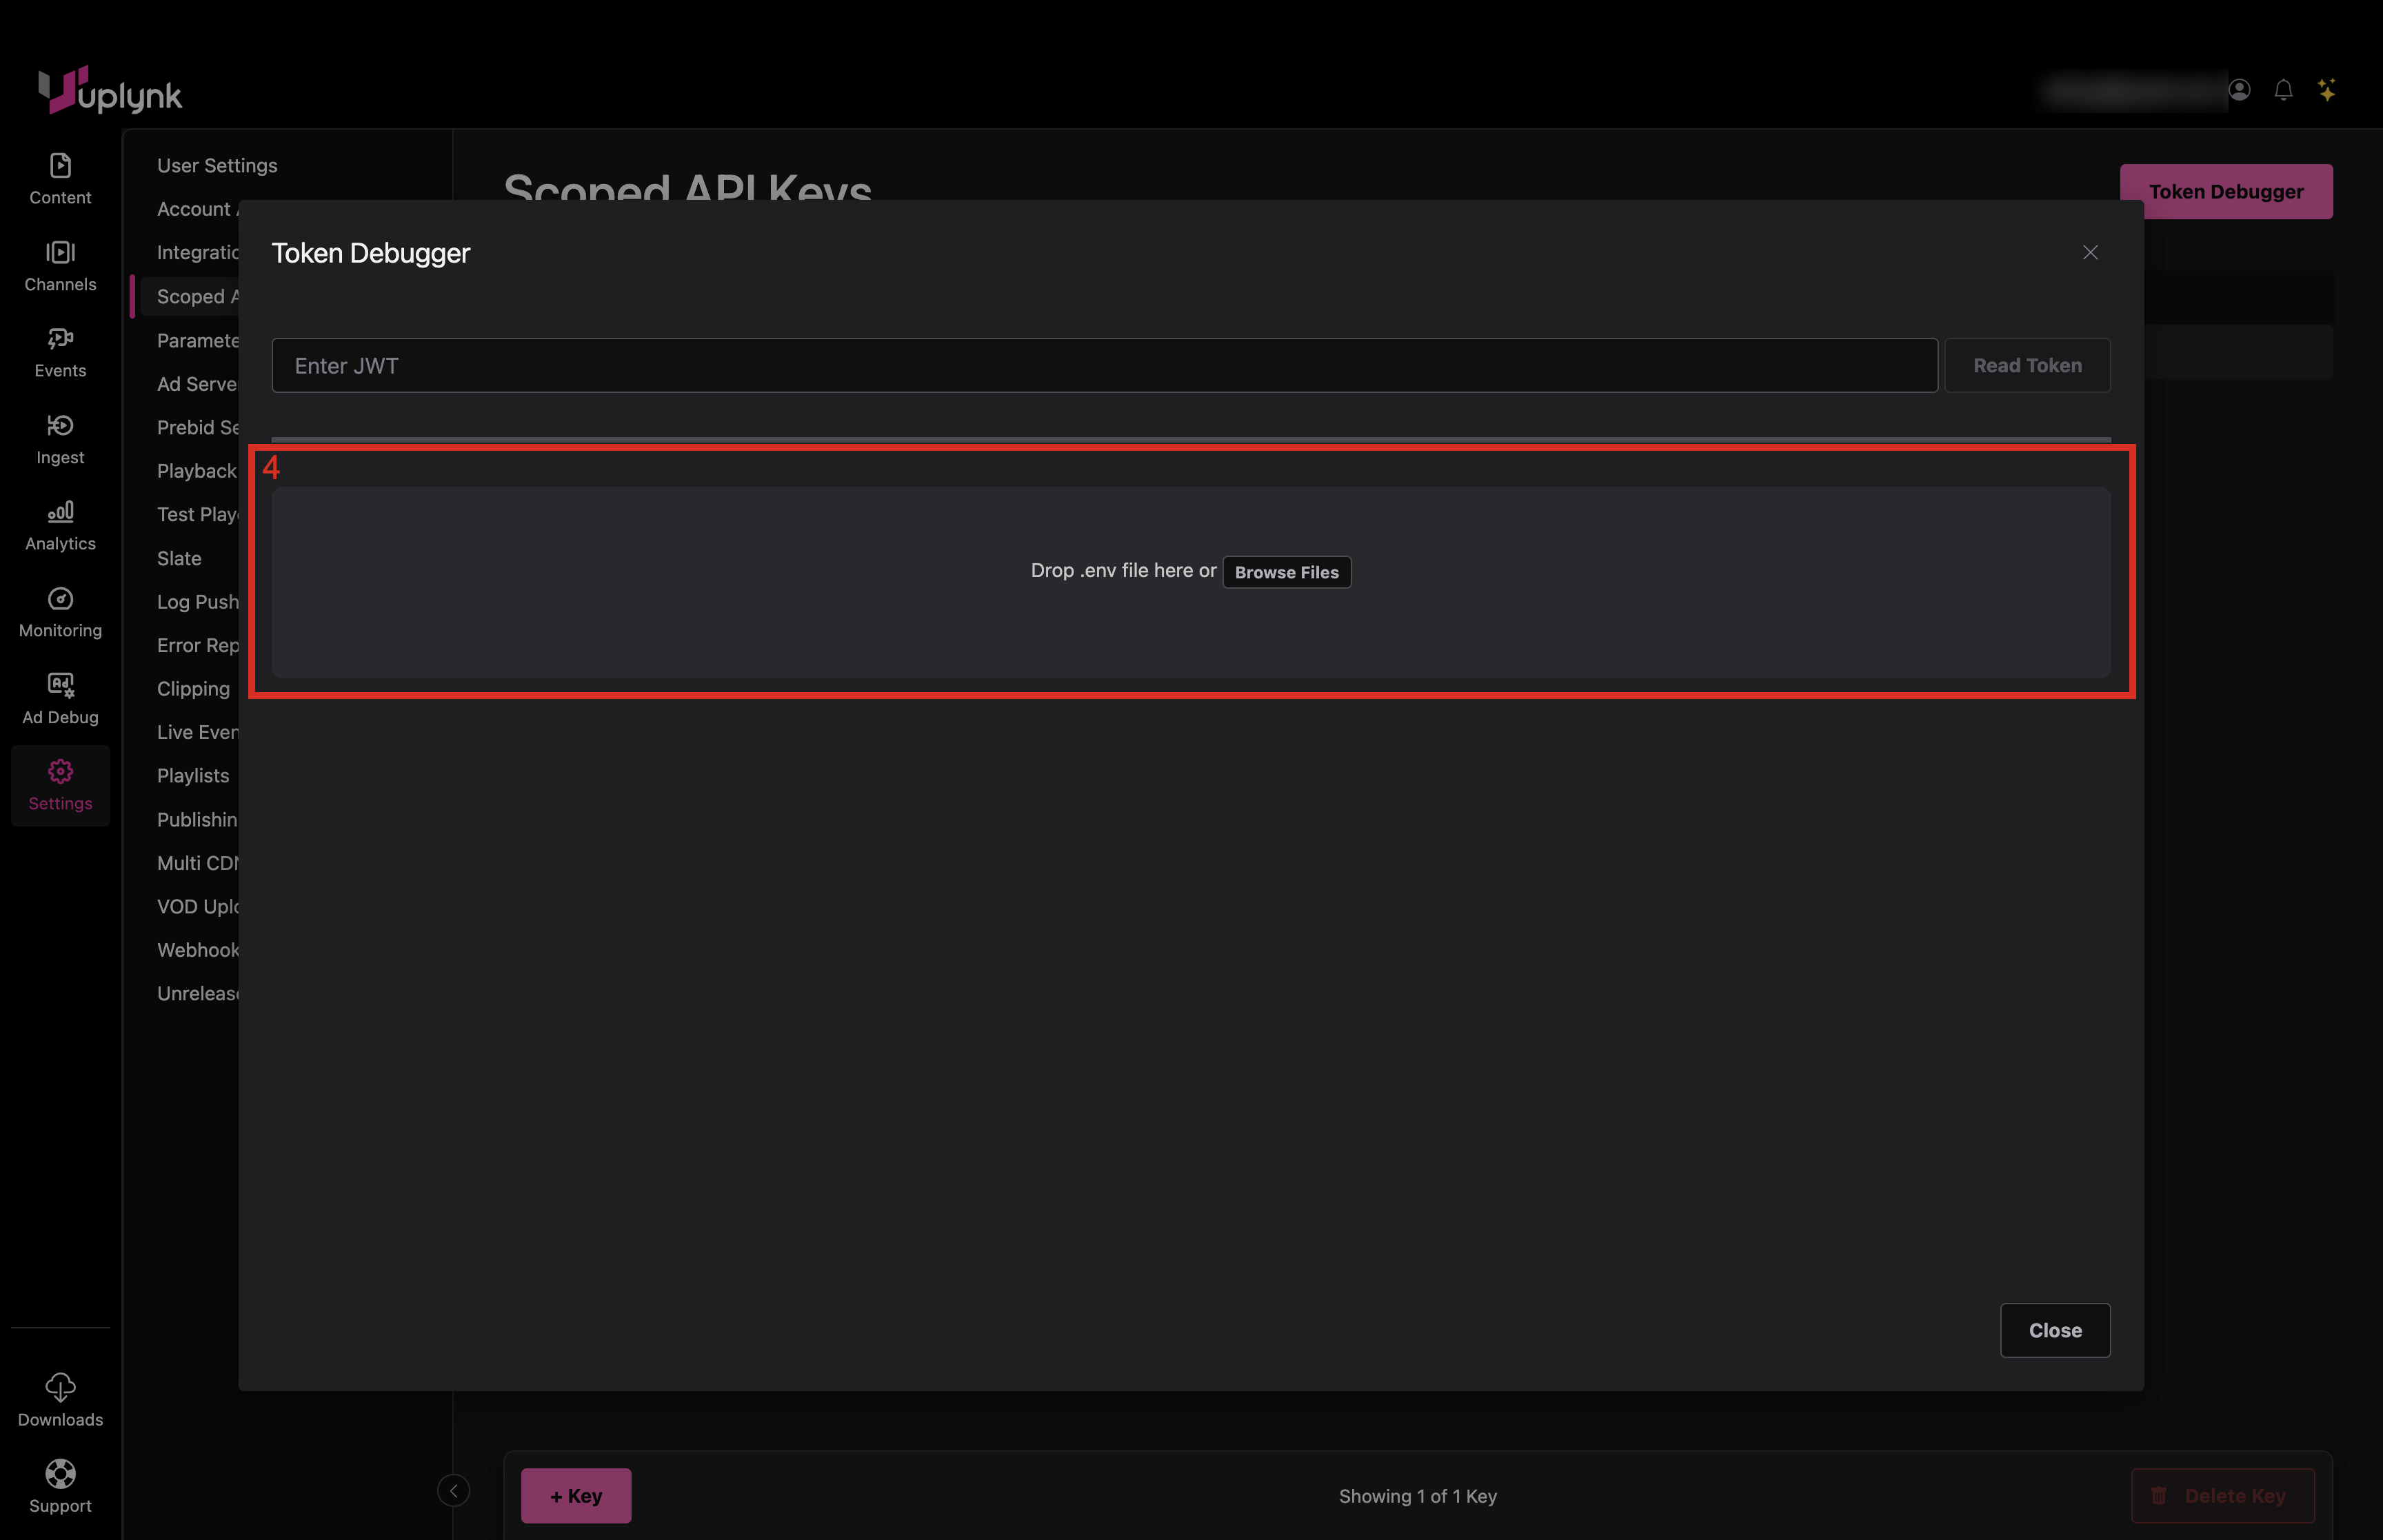
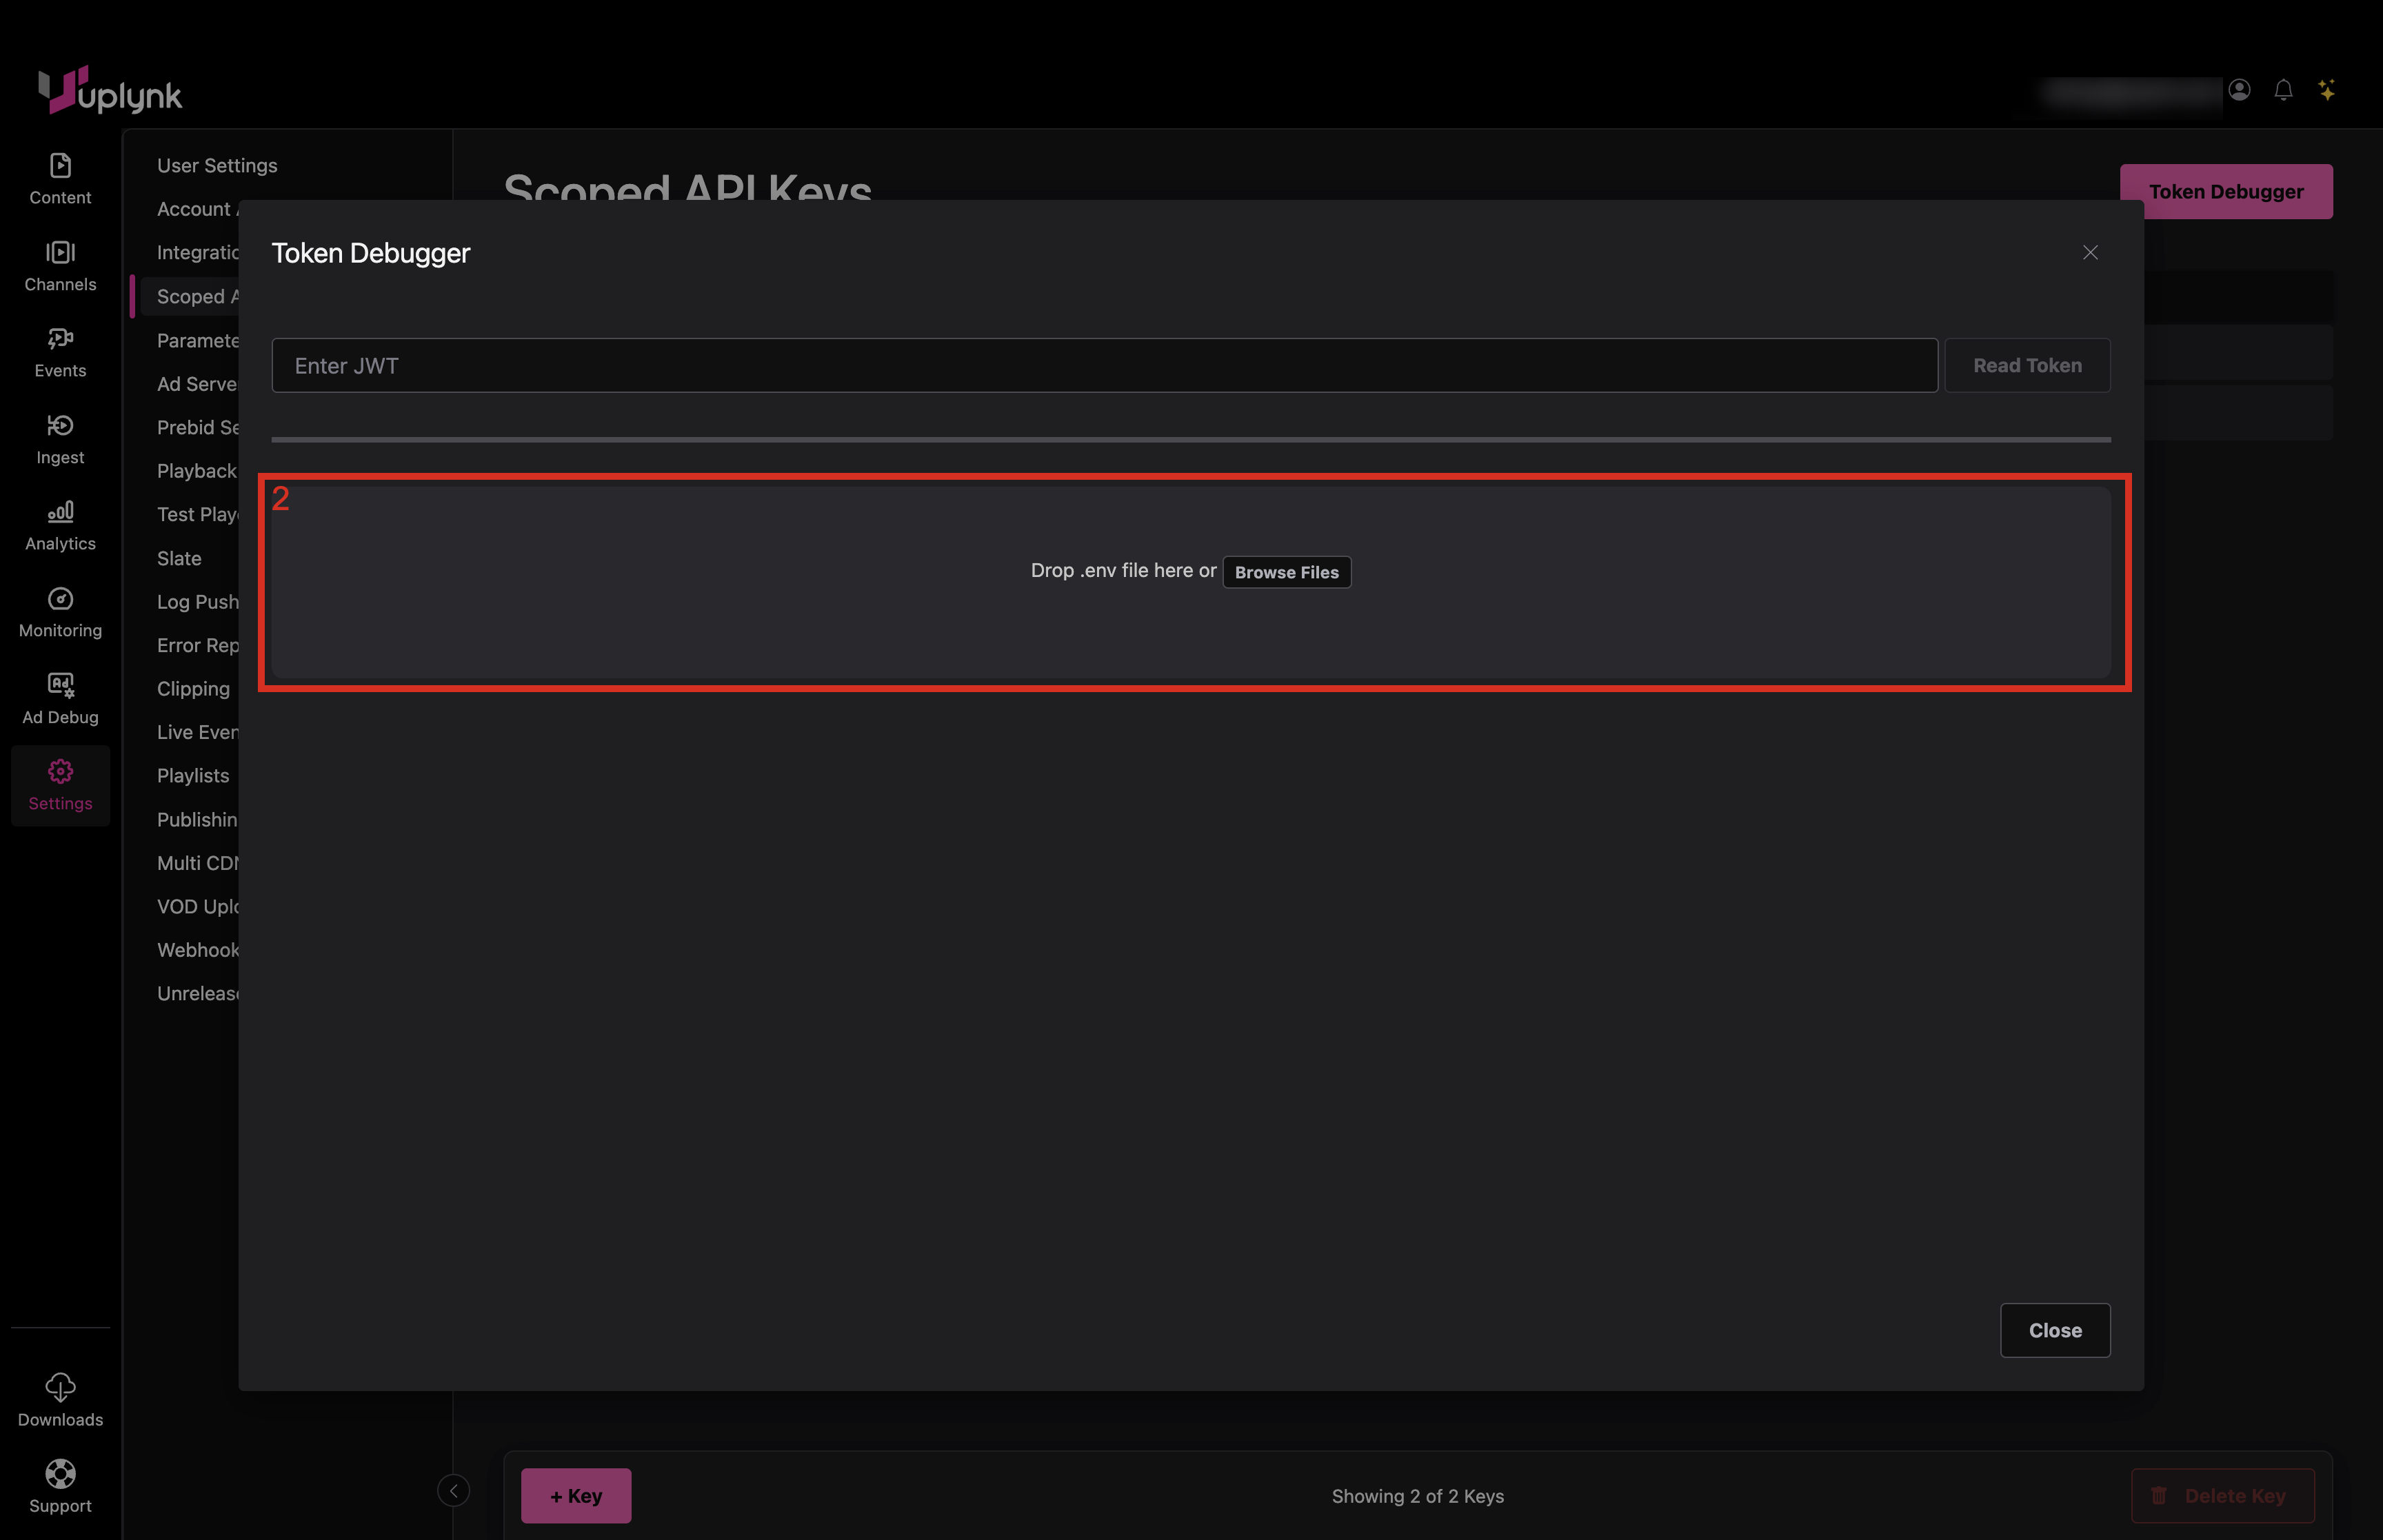
Creating a Test JWT
- Go to Settings tab in CMS
- Click Scoped API Keys tab
- Click on Token Debugger

- Drag and drop an .env file here or use Browse Files to browse for it
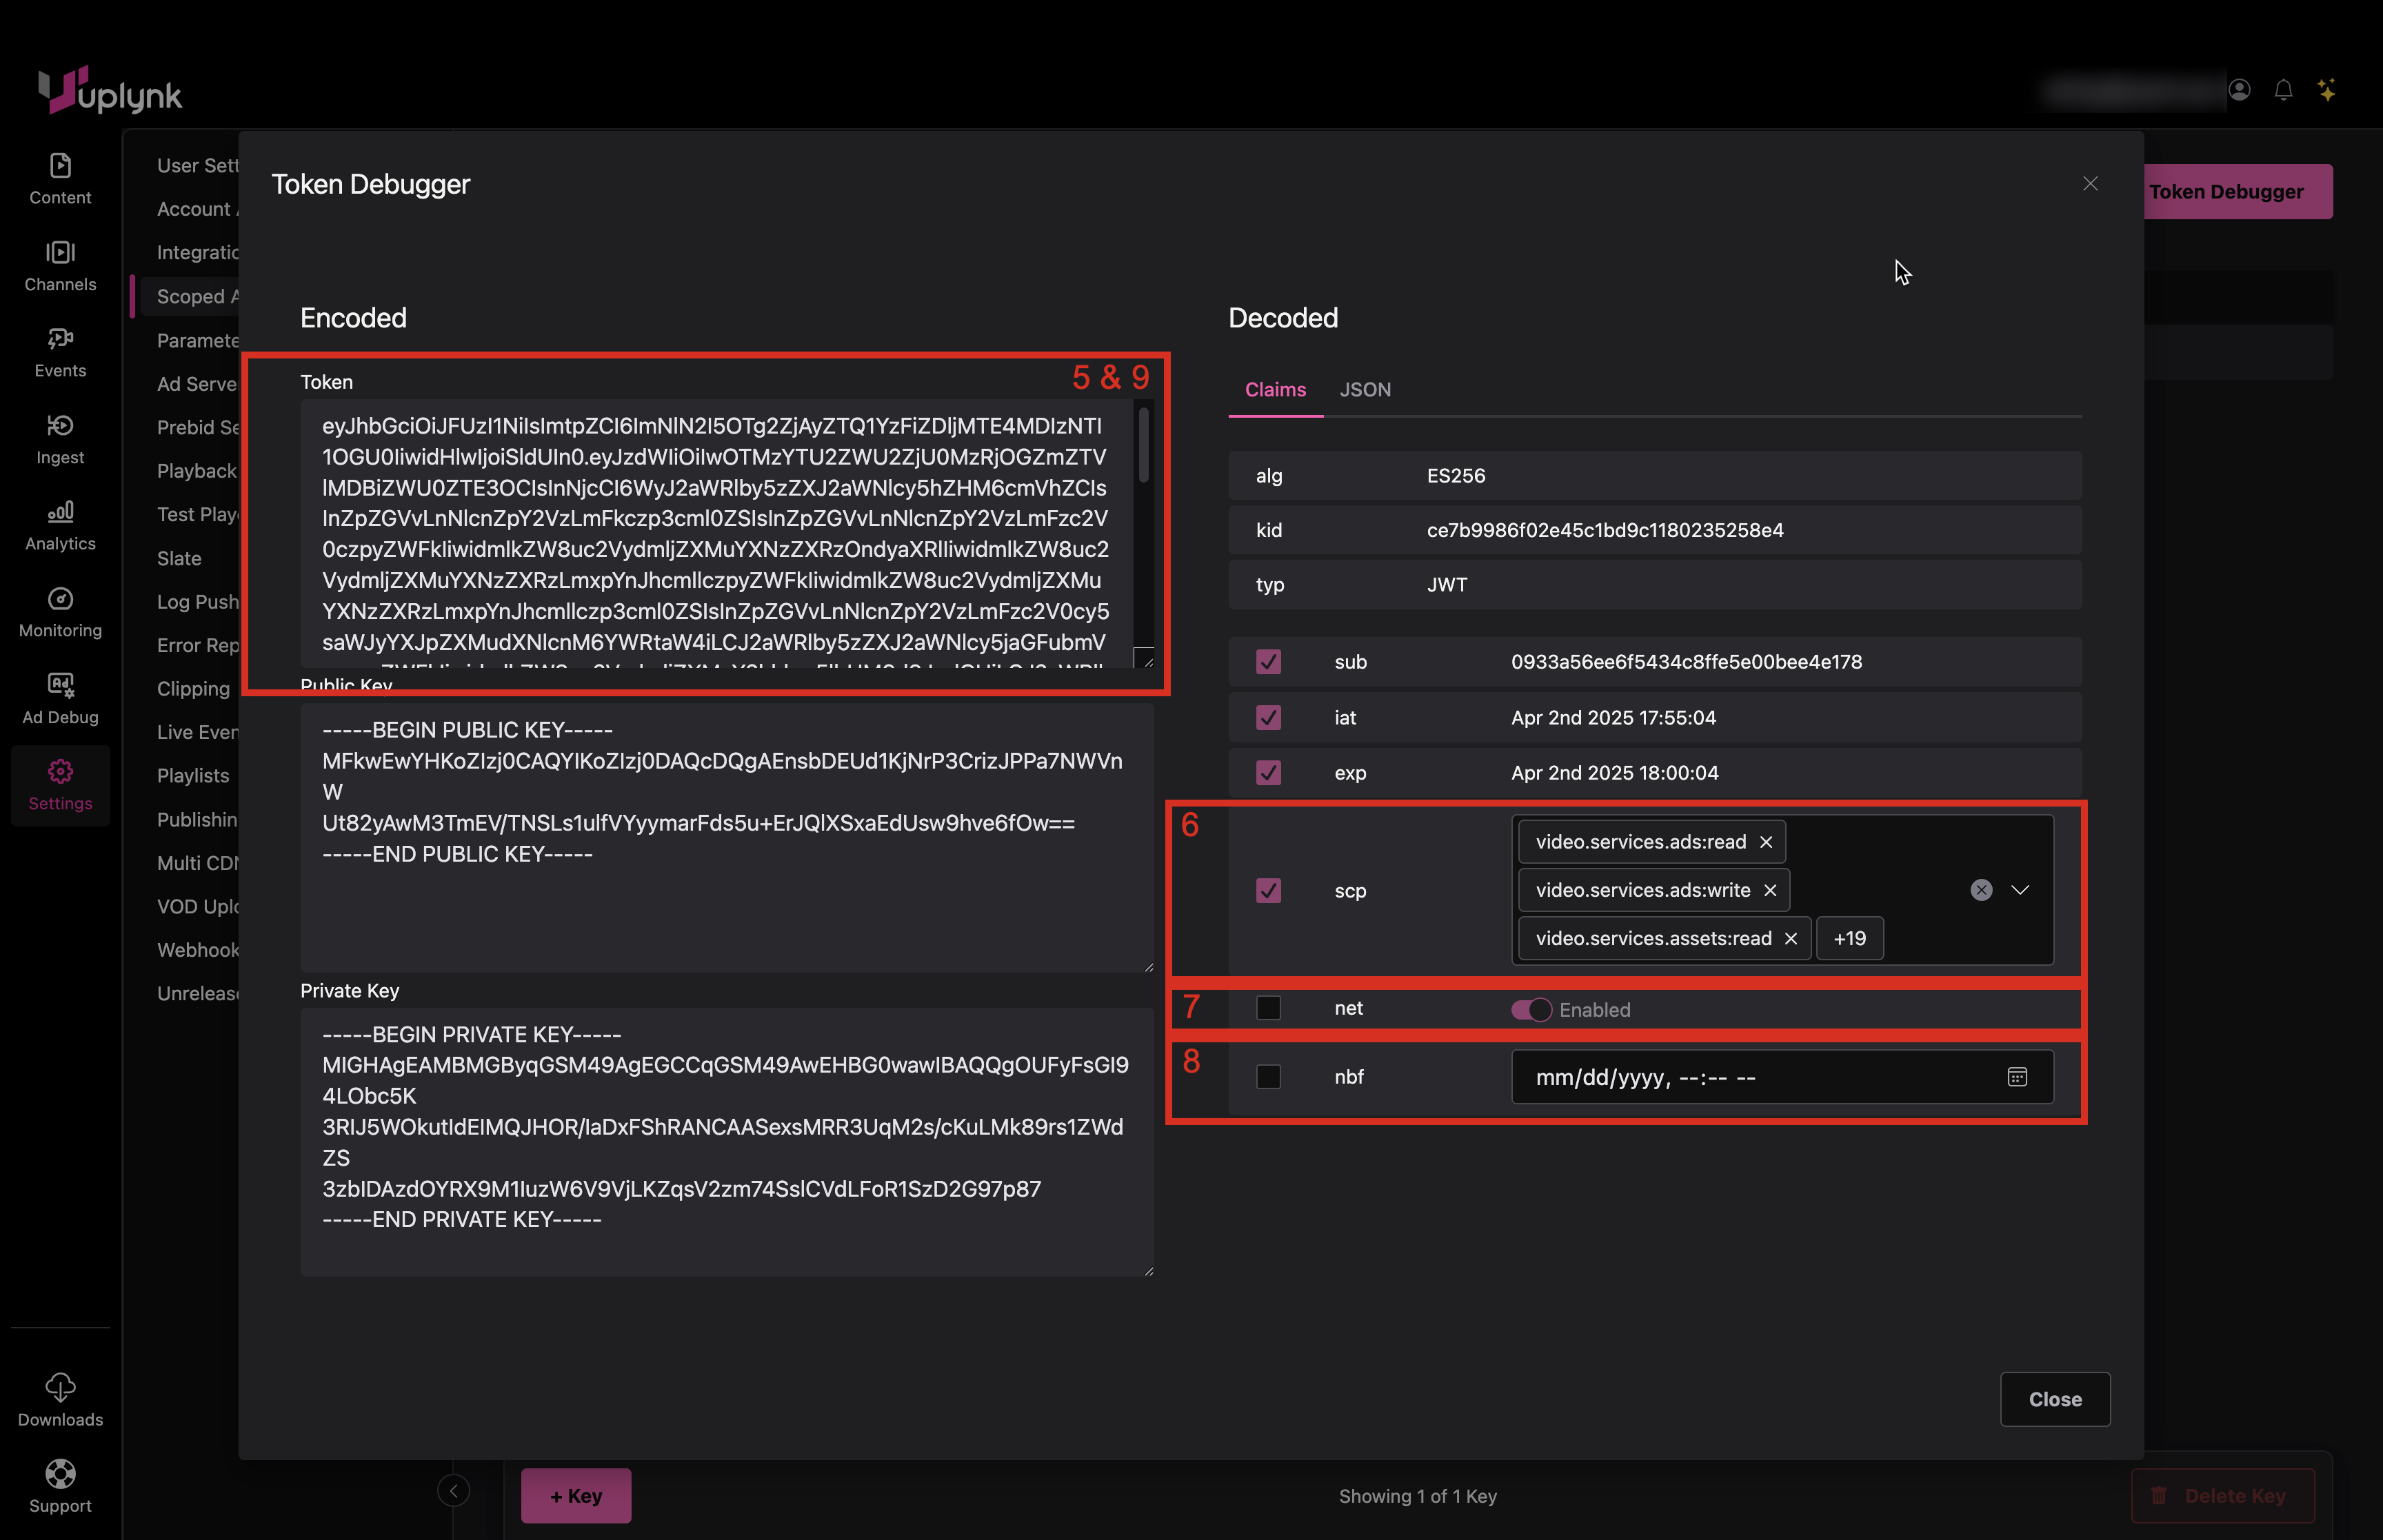
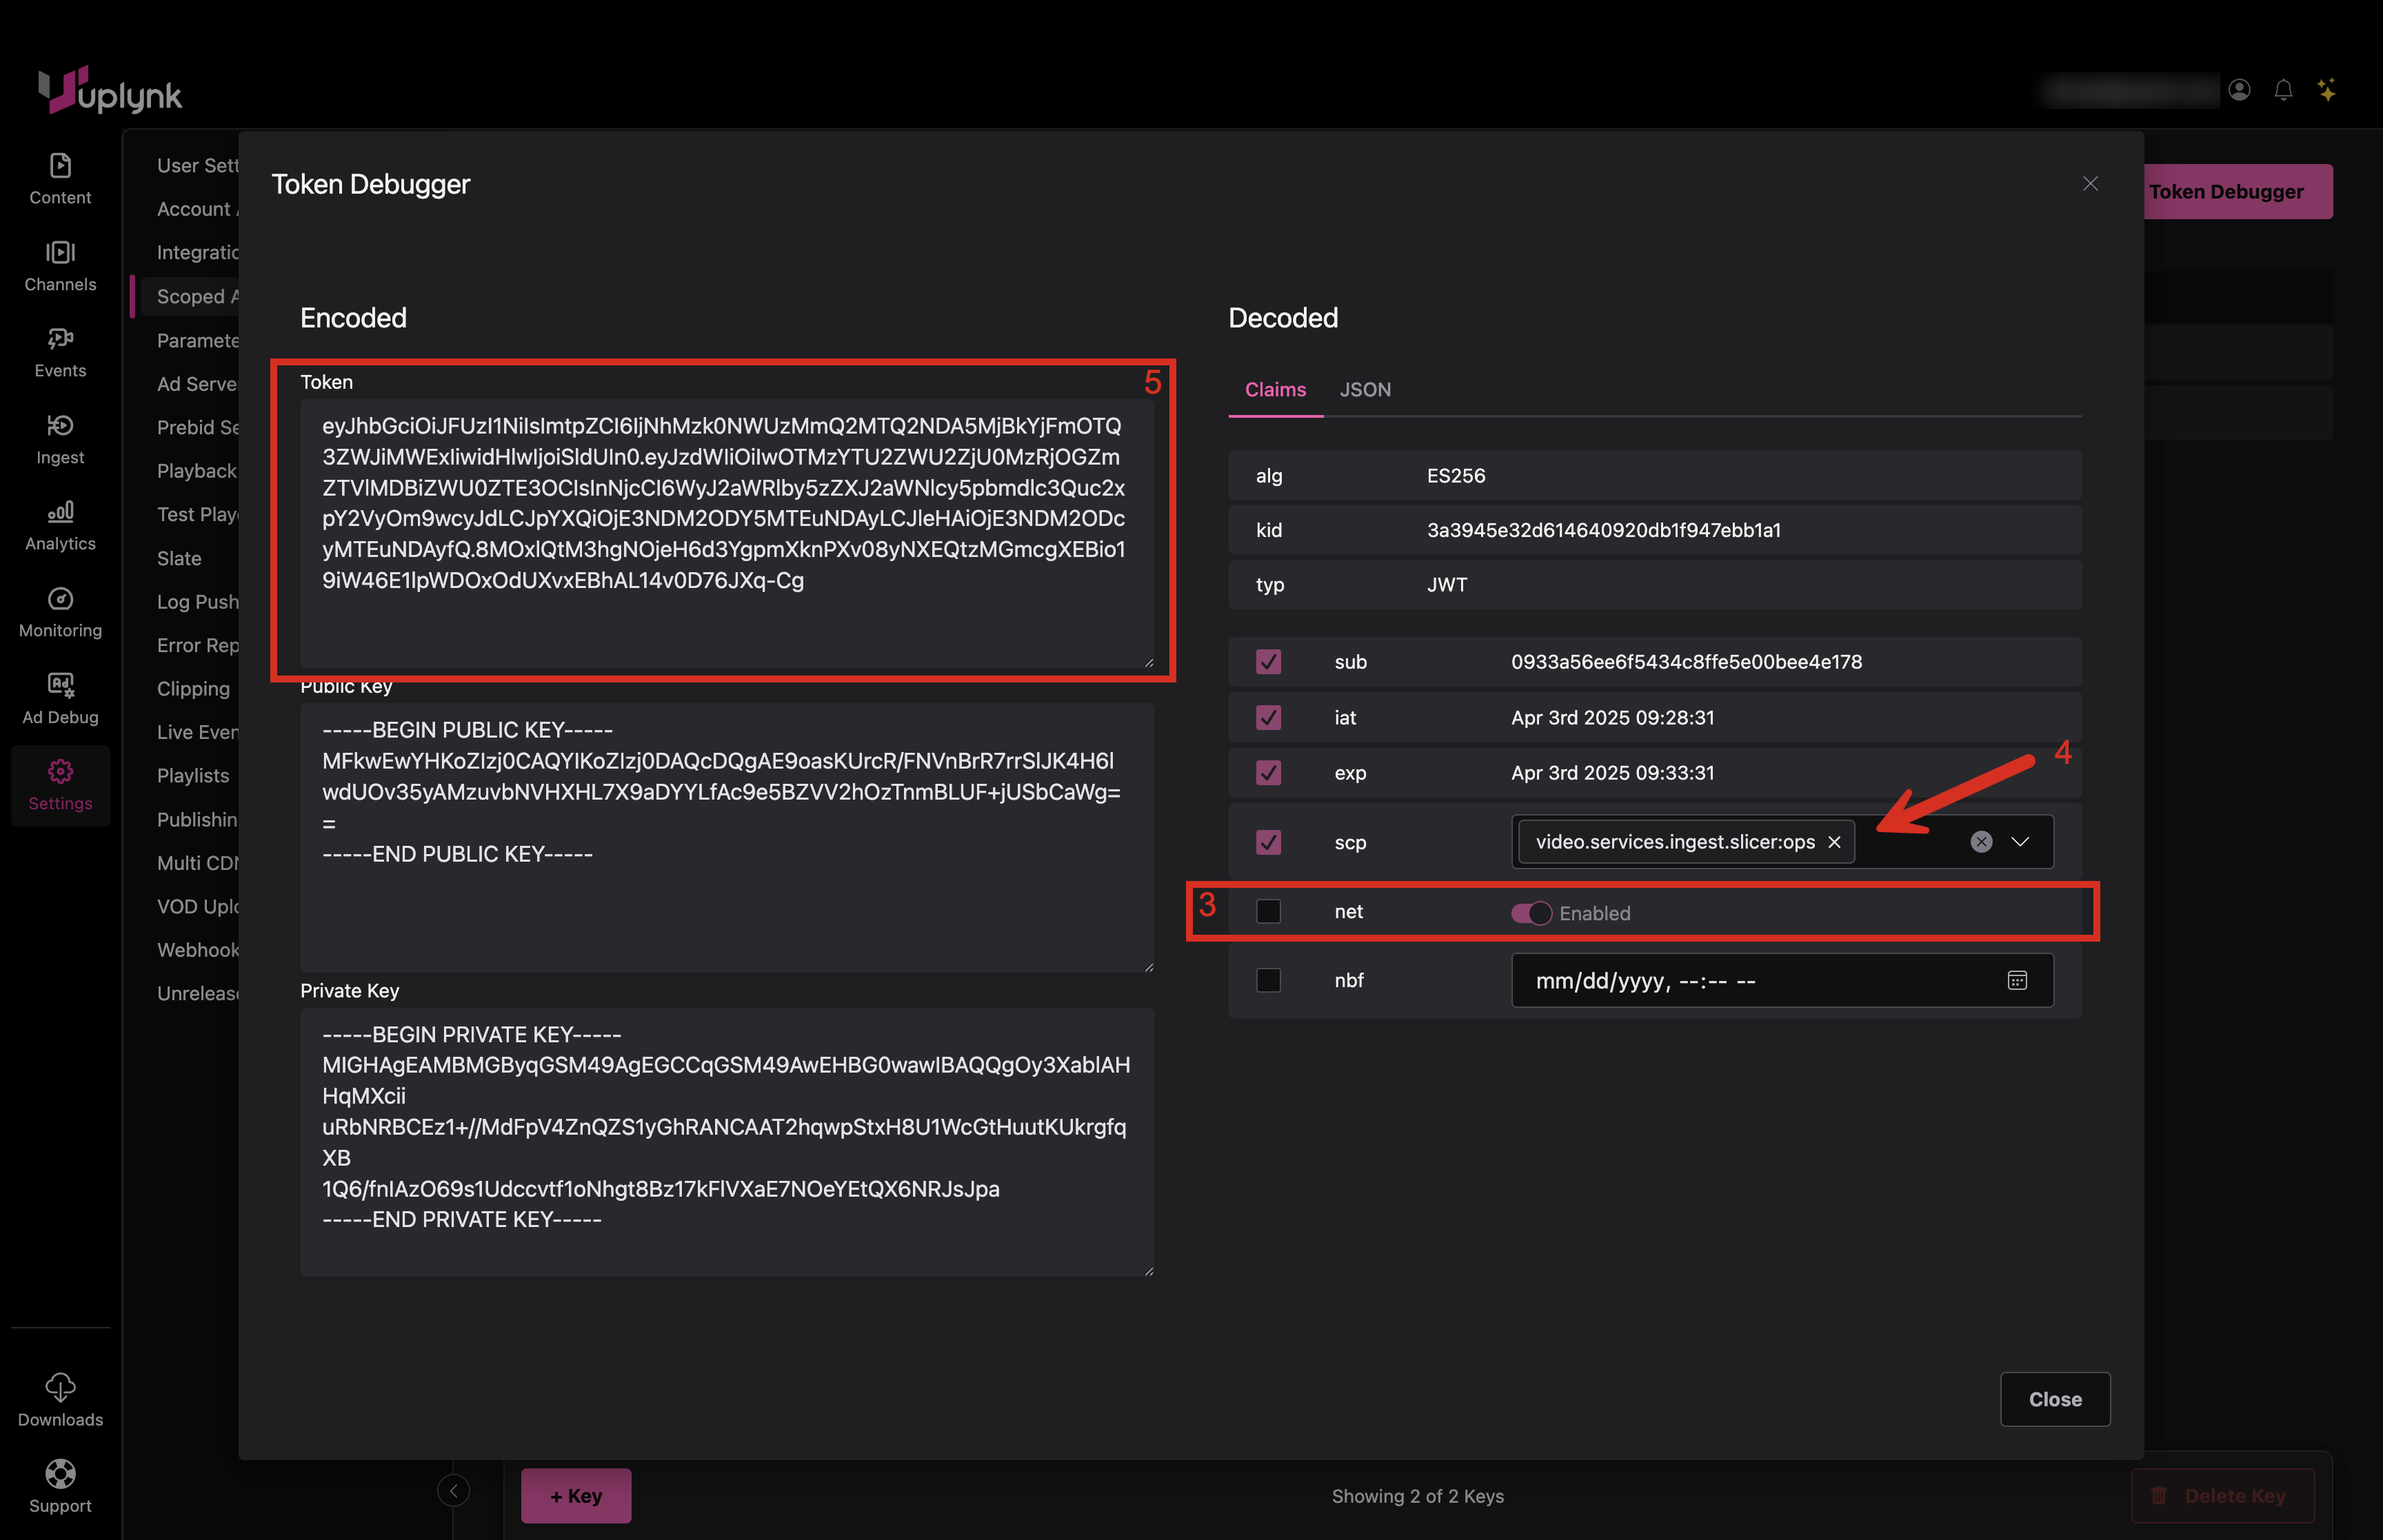
- Observe the token to use in the
X-Auth-Uplynk-Jwtheader - If desired, the scope (
scp) of the token can be edited - If desired,
netcan be selected to make the token never expire - If desired, the token can be made to take effect at a certain date and time using
nbf - Observe that the token was updated with any edits and that the expiration is five minutes after the last edit if
netnot used
Using the Slicer with a JWT (Beta)
A JWT can be used with the Slicer instead of the standard API key method. The scope for this JWT would be just to use the Slicer and nothing more. This is a Beta feature and usage can be requested at [email protected]. If a JWT is used with the Slicer, currently direct API calls to the Slicer will not work.
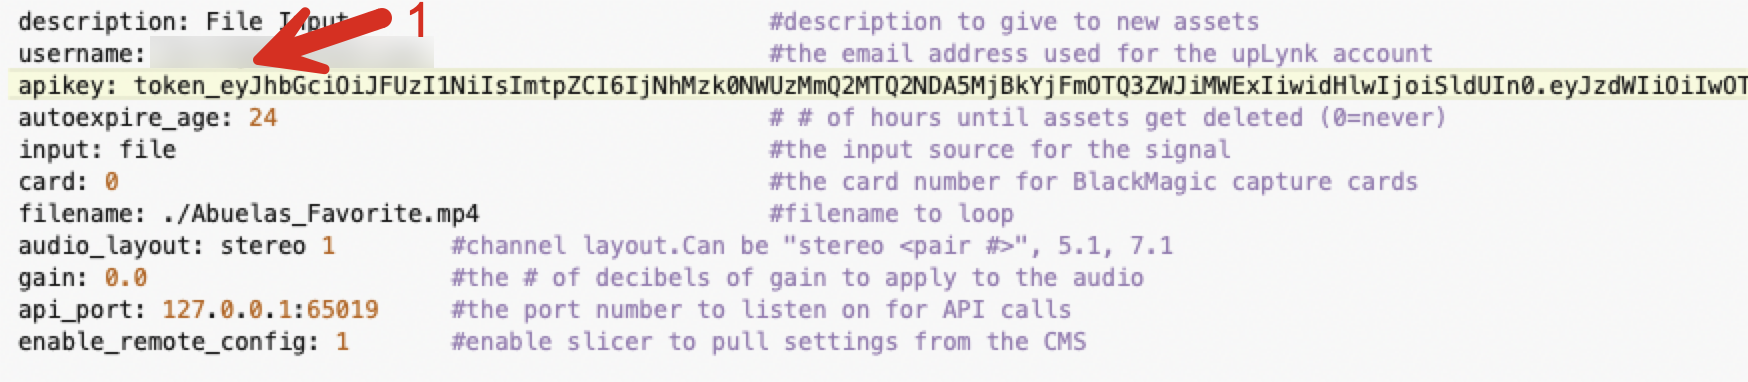
To use the JWT, in the Slicer config file, the apikey parameter would be specified as:
apikey: token_MyJWT
where MyJWT would come from the Token Debugger.
These are the use cases where you may want to use a JWT with the Slicer:
- Prevent general system access when just Slicer functionality is desired.
- Allow a Slicer to be used for a certain window of time:
- The JWT for the Slicer is created using the Token Debugger and has no expiration time.
- The XAuth key is configured to not allow this token to be used after a certain time.
- Use different JWTs for groups of Slicers to limit the damage in case a JWT is compromised.
To create a Scoped API Key for the Slicer:
- Go to Settings tab in CMS
- Click Scoped API Keys tab
- Click + Key
- Enter a name for the Scoped API Key
- Enter a description for the Scoped API Key
- Click on Scopes tab
- Scroll down to Ingest

- Select Slicer - Operator under Ingest
- Scroll up to display Info, Scopes, and Advanced tabs at top of scroll area

- Click on Advanced tab
- Set a Valid Until date which keeps JWTs from being used past this time
- Click Create
To save the key information:
- Click on Download .env File to save the public and private encryption keys in cleartext
- After downloading, click the checkbox
- Click Close
To get the Slicer token:
- Click on Token Debugger

- Drag and drop or browse for the .env file created for the Slicer API key
- Click the checkbox for
netto make the token never expire - Note that the scope has
video.services.ingest.slicer:opspermissions - Copy the token here to the clipboard for pasting into a Slicer config file
To update the Slicer config file:
- Paste the token into the Slicer configuration file for the
apikeysetting preceded by _token__ - Restart the Slicer