
Add VOD Content
On-demand content may be added to your library through the CMS, Slicer, or Slicebot. Slicebot, an automation tool, establishes a workflow through which content may be added to your library as it is generated.
Quick Start
On-demand content may be added to your library through either of the following methods:
-
CMS: Use the VOD Uploader to upload individual files or bulk upload media from an entire folder.
-
Slicer Application: Drag and drop media onto the Slicer application. View tutorial.
-
Command Line: Pass options through the command line to define Slicer credentials and how content will be ingested into your library.
VOD Uploader
VOD Uploader allows you to:
- Bulk upload a folder's content from your local machine or an Amazon S3 bucket.
- Upload the desired file(s) from your local machine by either dragging and dropping them into the CMS or by browsing and selecting the desired files.
- Upload a single media file at a time from a public HTTP/HTTPS URL.
Key Information
-
The maximum file size is 90 GB.
-
Subfolders are unsupported when uploading content by folder.
-
For content uploaded from your local machine, VOD Uploader applies Slicebot configuration settings in the following order:
-
VOD Uploader Template: A template, which contains a predefined set of Slicebot configuration settings, allows you to apply a base configuration to uploaded content.
-
File-Specific Customization: Define an external ID, ad breaks, metadata fields, or timed metadata for one or more file(s) in your upload queue.
-
Slicebot Configuration File: A Slicebot configuration file determines how files uploaded to our service will be processed.
Note: A Slicebot configuration file takes precedence over a VOD Uploader template or file-specific settings defined when uploading a file.
-
-
VOD Uploader automatically detects sidecar TTML files and Slicebot configuration files when uploading content by URL or folder. It checks for files that adhere to the following file naming convention:
{Filename}.ttml

{Filename}.cfg
Example
If you are uploading a media file whose filename is
basketball.mp4, then VOD Uploader will automatically check for the following files:basketball.mp4.ttml basketball.mp4.cfg -
Amazon S3 bucket: You may upload content from a:
-
Public bucket.
-
Private Bucket: This requires a S3 URI. You will also need to provide your access key ID and your secret access key from within the Key and Secret options, respectively.
-
Attempting to upload content from private URLs will typically generate a
403 Forbiddenerror. -
If you are uploading content from Dropbox, change the query string from
?dl=0to?dl=1to prevent Dropbox from attempting playback.
Add Content through VOD Uploader
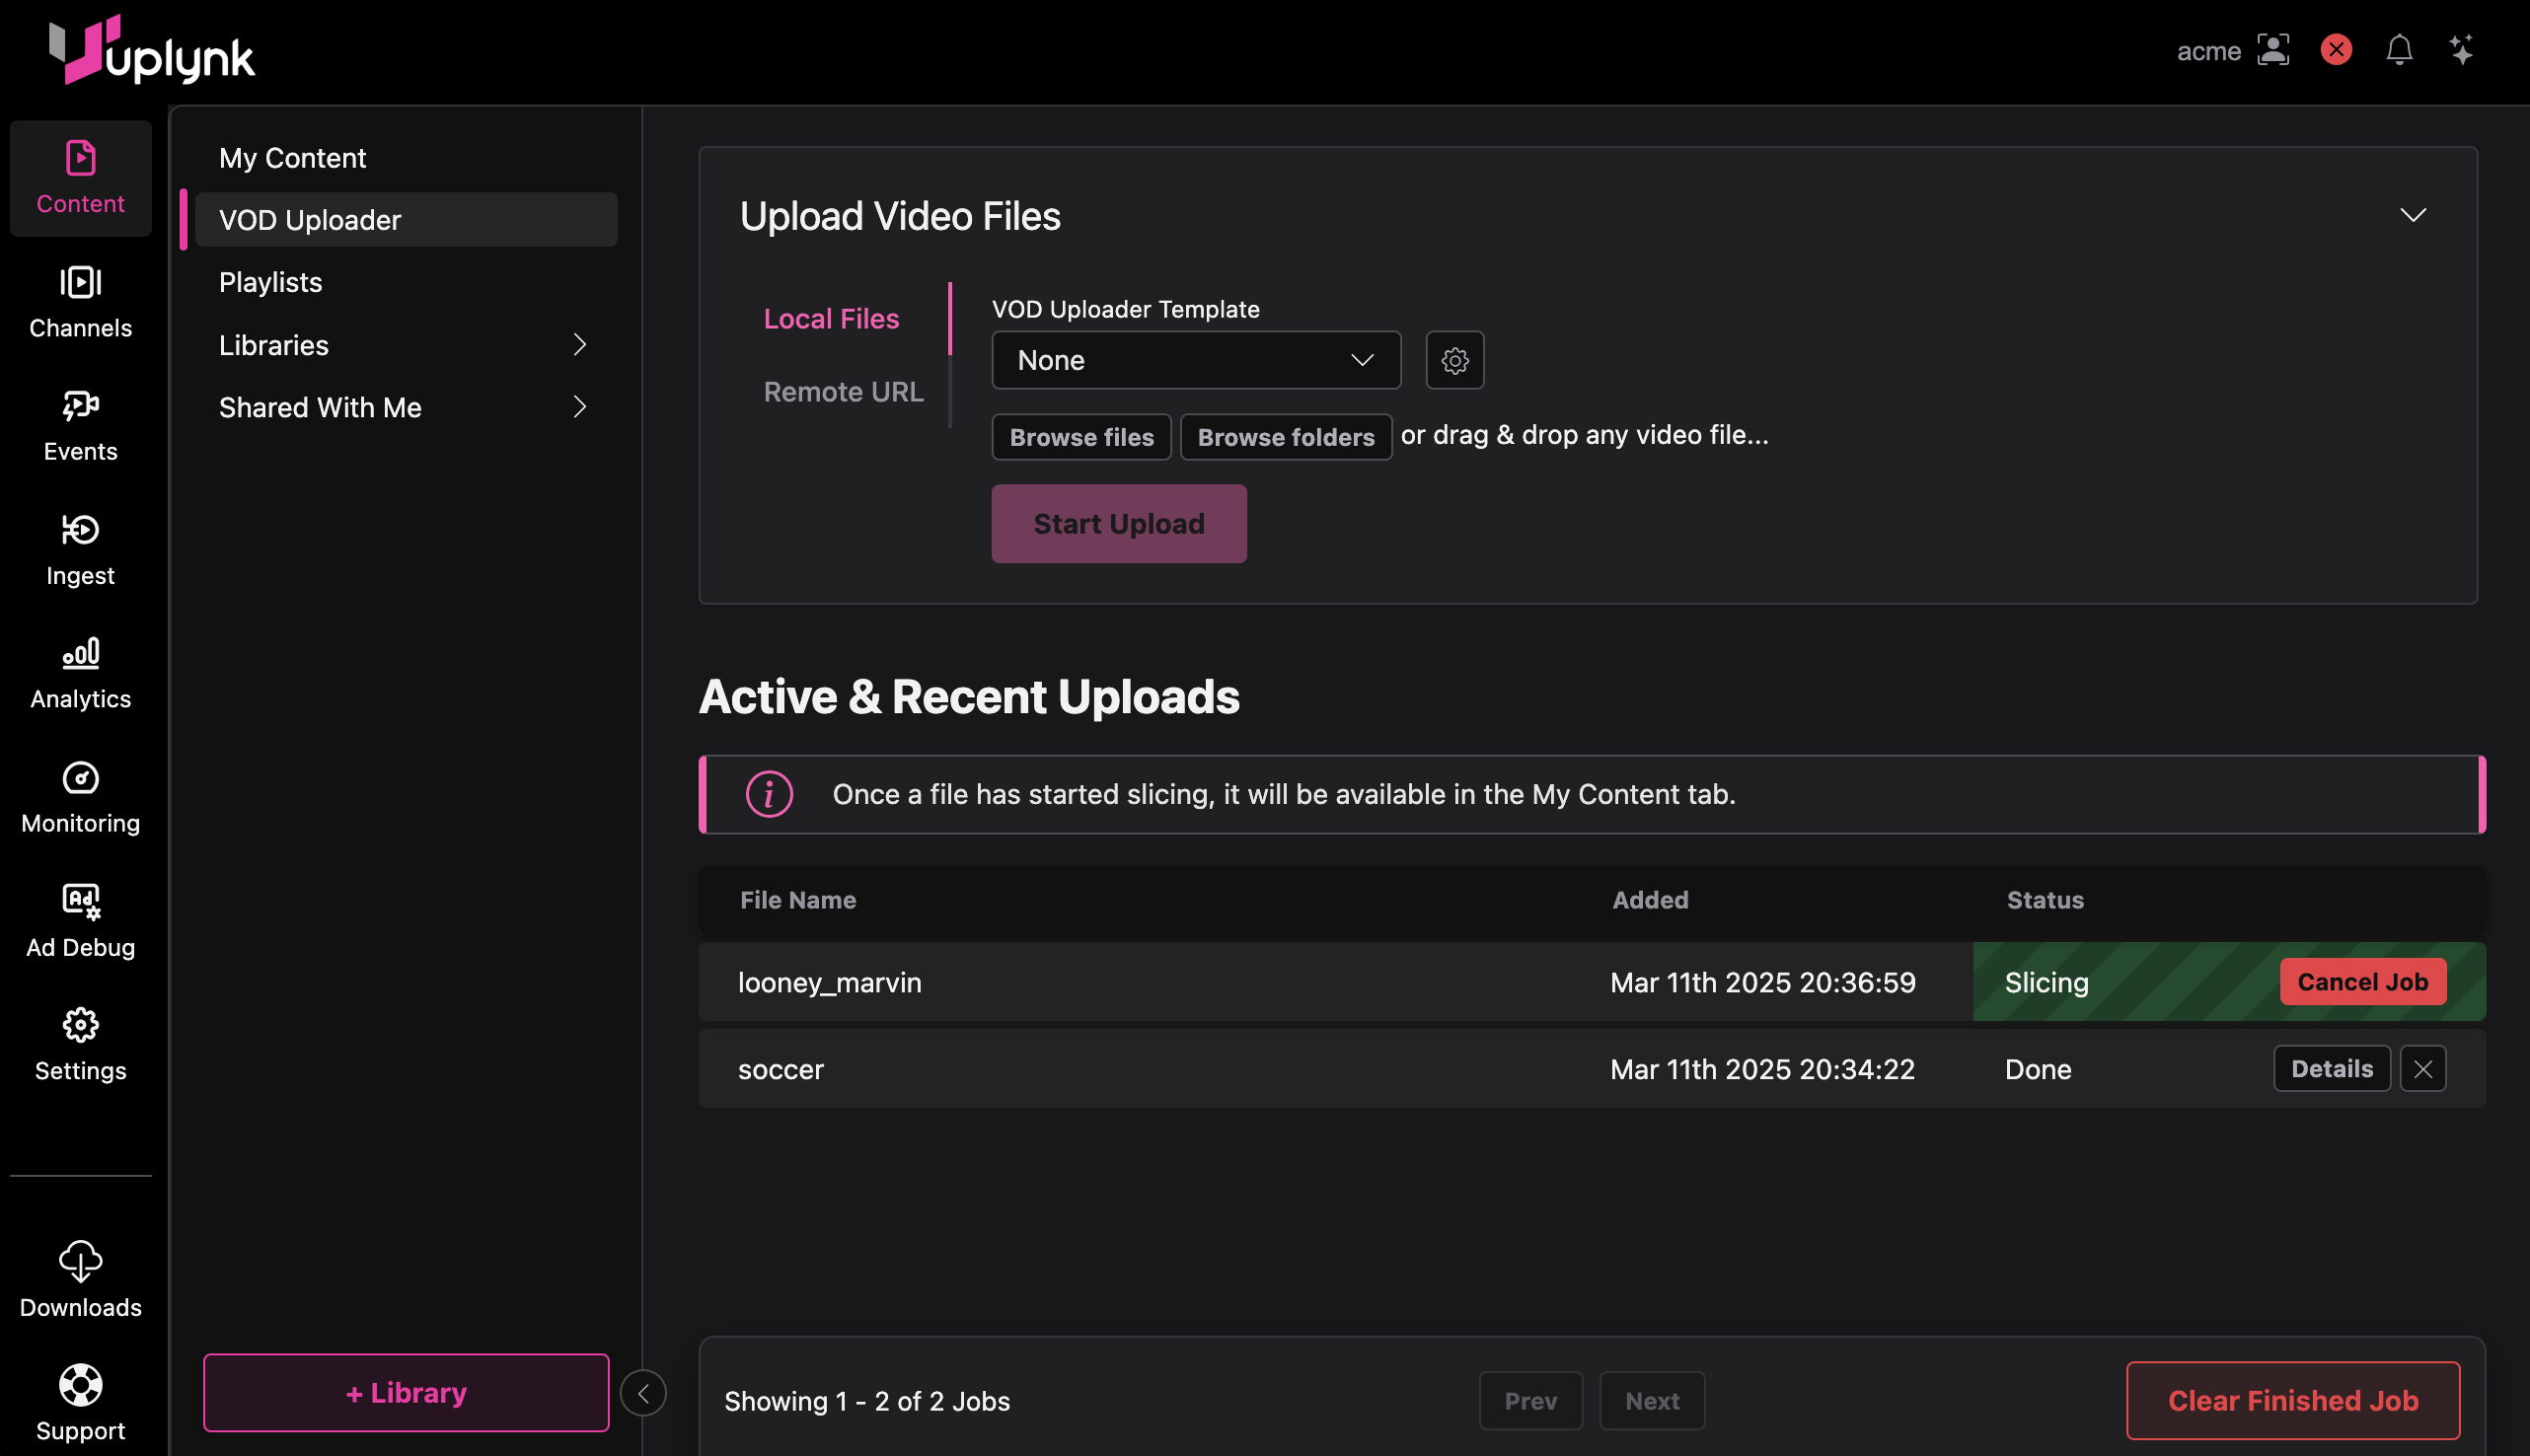
VOD Uploader
-
Navigate to theVOD Uploader Page by navigating to Content > VOD Uploader.
-
Add Media from Your Local Machine
- Verify that Local Files is selected.
- Perform one of the following steps:
- Drag and Drop: Drag and drop media anywhere on the page.
- Browse Files: Click Browse files, select the desired media files, and then click Open.
- Browse Folders: Click Browse folders, select a folder that contains the desired media, and then click Upload. When prompted, click Upload to confirm that all media files from that folder will be added to your CMS library.
- Optional: Select a VOD Uploader template to apply to all local files in your upload queue.
- Optional: Define an external ID, ad breaks, metadata fields, or timed metadata for one or more file(s) in your upload queue:
- Click Customize next to the desired file.
- Define the desired settings.
- Click Save.
-
Add Media from a Public HTTP/HTTPS URL or a Private S3 Bucket
-
Select Remote URL and then:
-
Type a URL that points to either the desired media file or a folder that contains the set of media files that will be uploaded.
-
Dropbox: If uploading media from Dropbox, change the query string from
?dl=0to?dl=1. -
Amazon S3:
- For a public S3 bucket, proceed to the next step.
- For a private S3 bucket using a S3 URI, provide your access key ID and secret access key in the Key and Secret fields, respectively.
-
-
Optional: If your previous attempt to upload this content failed, clear the Overwrite existing files option to prevent previously uploaded files from being uploaded again.
-
-
Start the Upload
- Click Start Upload. The VOD Uploader will upload and then encode your content. Track the progress in the Active & Recent Uploads section.
- Once you start a job, you may safely navigate to another page while VOD Uploader processes your content.
VOD Uploader Template
Apply a base set of Slicebot configuration settings to uploaded content by assigning a VOD Uploader template. A VOD Uploader template contains the following Slicebot configuration settings:
Add to Libraries | Auto Expire Hours | Auto Replace | Forced Aspect Ratio | Mix Audio Tracks | Poster Size | Poster Offset | Skip Playback Token
Create a VOD Uploader Template
-
Navigate to the VOD Uploader Templates Page by navigating to Settings > VOD Uploader Templates.
-
Add a New Template
- Click + Add Template.
- In the Template Name field, assign a name to this VOD Uploader template.
- Define the desired settings.
- Click Save.
Modify a VOD Uploader Template
-
Navigate to the VOD Uploader Templates Page by navigating to Settings > VOD Uploader Templates.
-
Edit the Template
- Click on the desired template.
- Modify the desired settings.
- Click Save.
Delete a VOD Uploader Template
-
Navigate to the VOD Uploader Templates Page by navigating to Settings > VOD Uploader Templates.
-
Delete the Template
- Click on the desired template.
- Click Delete.
Format
VOD Uploader, the Slicer, and Slicebot are compatible with standard audio/video file formats (e.g., mov, mpeg/mpg, avi, m4v, and mkv).
Recommended codecs/container
- Video Codec: H.264 or H.265
- Audio Codec: AAC
- Container: MP4
Encoding Profiles
By default, audio/video will be encoded using the HD 720p25/30 encoding profile. This encoding profile has a maximum resolution of 1280x720. Please contact your account manager if you would like to upgrade to a different encoding profile.
Learn more about Encoding Profiles.
Color Space
By default, an asset's color standard is converted to either HDR10 or SDR according to whether your encoding profile supports HDR.
| Encoding Profile | Color Standard (Source) | Color Standard (Output) |
|---|---|---|
| HDR | Hybrid Log-Gamma (HLG), HDR, or SDR | HDR10 |
| SDR | HLG, HDR, or SDR | SDR |
Custom Color Representation
Customize color representation conversion by assigning a lookup table (LUT) to the desired color space conversion. Define this mapping through the rgb_lut setting.
Key Information
-
Verify that your LUT adheres to Adobe's Cube LUT Specification 1.0.
-
You may define multiple RGB LUTs to adjust for different input assets. The output asset's color standard (i.e., HDR10 or SDR) determines the configuration that will be used. If multiple LUTs have been defined for that color standard, the configuration that best matches the input asset's color space and range will be used.
-
By default, the output asset's color space uses a narrow (i.e., limited) range (16 - 235). You may define the desired range when configuring the
rgb_lutsetting.Slicer Example
The following configuration uses a custom LUT to generate an HDR 10 asset with a full range when the input asset is HLG:
-rgb_lut hlg hdr10,full /path/mylut.cube -
Alternatively, you may explicitly define a color space, a color primary, the transformation characteristics, and the range.
Slicer Example
The following configuration is equivalent to the above sample configuration:
-rgb_lut colorspace:bt2020nc,primaries:bt2020,trc:arib-std-b67,range:tv colorspace:bt2020nc,primaries:bt2020,trc:smpte2084,range:pc /path/mylut.cube
View Slicer syntax information.
Audio Codec
By default, your media's audio is encoded using the Advanced Audio Coding (AAC) audio codec. However, you may configure it to encode an audio track into Dolby Digital Plus (DD+) and AAC subtracks by passing the dolby switch.
Default Channel Layout for Dolby
C L R RL RR LFE
If the source audio track is stereo, then the subtrack will contain 4 muted channels (i.e., C RL RR LFE). If the source audio track contains more than 6 channels, then it will be automatically downmixed to Dolby 5.1.
Use the mix and nexttrack switches to apply a custom mix to your audio subtracks. For example, if your source audio track contains 8 channels, you may use the mix switch to map the first 6 channels to 5.1 and the last two channels to stereo.
Slicer Examples
This first example generates an audio track that contains AAC and Dolby 5.1 subtracks:
./slicer ... -audiodesc english -dolby -atrack 0
This second example generates these audio tracks:
- Track 1: AAC and Dolby 5.1 subtracks
- Track 2: AAC subtrack
./slicer ... -audiodesc english -dolby -atrack 0 -audiodesc sap -atrack 1
This third example generates AAC and Dolby 5.1 subtracks for both audio tracks:
./slicer ... -audiodesc english -dolby -atrack 0 -audiodesc sap -dolby -atrack 1
Add Multiple Audio Tracks
Use the following Slicer syntax to associate multiple audio tracks with a video:
... -audiodesc "Value 1" -lang Value 1 -atrack Value 1 -audiodesc "Value 2" -lang Value 2 -atrack Value 2 -audiodesc "Value 3" -lang Value 3 -atrack Value 3 ...
Example
./slicer -u joe -apikey abcDEFghiJKLmnoPQRtuvWXYz123ABCdefGHIJKL ..\Videos\marketing.mp4 -audiodesc "First Track" -lang en -atrack 0 -audiodesc "Second Track" -lang sp -atrack 1 -audiodesc "Third Track" -lang fr -atrack 2
Slicer Command Line
VOD Uploader provides an easy way to add content to the library. An alternative method that allows more flexibility when adding content is the command line mode.
Add Content through the Command Line
- Open the command prompt.
- Navigate to the directory where the Slicer was installed.
- Launch the Slicer by passing your credentials and the path to the desired on-demand content.
Syntax
./slicer -u UserName -apikey APIKey MediaFile(RelativePath) AdditionalOptions
The progress of this job will be reported in both the command line and the CMS.
Locate API Keys
- Navigate to the Integration Keys page by clicking the Settings tab and then clicking Integration Keys from the side navigation tab.
- Your API key(s) are listed under the API Keys section.
Options
| Option | Description | ||
|---|---|---|---|
-addtrack | Adds the audio from the specified file as an alternate audio track for the specified beam. Syntax: `-addtrack BeamID | ext:ExternalID TrackDescription<br /> **Example**:-addtrack b123 | ext:me3 Event3` |
-apikey |
| ||
-atrack | Sets the source audio to the specified audio track. Syntax: -atrack AudioTrack# Example: -atrack 3 | ||
-atmos_pass_through | Replaces the Dolby 5.1 subtrack with the Dolby Digital Plus Atmos track from the asset being sliced. Example: -dolby -atmos_pass_through | ||
-audiodesc | Defines a description for the audio track. Typically, this description indicates the track's language. Syntax: -audiodesc Description Example: -audiodesc English | ||
-autoexpire | Sets the asset's retention period. The asset will be automatically deleted after the specified time expires. Syntax: -autoexpire Hours Example: -autoexpire 3 | ||
-break | Inserts an ad break for each specified time range. Syntax: -break StartTime-StopTime (Single Ad Break) or -break StartTime1-StopTime1,StartTime2-StopTime2,StartTimeN-StopTimeN (Multiple Ad Breaks) Example: -break 10.1-30.58,105-151.332 | ||
-bug | Overlays an image on the video at the specified start time for the given duration. Syntax: -bug PNGFile=StartTime,Duration Example: -bug logo3.png=5000,20000 | ||
cc#_desc | Defines a description for the closed captioning channel defined by this setting's name. Syntax: cc#_desc: Closed Captioning Channel Description Example: cc1_desc: English | ||
cc#_lang | Identifies the language associated with the closed captioning channel defined by this setting's name. Syntax: cc#_lang: Closed Captioning Channel Language Example: cc1_lang: en | ||
-cleardash | Generates unencrypted DASH slices when slicing an asset. Example: -cleardash | ||
-d | Assigns a name to the asset generated from the source media. Example: -d "Marketing Event A" | ||
-dolby | Adds a Dolby 5.1 subtrack to the audio track. Example: -dolby | ||
-drm_mode | Determines the level of security that will be applied to a CMS asset generated by the Slicer. Syntax: -drm_mode Mode Example: -drm_mode studio | ||
-dvs | Flags the current audio track as a DVS track. Example: -dvs | ||
-encwait | Forces the Slicer to wait until encoding is completed before allowing it to quit. Example: -encwait | ||
-extid | Assigns an external ID to the asset generated from the source media. Example: -extid "MarketingEvent123" | ||
-fadein | Fades audio and/or video in from the specified start time. Syntax: -fadein MediaType=StartTime,Duration Example: -fadein audio=-5000,5000 | ||
-fadeout | Fades audio and/or video out from the specified start time. Syntax: -fadeout MediaType=StartTime,Duration Example: -fadeout audio=-5000,5000 | ||
-forceAR | Forces the output to use the specified aspect ratio (in pixels). Syntax: -forceAR Width:Height Example: -forceAR 640:480 | ||
-gain | Overrides the calculated gain/attenuation with the specified value. Syntax: -gain Decibel Example: -gain 2 | ||
-idpath | Writes the asset's GUID to the specified path. Example: -idpath /Users/joe/library/latest.txt | ||
-lang | Sets the audio track's language using the codes defined in RFC 5646. Syntax: -lang LanguageCode Example: -lang en-US | ||
-layout | Sets the audio layout for downmixed audio channels. Example: -layout dolby | ||
-libraries | Adds an asset to one or more shared libraries. Syntax: -libraries LibraryName or -libraries LibraryGUID or -libraries Library1,Library2,LibraryN Example: -libraries Marketing | ||
-meta | Adds metadata to the asset. Syntax: -meta Field=Value Example: -meta Description="Marketing Video" | ||
-meta.file | Adds the metadata fields defined in a JSON file to the asset. Syntax: -meta.file JSONFile Example: -meta.file MarketingFields.json | ||
-meta.int | Adds metadata containing an integer value to the asset. Syntax: -meta.int Field=Integer Example: -meta.int Rating=9 | ||
-mix | Customizes how an audio subtrack is mixed. Syntax: `-mix 'Audio Codec=Channel Layout | Channel=Source Track:Source Channel@Level,...'<br /> **Example**:-mix 'dolby=5.1 | L=0:0,R=0:1,...'` |
-mixatracks | Mixes multiple audio tracks together into a single track. Syntax: -mixatracks Track=Channel,Track=Channel,... Example: -mixatracks 0=L,1=R | ||
-nexttrack | Closes the mix definition for the current audio track. Example: -nexttrack | ||
-nielsen | Enables scanning for Nielsen audio watermarks. Syntax: -nielsen 1 Example: -nielsen 1 | ||
-nielsen_ad_mode | Sets the Nielsen Breakout Code. Syntax: -nielsen_ad_mode NielsenBreakoutCode Example: -nielsen_ad_mode 03 | ||
-output_ttml | Outputs a fragmented TTML. Example: -output_ttml | ||
-p | Deprecated. Please use the apikey option or the SLICER_APIKEY environment variable instead. Example: -p 1@D208PneG63f | ||
-poster | Generates a poster image from the video frame corresponding to the specified time. Syntax: -poster Time Example: -poster 5000 | ||
-poster_montage | Generates a montage of stills from the video frames corresponding to the specified times. Syntax: -poster_montage Time1,Time2,... Example: -poster_montage 5000,10000,... | ||
-poster_frame | Extracts an image from the video frame at the specified time, but does not create an asset. Syntax: -poster_frame Time Example: -poster_frame 5000 | ||
-prev_assetid | Registers the asset being created as the new version of the specified existing asset. Syntax: -prev_assetid AssetGUID Example: `-prev_assetid "{12345678-1234-1234-1234-123456789012} | ||
-prev_trackid | Registers the audio track being created as the new version of the specified existing track. Syntax: -prev_trackid AudioTrackGUID Example: `-prev_trackid "{12345678-1234-1234-1234-123456789012} | ||
-proxy | Uploads the file specified by the proxy path as the asset's proxy. Syntax: -proxy ProxyPath Example: -proxy /path/to/proxy.mp4 | ||
-s3 | Registers the asset as an Amazon S3 upload. Example: -s3 | ||
-skip | Skips the video or audio encoding step, relying on the encoded data from the previous slicing operation. Example: -skip | ||
-split | Divides the output asset into multiple files, each with the specified duration (in seconds). Syntax: -split Duration Example: -split 600 | ||
-split_in | Generates individual output files corresponding to the specified input file segments. Syntax: -split_in Start1-End1,Start2-End2,... Example: -split_in 0:0-0:30,0:40-1:00 | ||
-srt | Imports a .srt subtitle file into the generated asset. Syntax: -srt SRTFile Example: -srt /path/to/file.srt | ||
-stereodownmix | Downmixes the input audio to stereo, regardless of the source's original channel layout. Example: -stereodownmix | ||
-thumb | Generates a thumbnail image from the video frame corresponding to the specified time. Syntax: -thumb Time Example: -thumb 5000 | ||
-trim_in | Removes video and audio from the start of the media, up to the specified time. Syntax: -trim_in StartTime Example: -trim_in 5000 | ||
-trim_out | Removes video and audio from the end of the media, starting at the specified time. Syntax: -trim_out StopTime Example: -trim_out 5000 | ||
-u |
| ||
-v | Assigns the asset version. Syntax: -v AssetVersion Example: -v 2.3 | ||
-volnorm | Normalizes the volume level across all input channels. Example: -volnorm | ||
-wav | Extracts the audio data from the specified asset and saves it as a .wav file. Syntax: -wav Filename.wav Example: -wav output.wav | ||
-x | Deprecated. Please use the extid option instead. Example: -x "MarketingEvent123" |
Updated 10 months ago