
Configure Slicer Failover
Create a failover group, configure and prioritise its Live Slicers, and map the group to a channel.
Configuration
Step 1: Create the Channel in the CMS
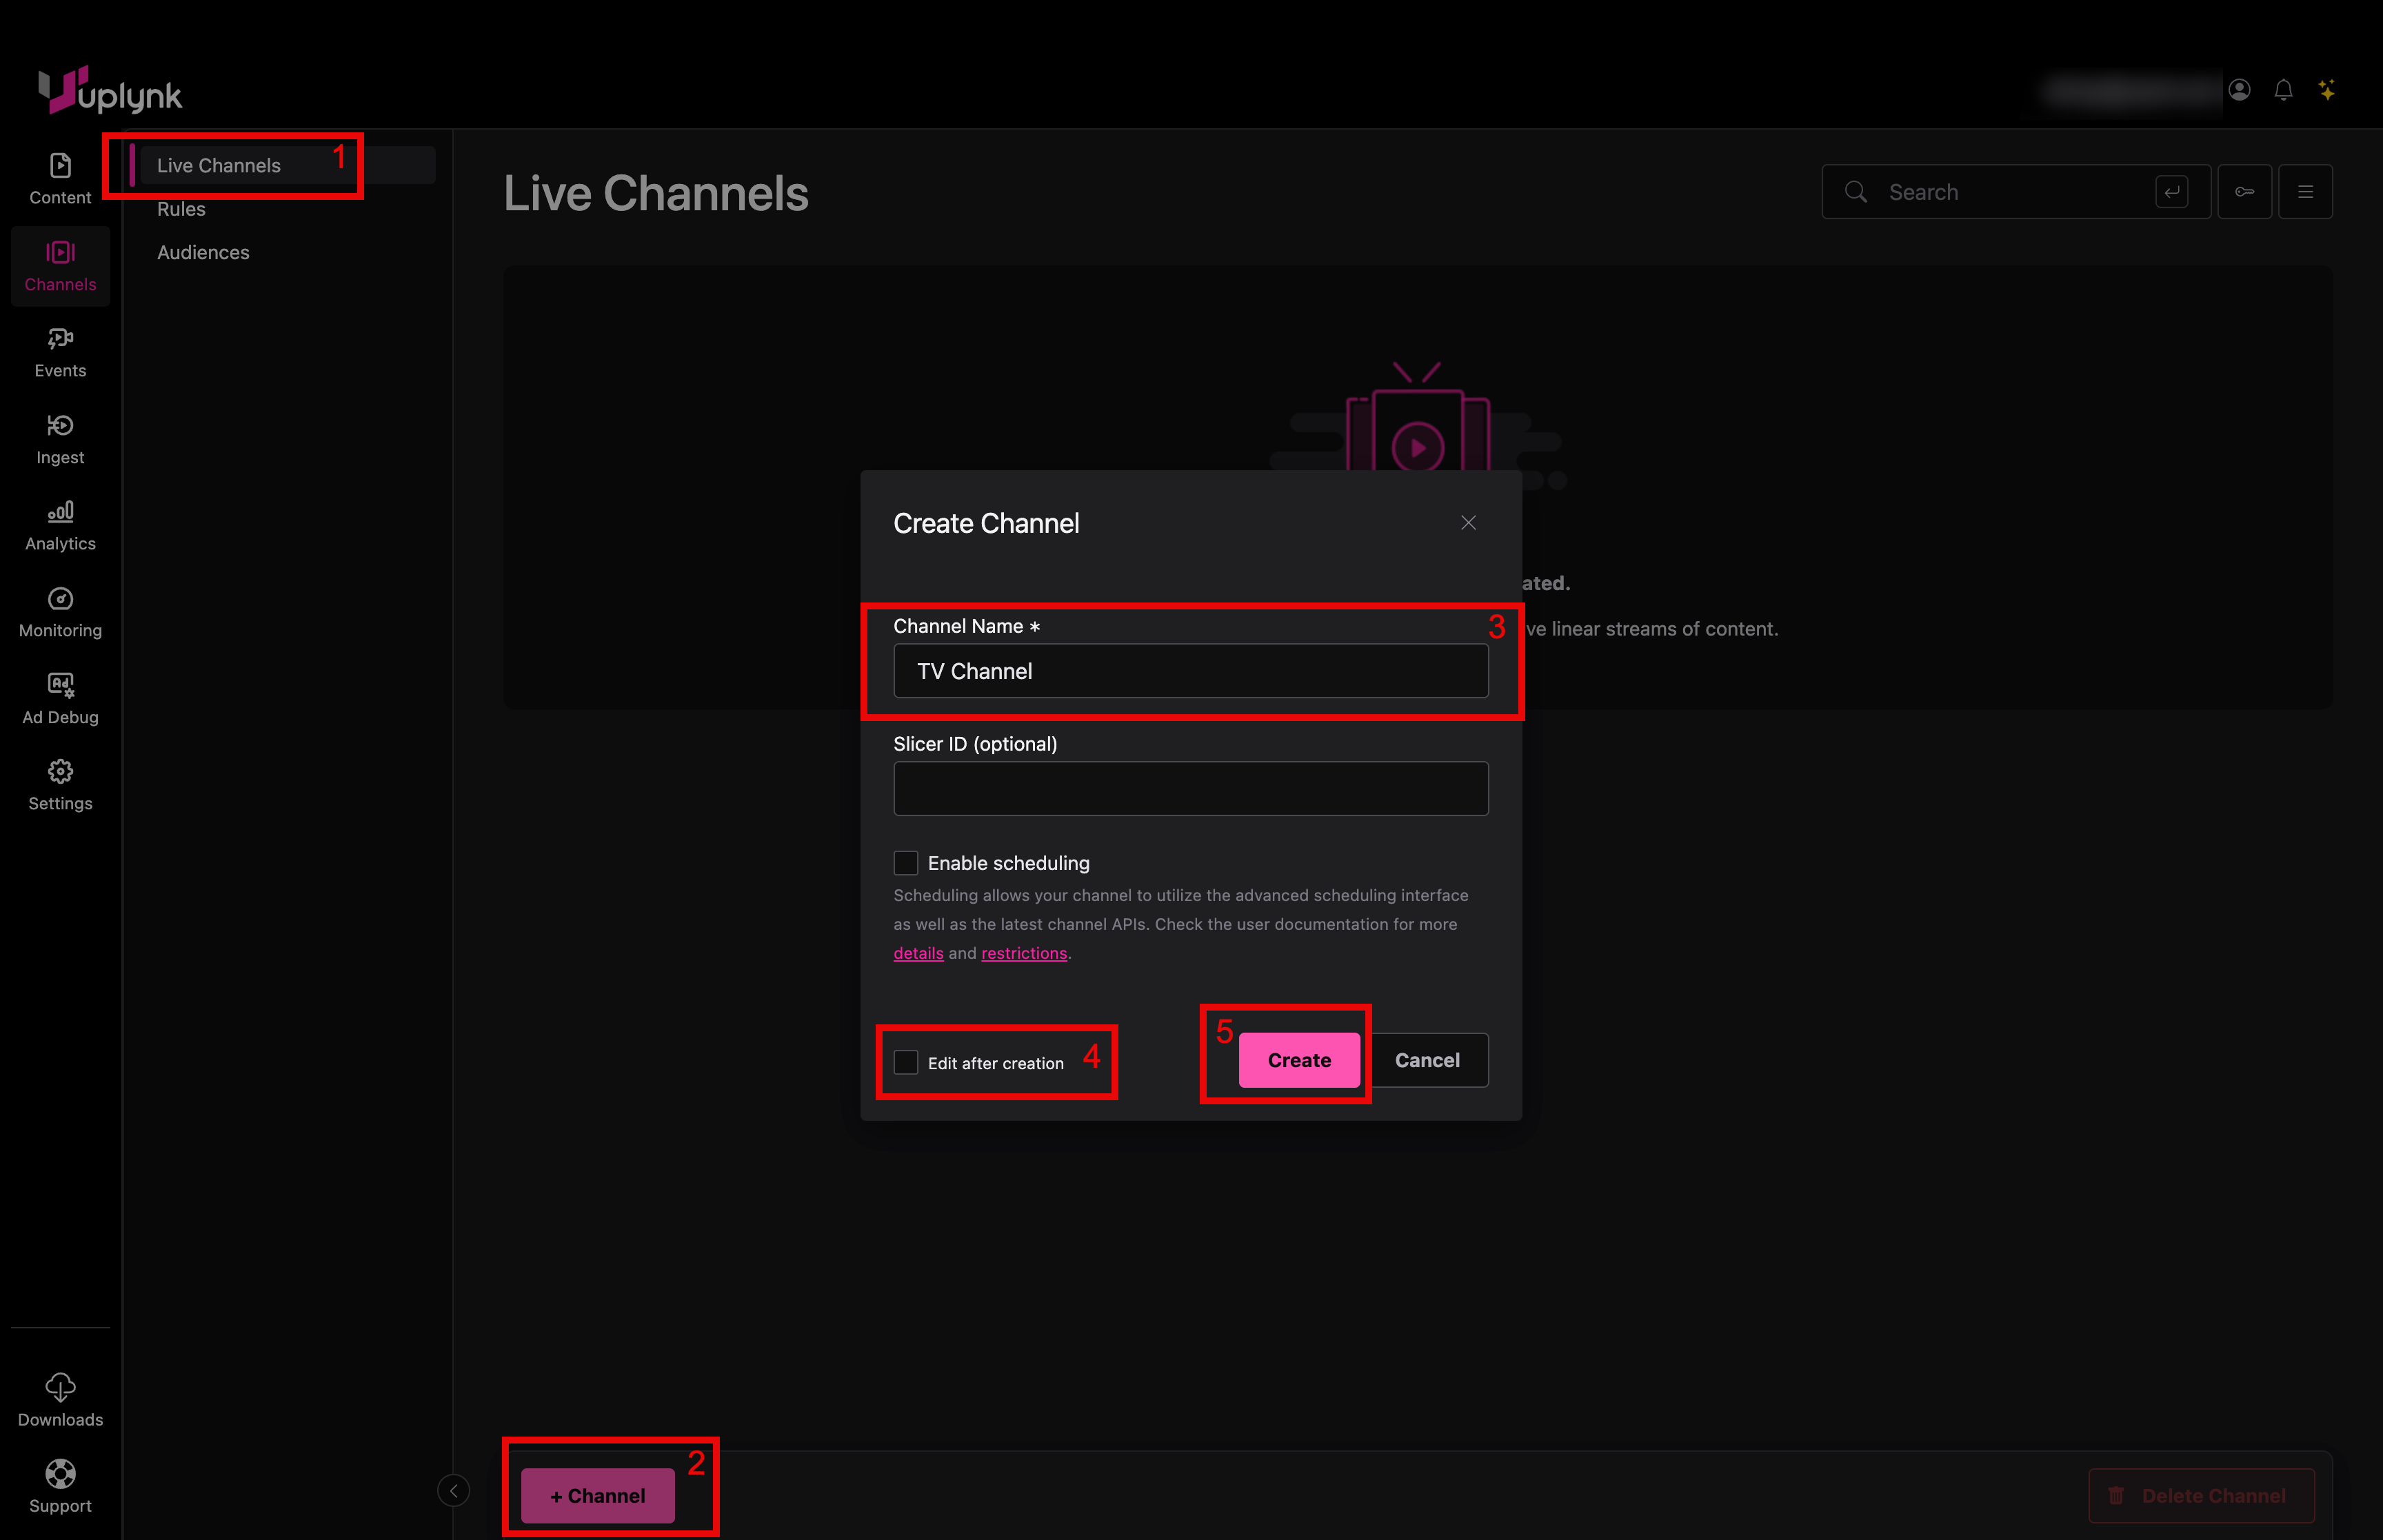
- Go to the Channels tab in the CMS.
- Select + Channel.
- Enter a Channel Name, leaving Slicer ID blank.
- Deselect Edit after creation.
- Select Create.
Step 2: Define the Failover Group in the CMS
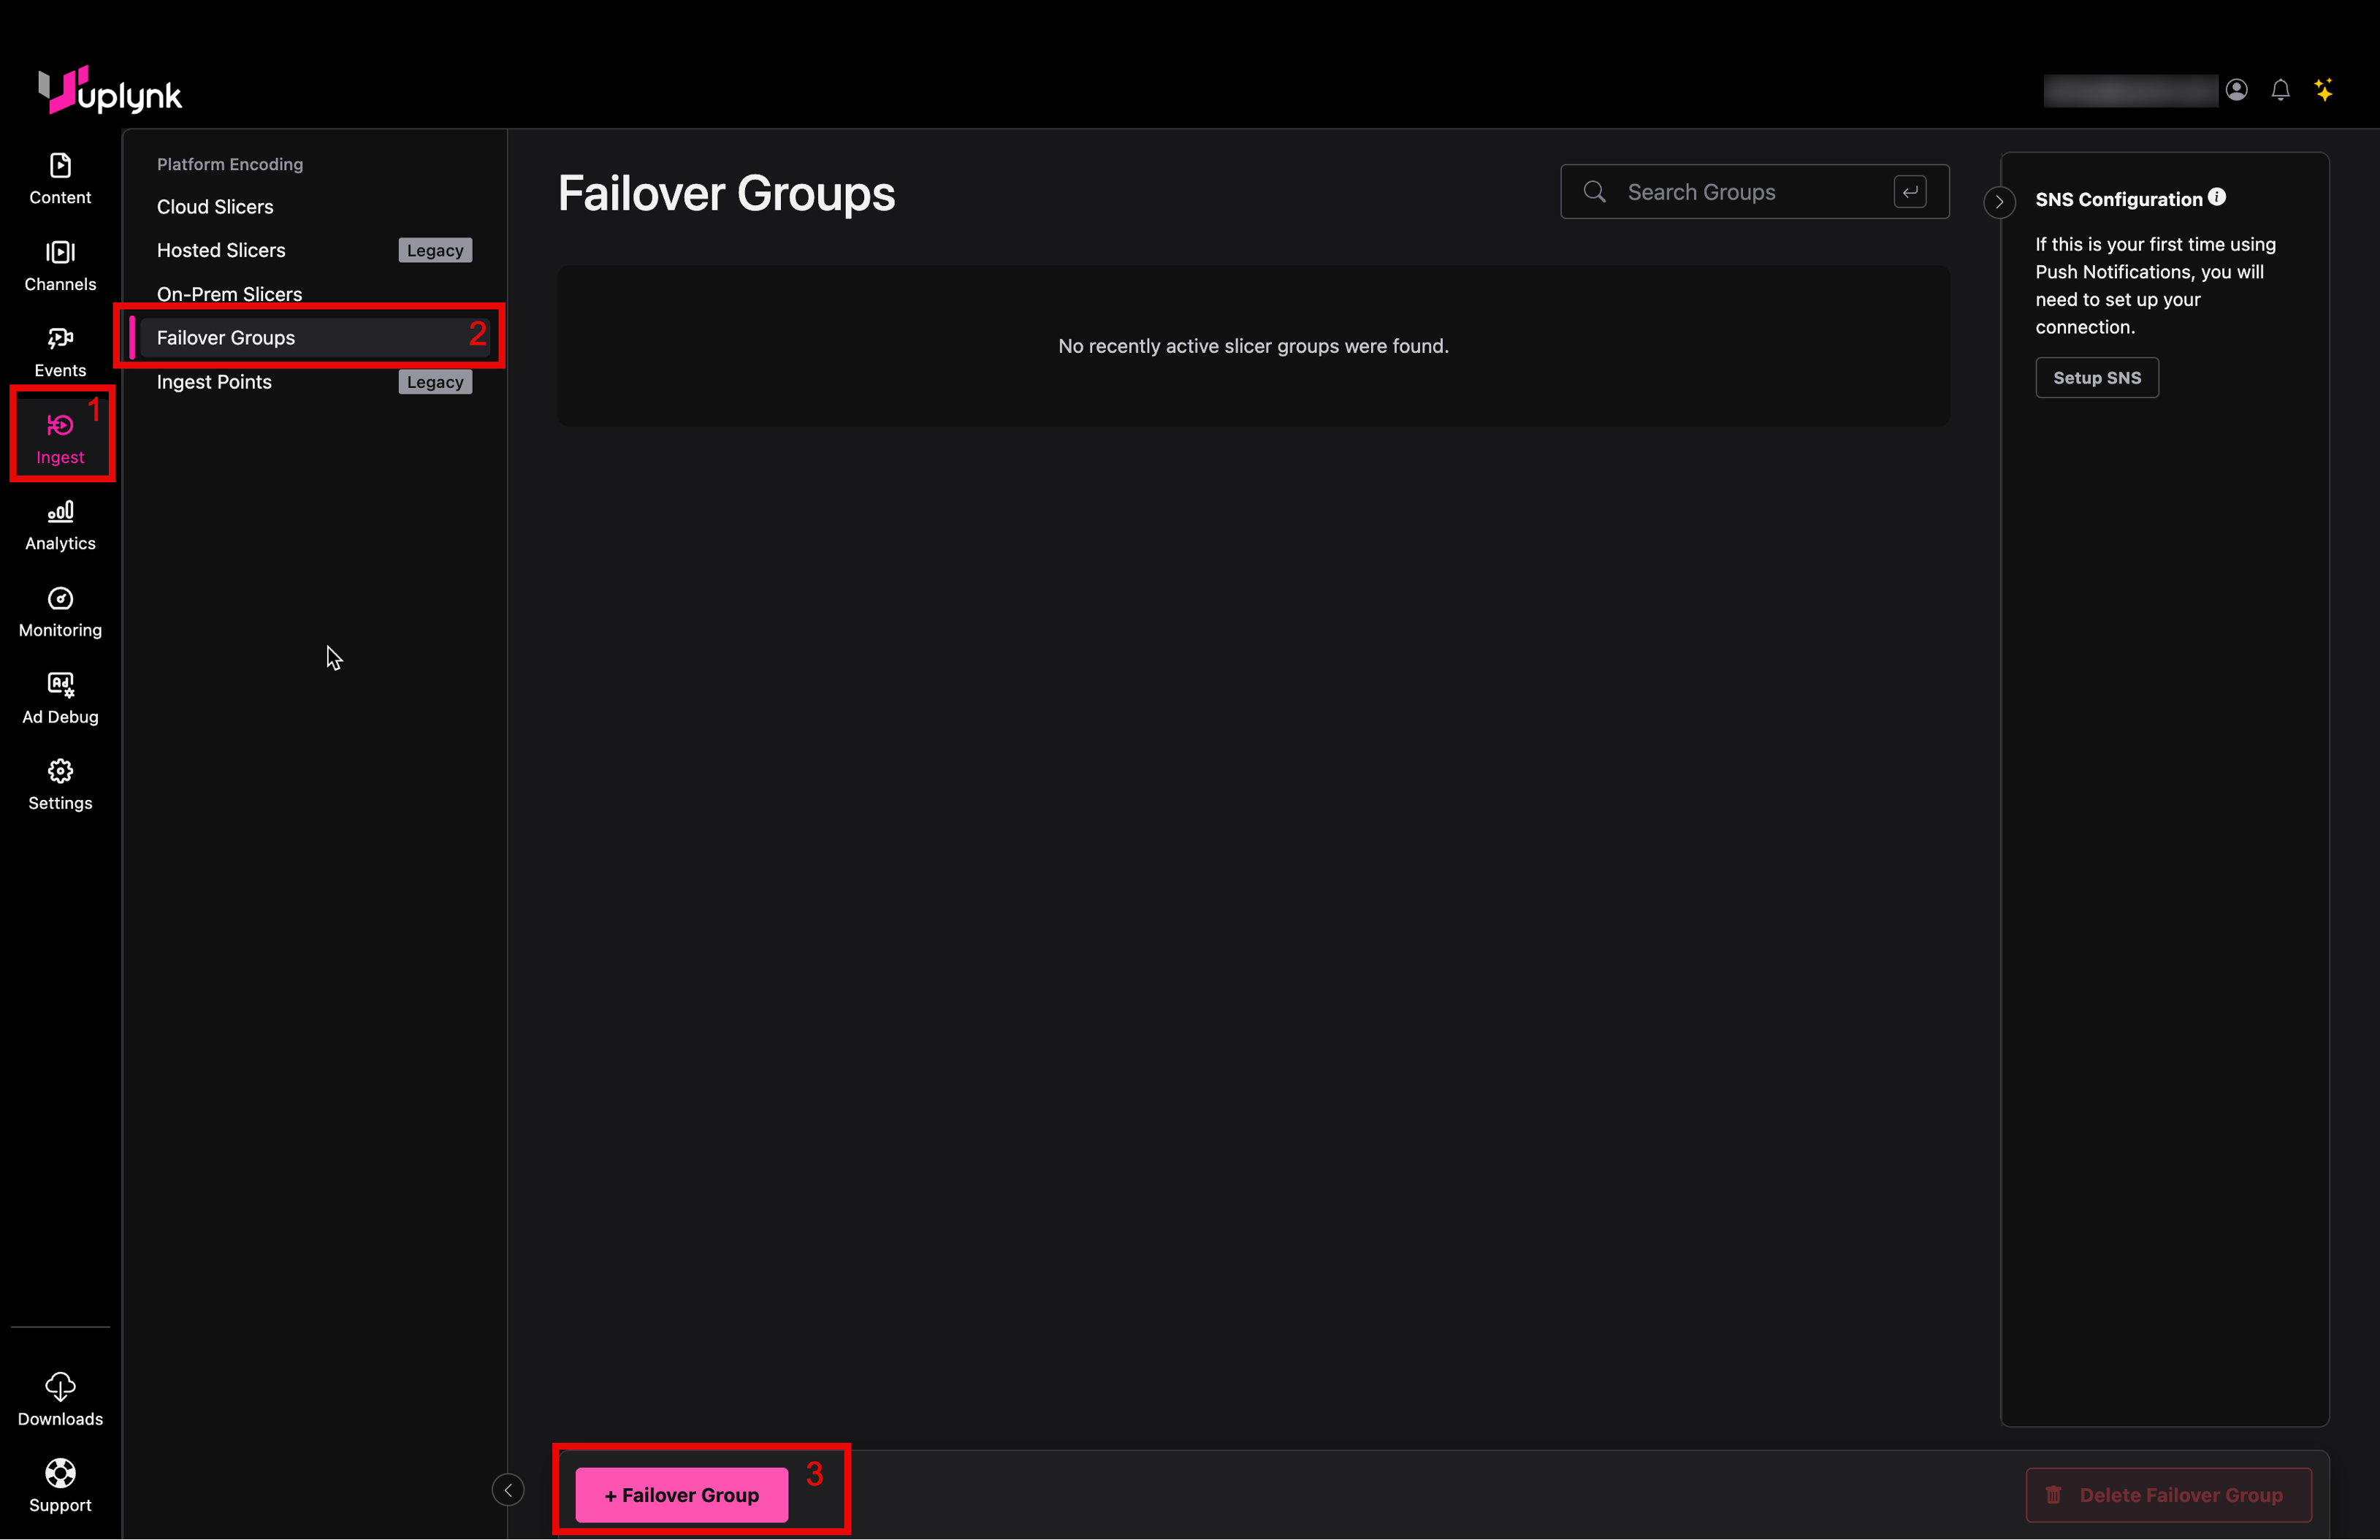
- Go to the Ingest tab in the CMS.
- Select Failover Group.
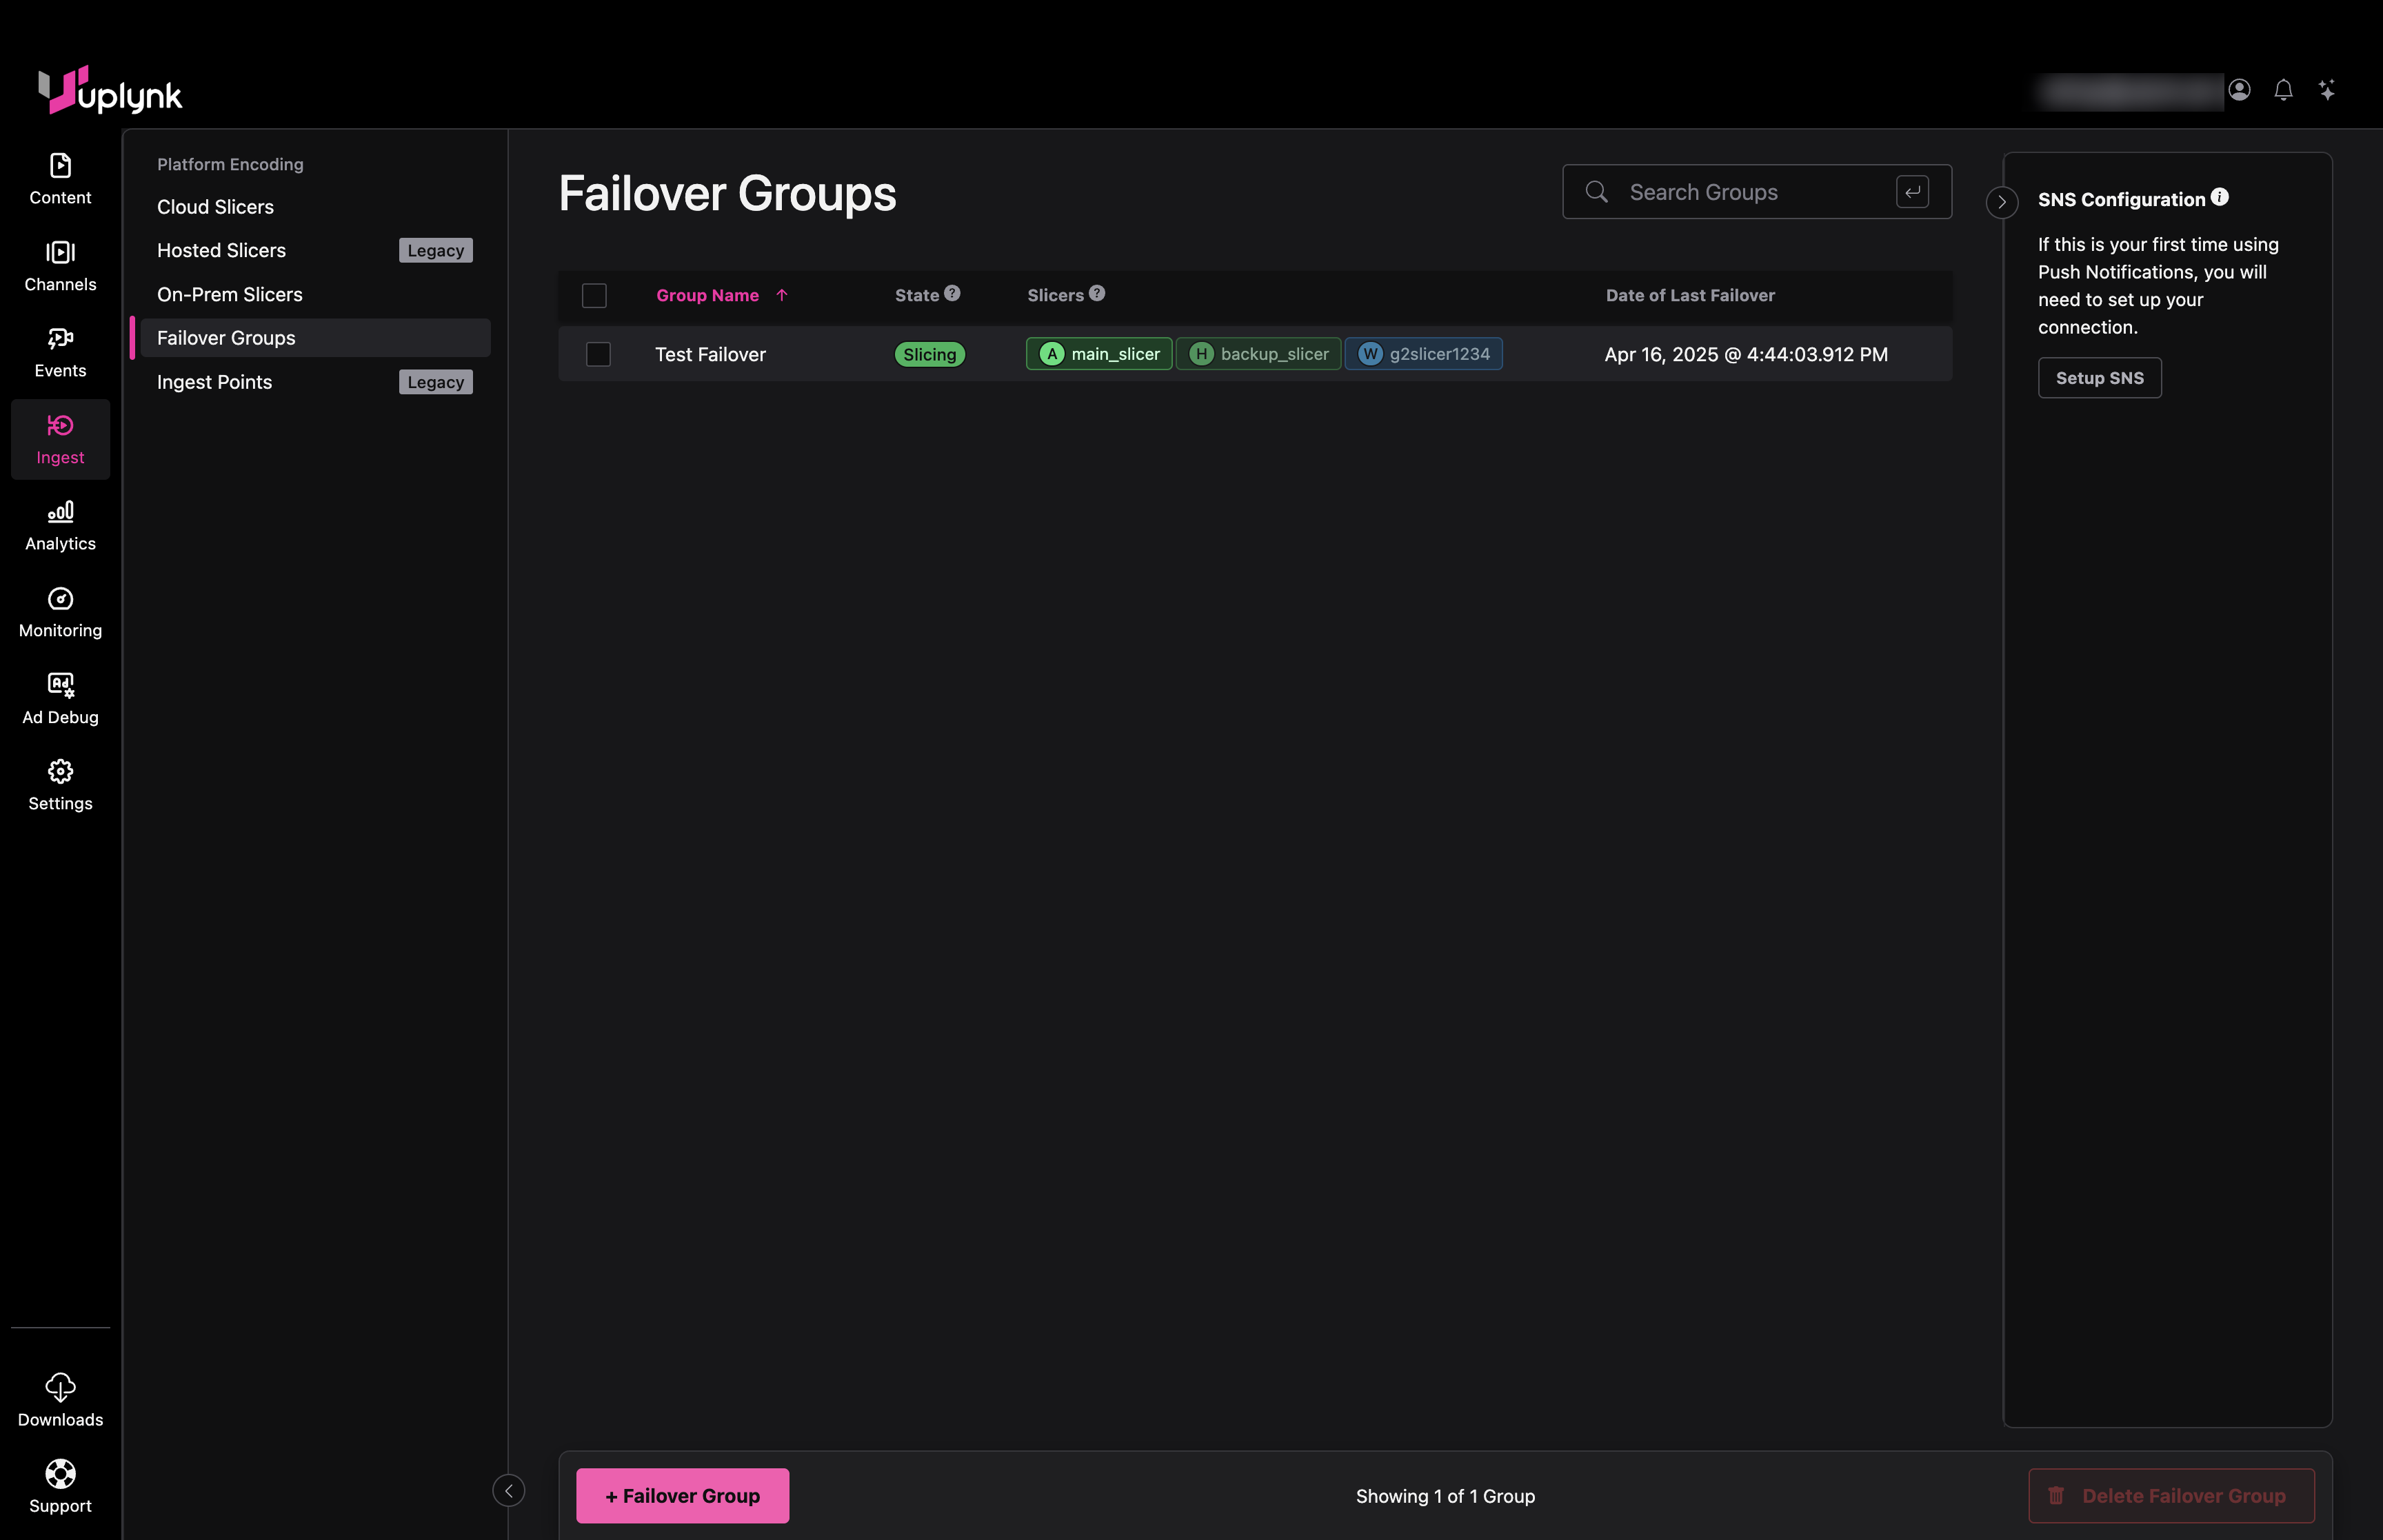
- Select + Failover Group.
- Enter a Failover Group Name.
- Select Create.
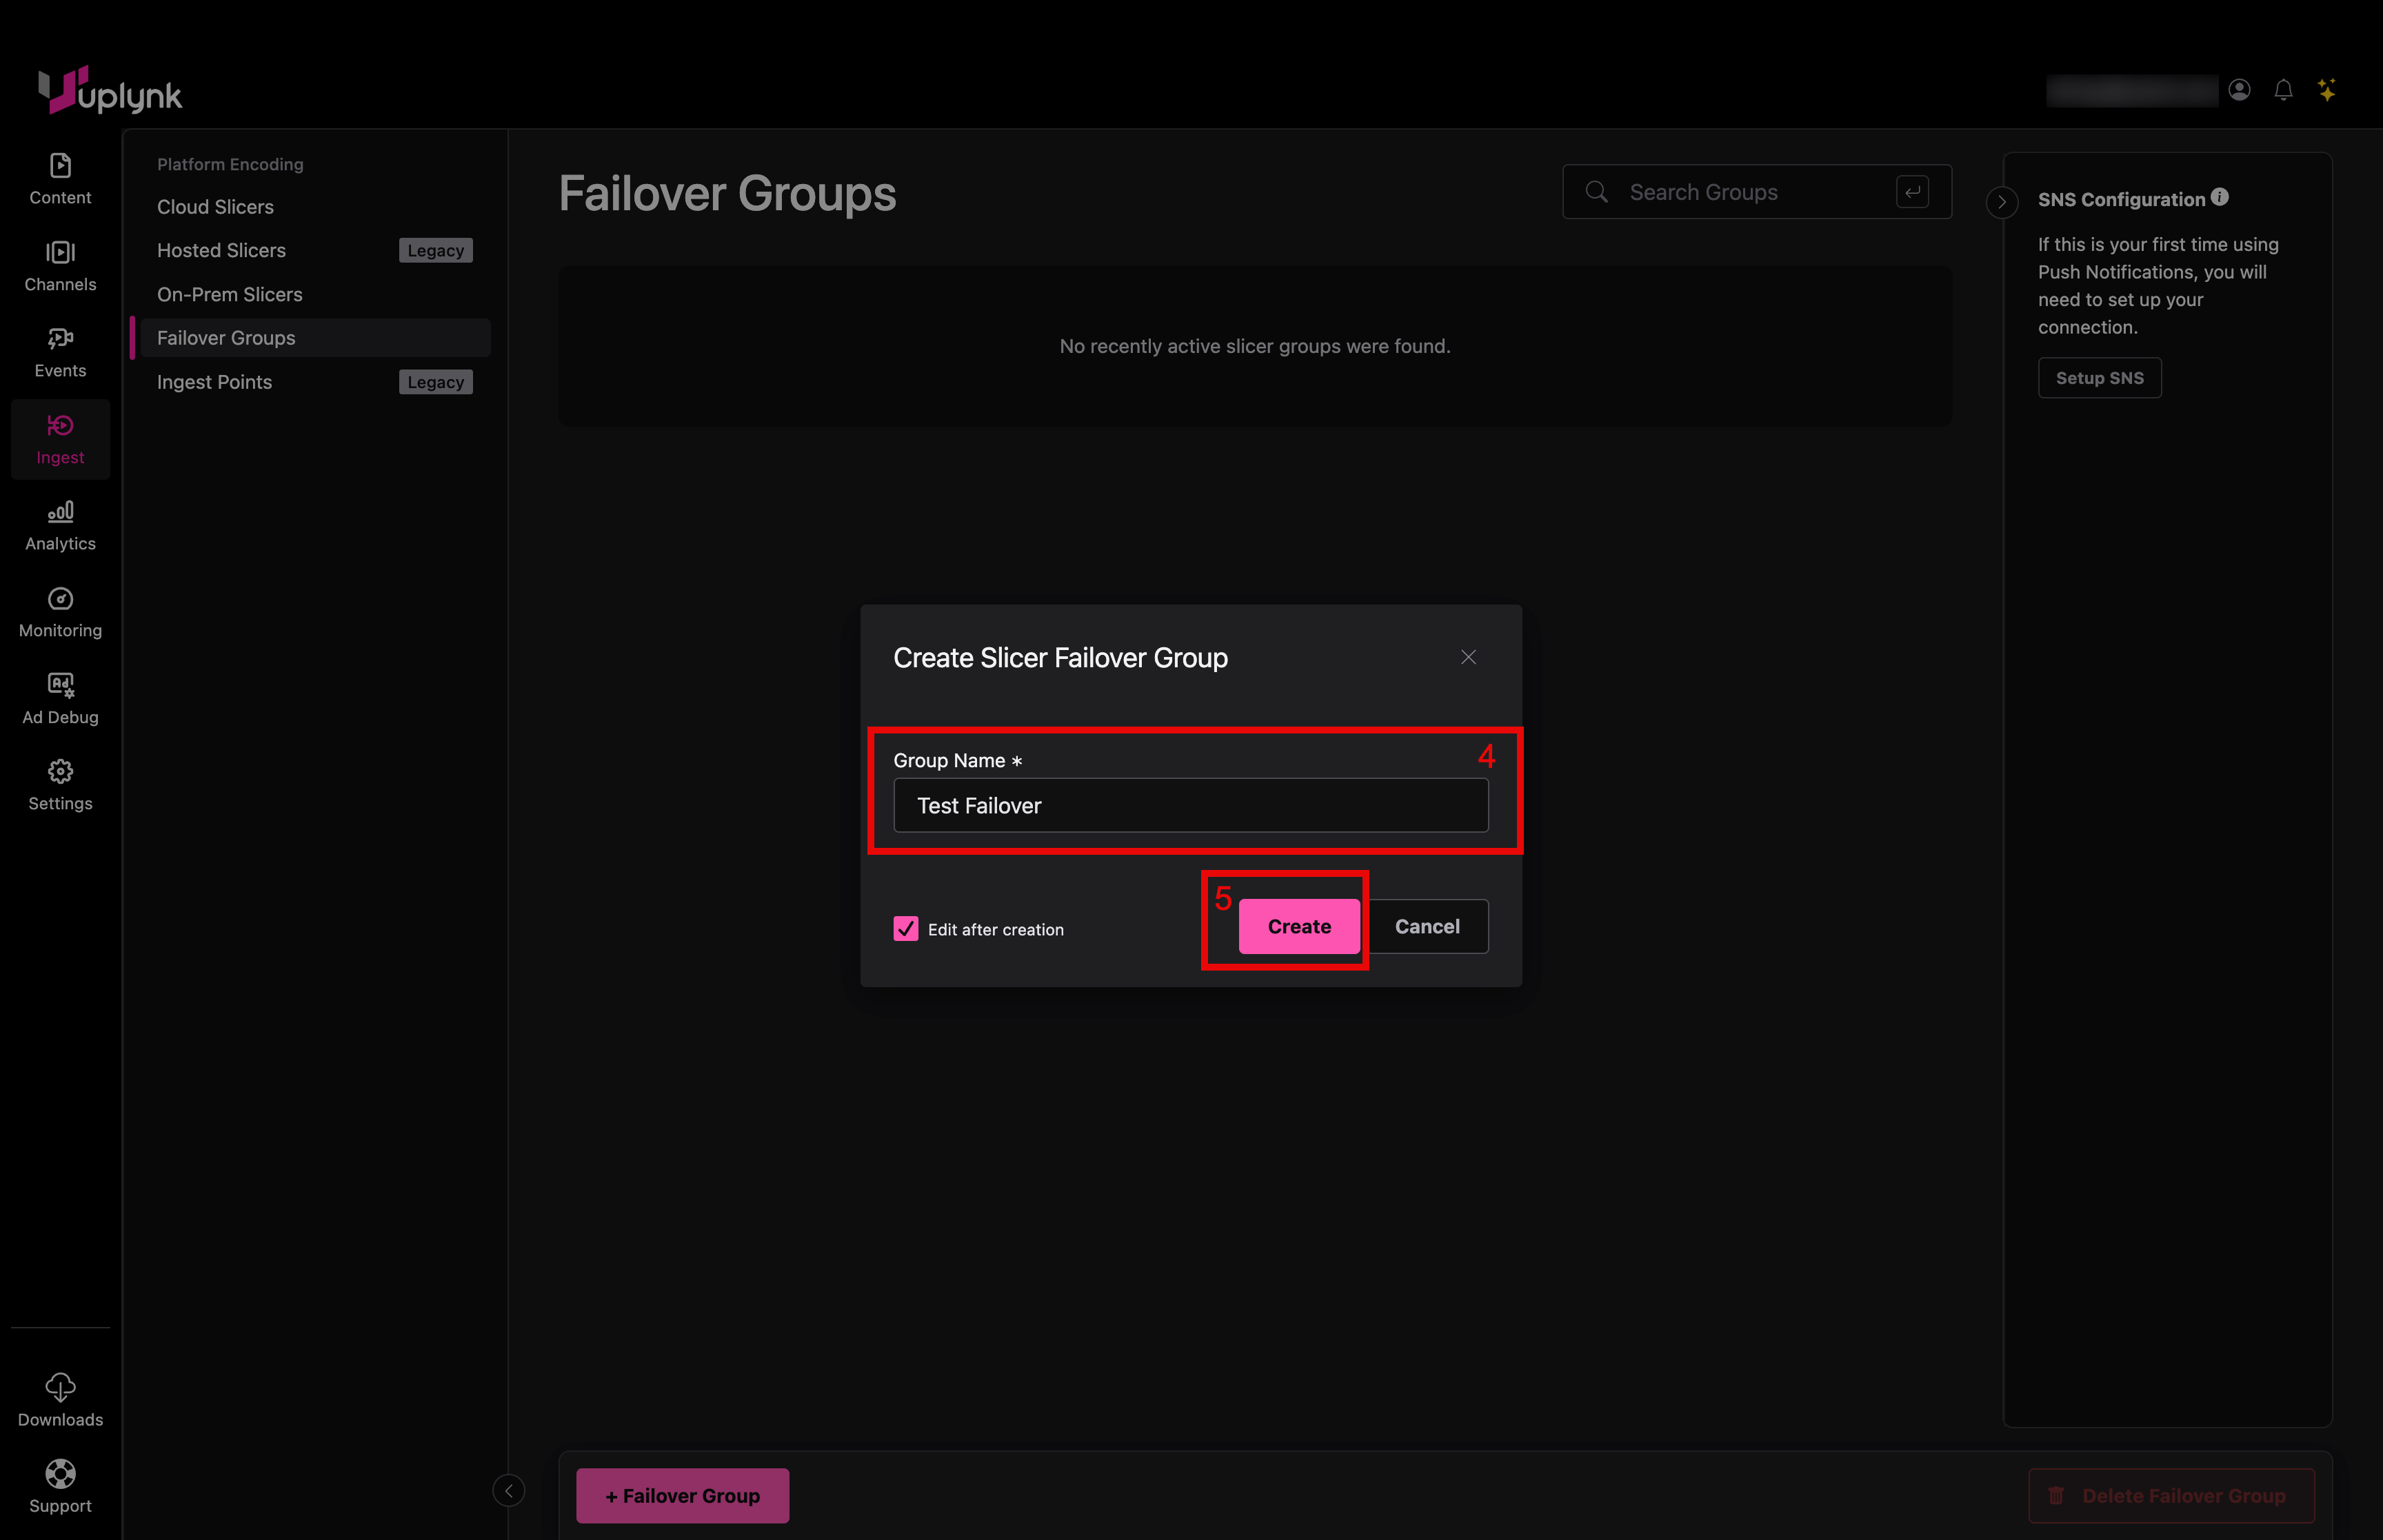
- Note the Failover Group ID, which uniquely identifies the Failover Group (not the Failover Group Name).
Step 3: Configure the Slicers in the Failover Group
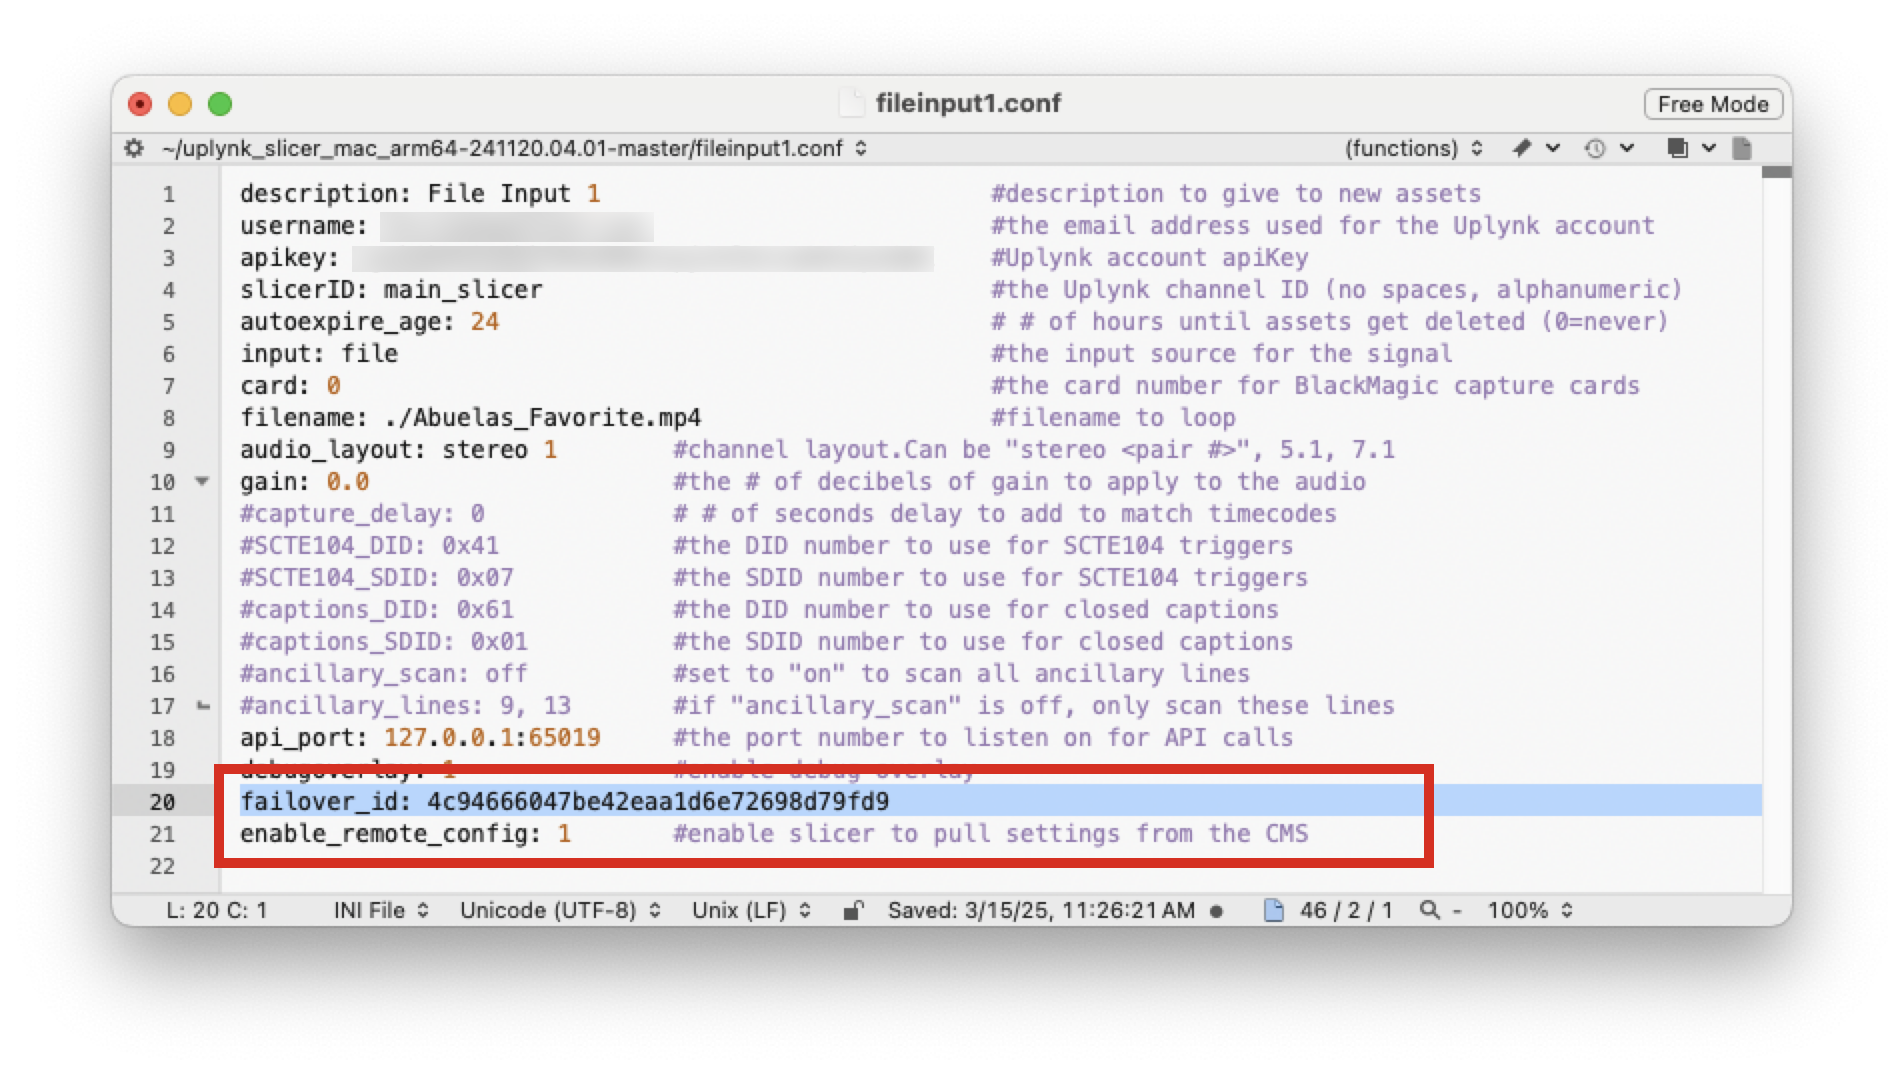
- To indicate that the Slicer should pull configurations from the CMS, add
enable_remote_config: 1to the configuration file. This can be placed anywhere in the file, not just at the end. - Restart the Slicer(s) for the updates to take effect. A restart is required for any configuration file change.
To retrieve TR 101 290 data from the Slicer Status API or to use TR 101 290 for Slicer Failover, add the following fields to the configuration file:
###### Set DtApi functionality on or off
dt_api_sdk_on: 1

###### Set mode where the modes are: 0 No tables, 1 ATSC, 2 DVB, 3 DVB_RCS
dt_api_sdk_standard_mode: 1

###### Target bitrate of the stream (the bitrate of the incoming stream,
###### dt_api_sdk uses it to estimate the timestamps)
###### This is not needed with any Slicers after the September 2024 Slicer release
dt_api_sdk_bitrate: (the bitrate of the incoming stream prior to encoding)

###### Priority is the class of error we want to monitor: 3 - catch all errors
###### (P3 & P2 & P1); 2 - catch P1 & P2, 1- catch P1 errors; 0 catch nothing
###### It is recommended to use 2 since P3 errors occur too often
dt_api_sdk_priority: 2
It is recommended to only monitor TR 101 290 P1 and P2 errors since P3 errors occur too often in practice.
Step 4: Add the Slicers to the Failover Group in the CMS
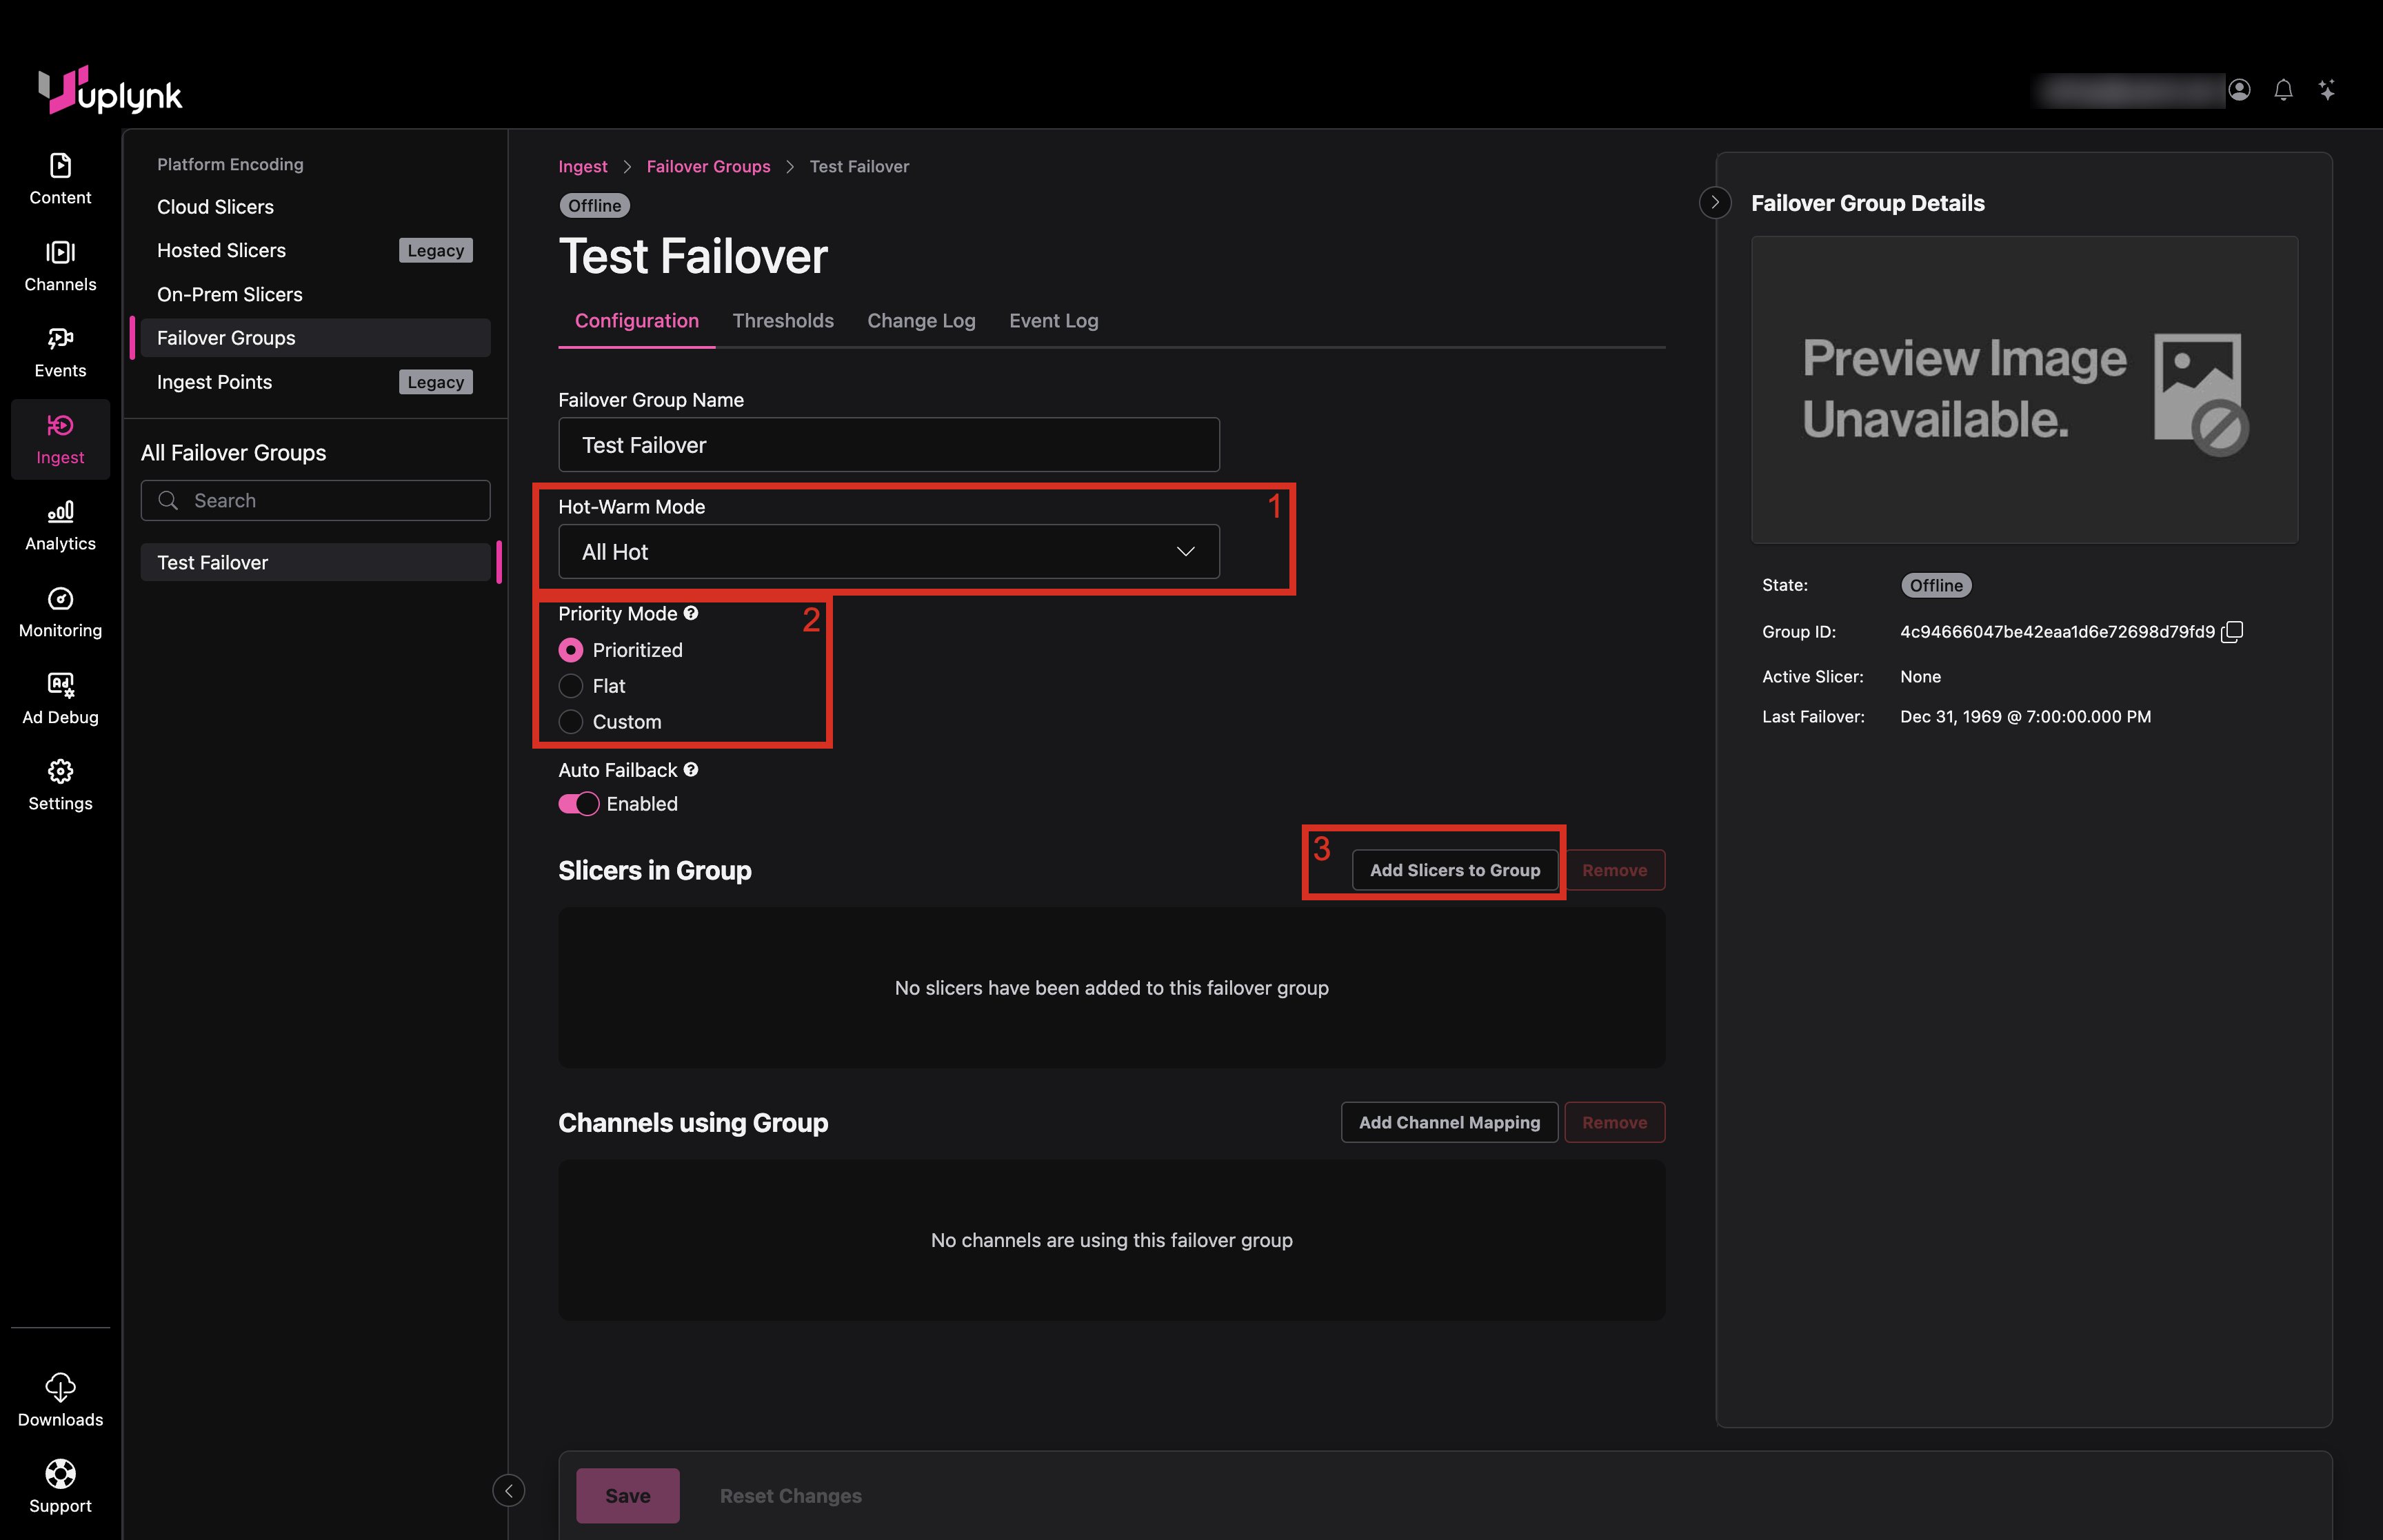
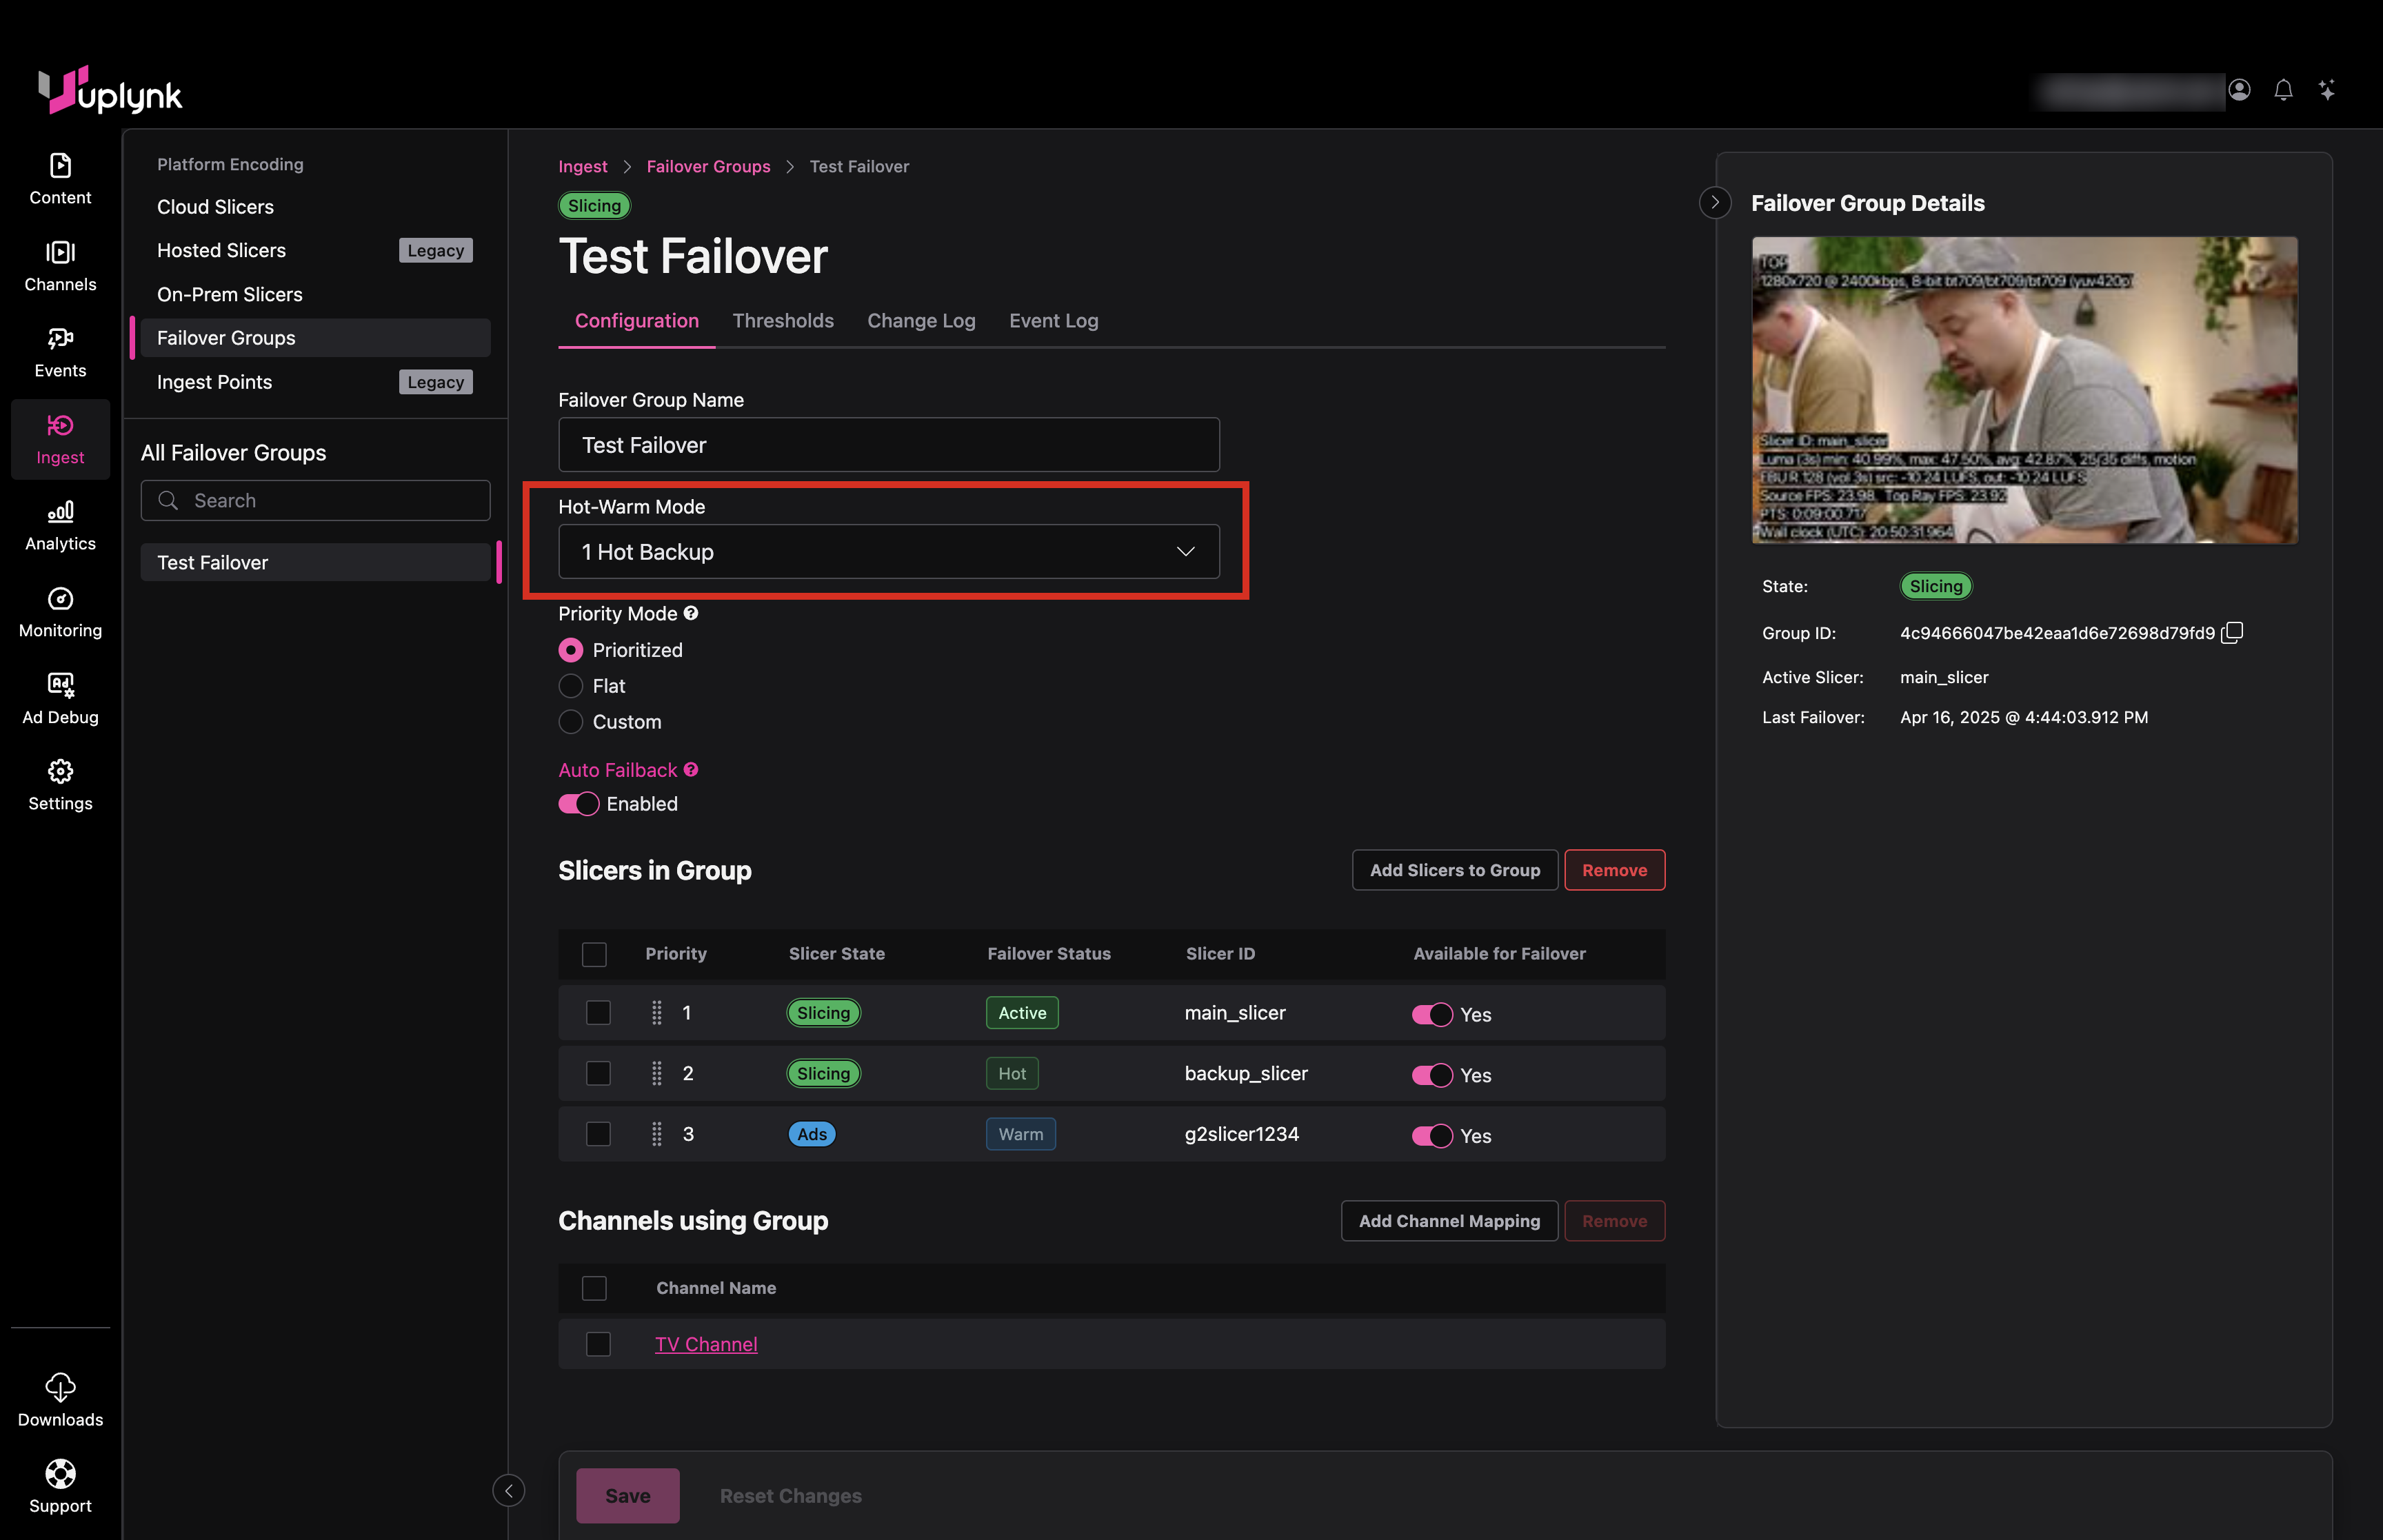
- Select Hot-Warm Mode (All Hot shown chosen).
- Select a Failover Mode of Prioritized, Flat, or Custom (Prioritized chosen).
- Select Add Slicers to Group.
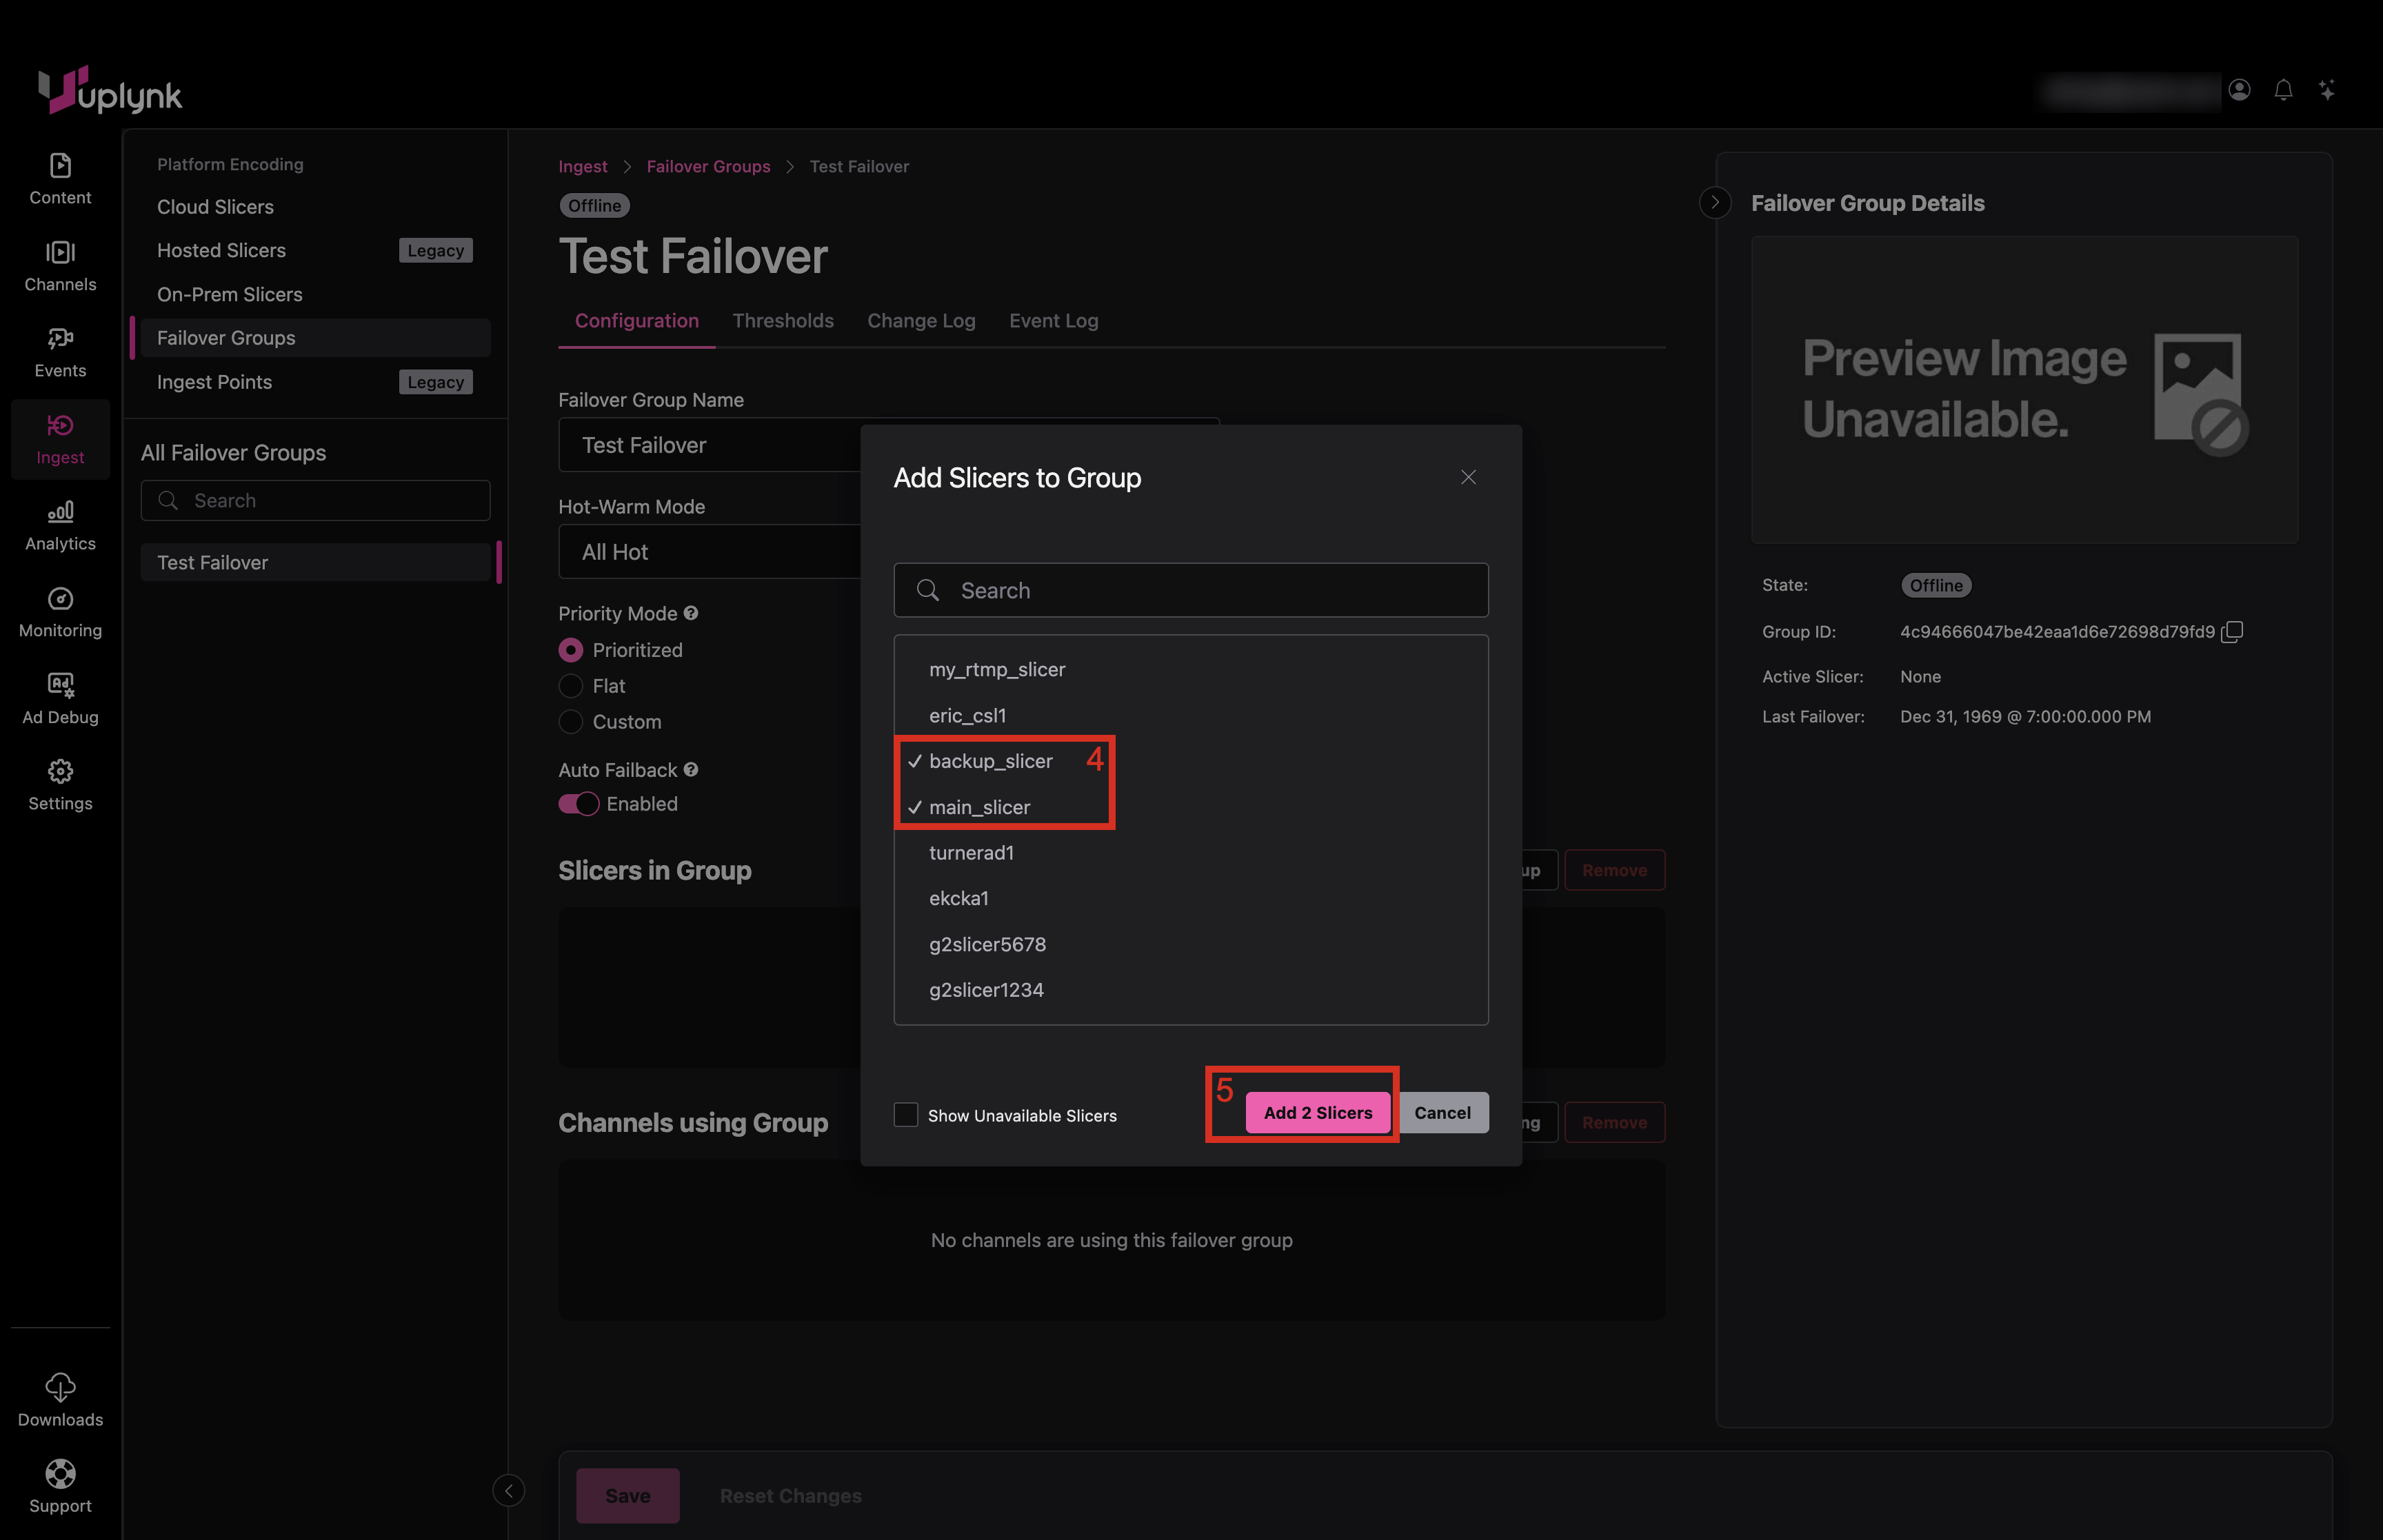
- Select the desired Slicers to add to the Failover Group (they will be checked).
- Select Add X Slicers where X is the number of Slicers that will be added.
Step 5: Enable the Slicers and Set Priority
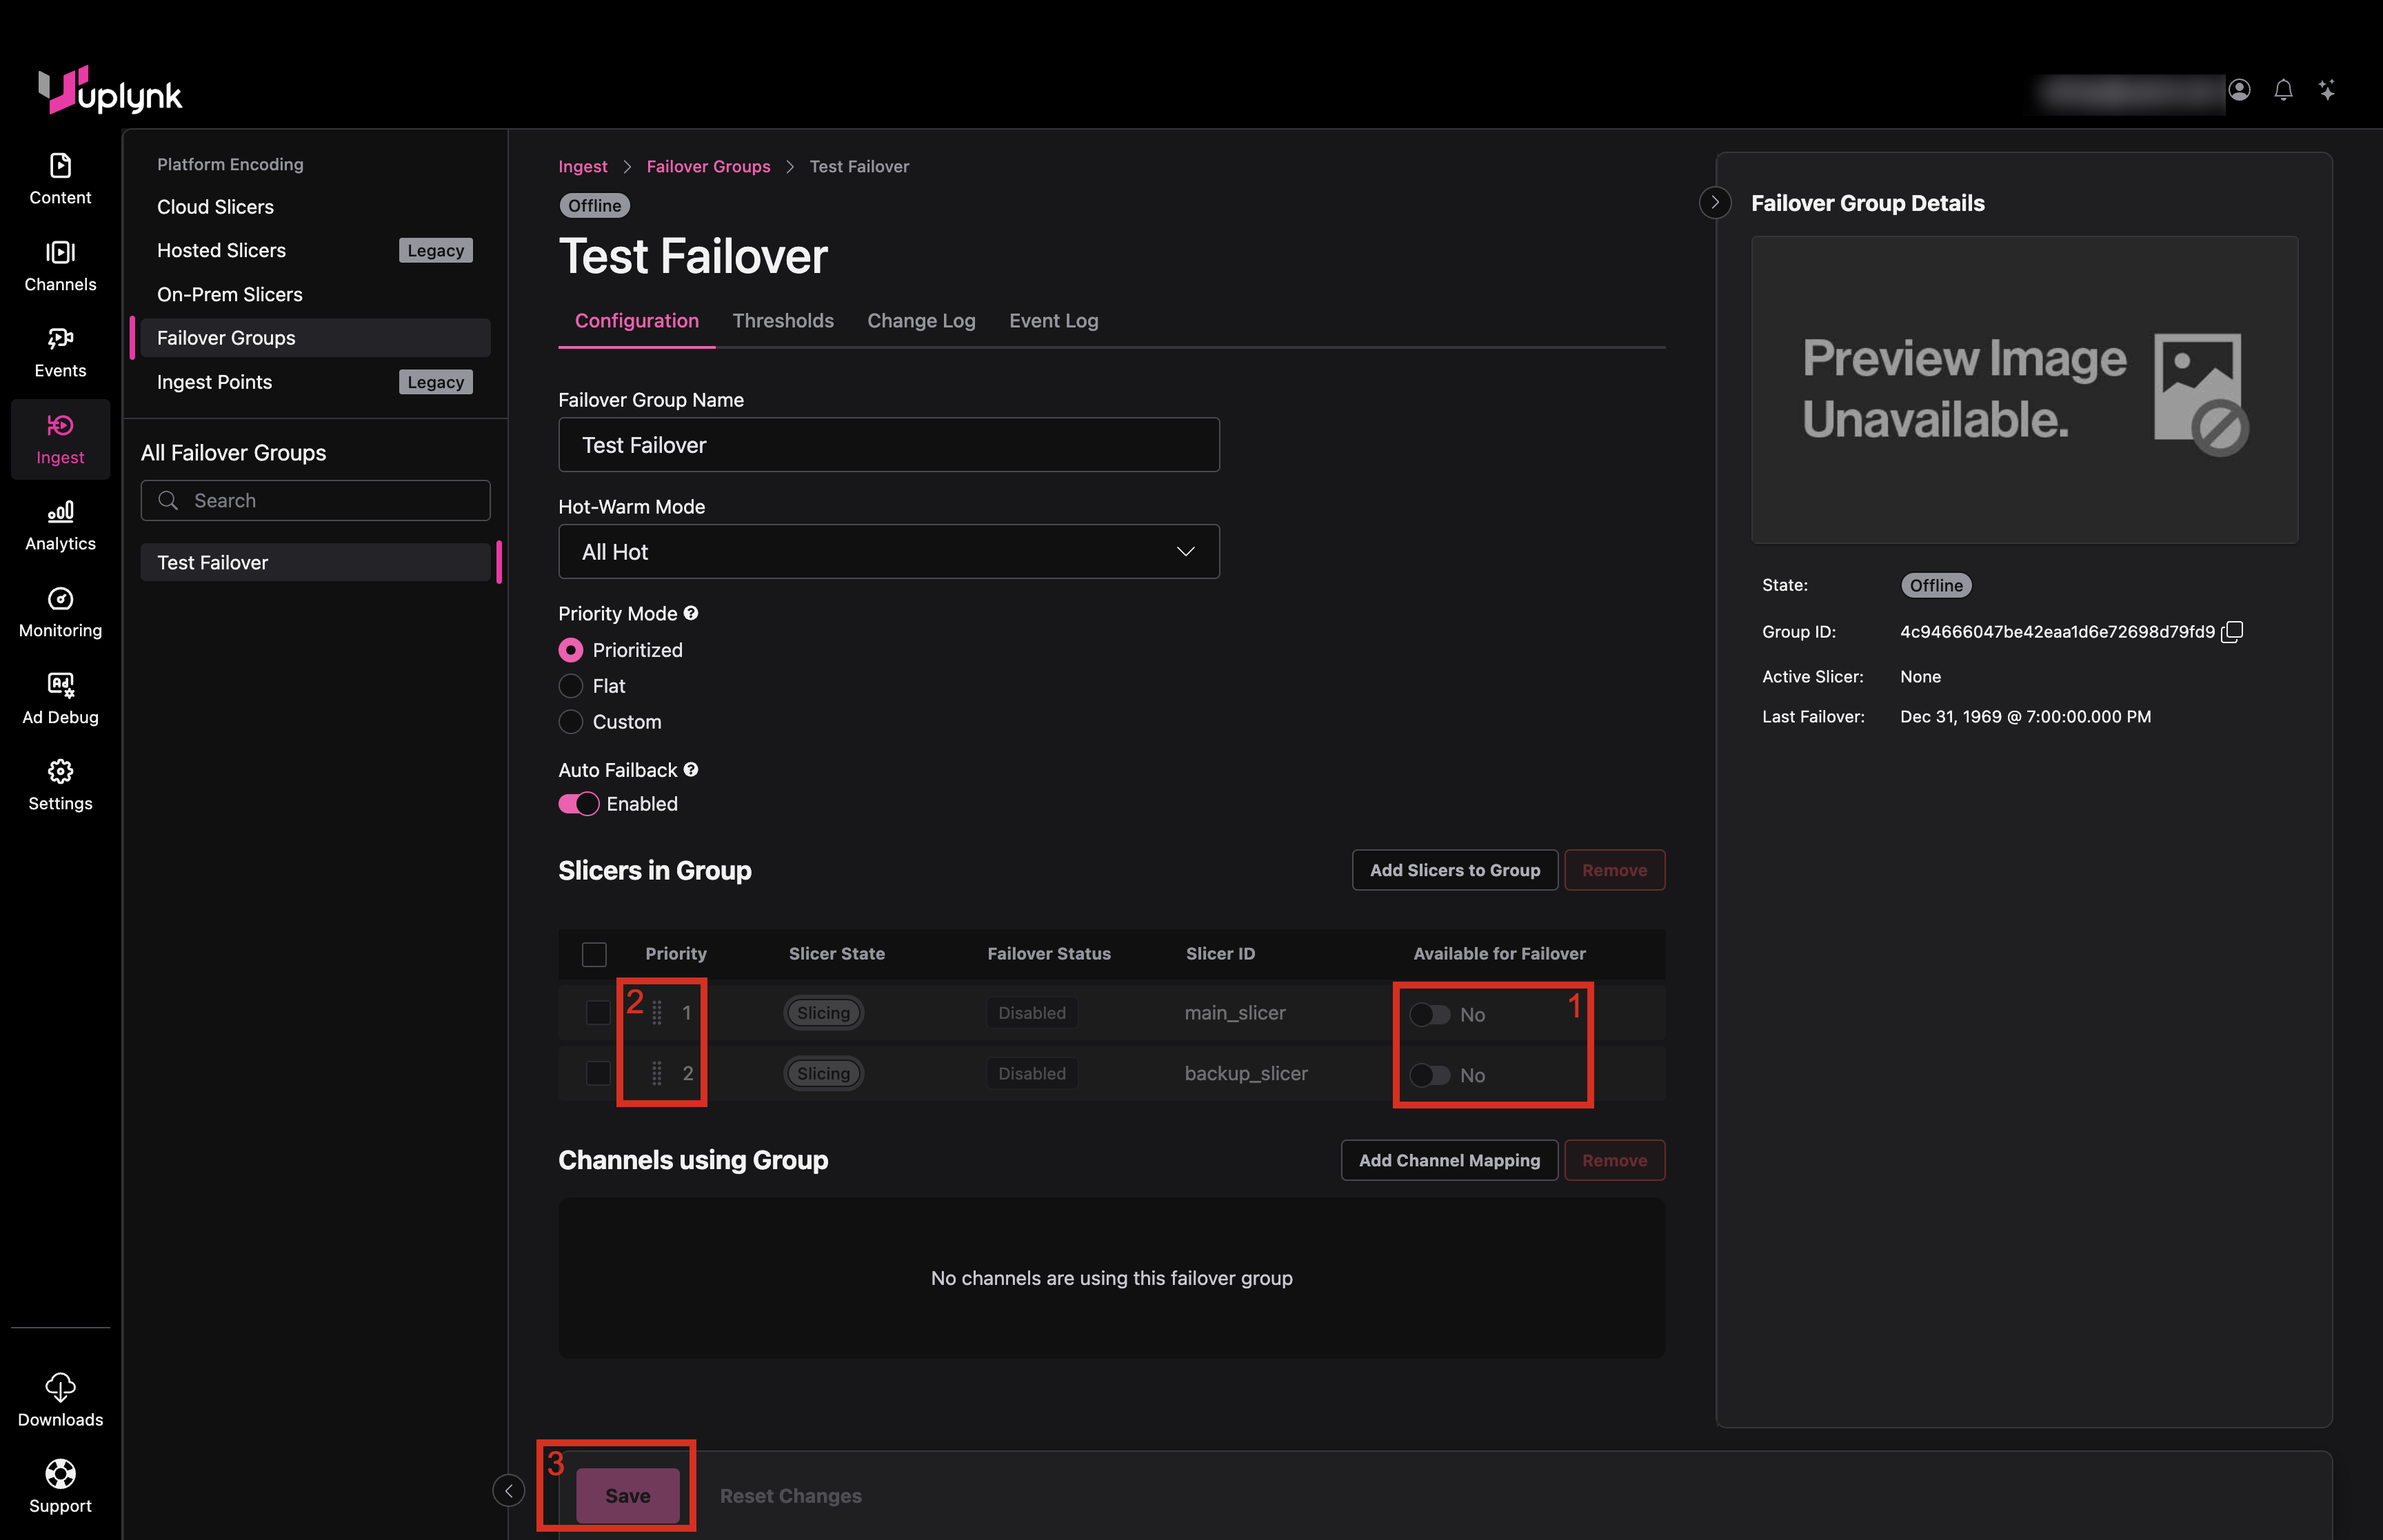
- Enable the Slicers in the Failover Group by moving the slider to Yes.
- Change Slicer priority by dragging the Slicer entries to rearrange them.
- Select Save.
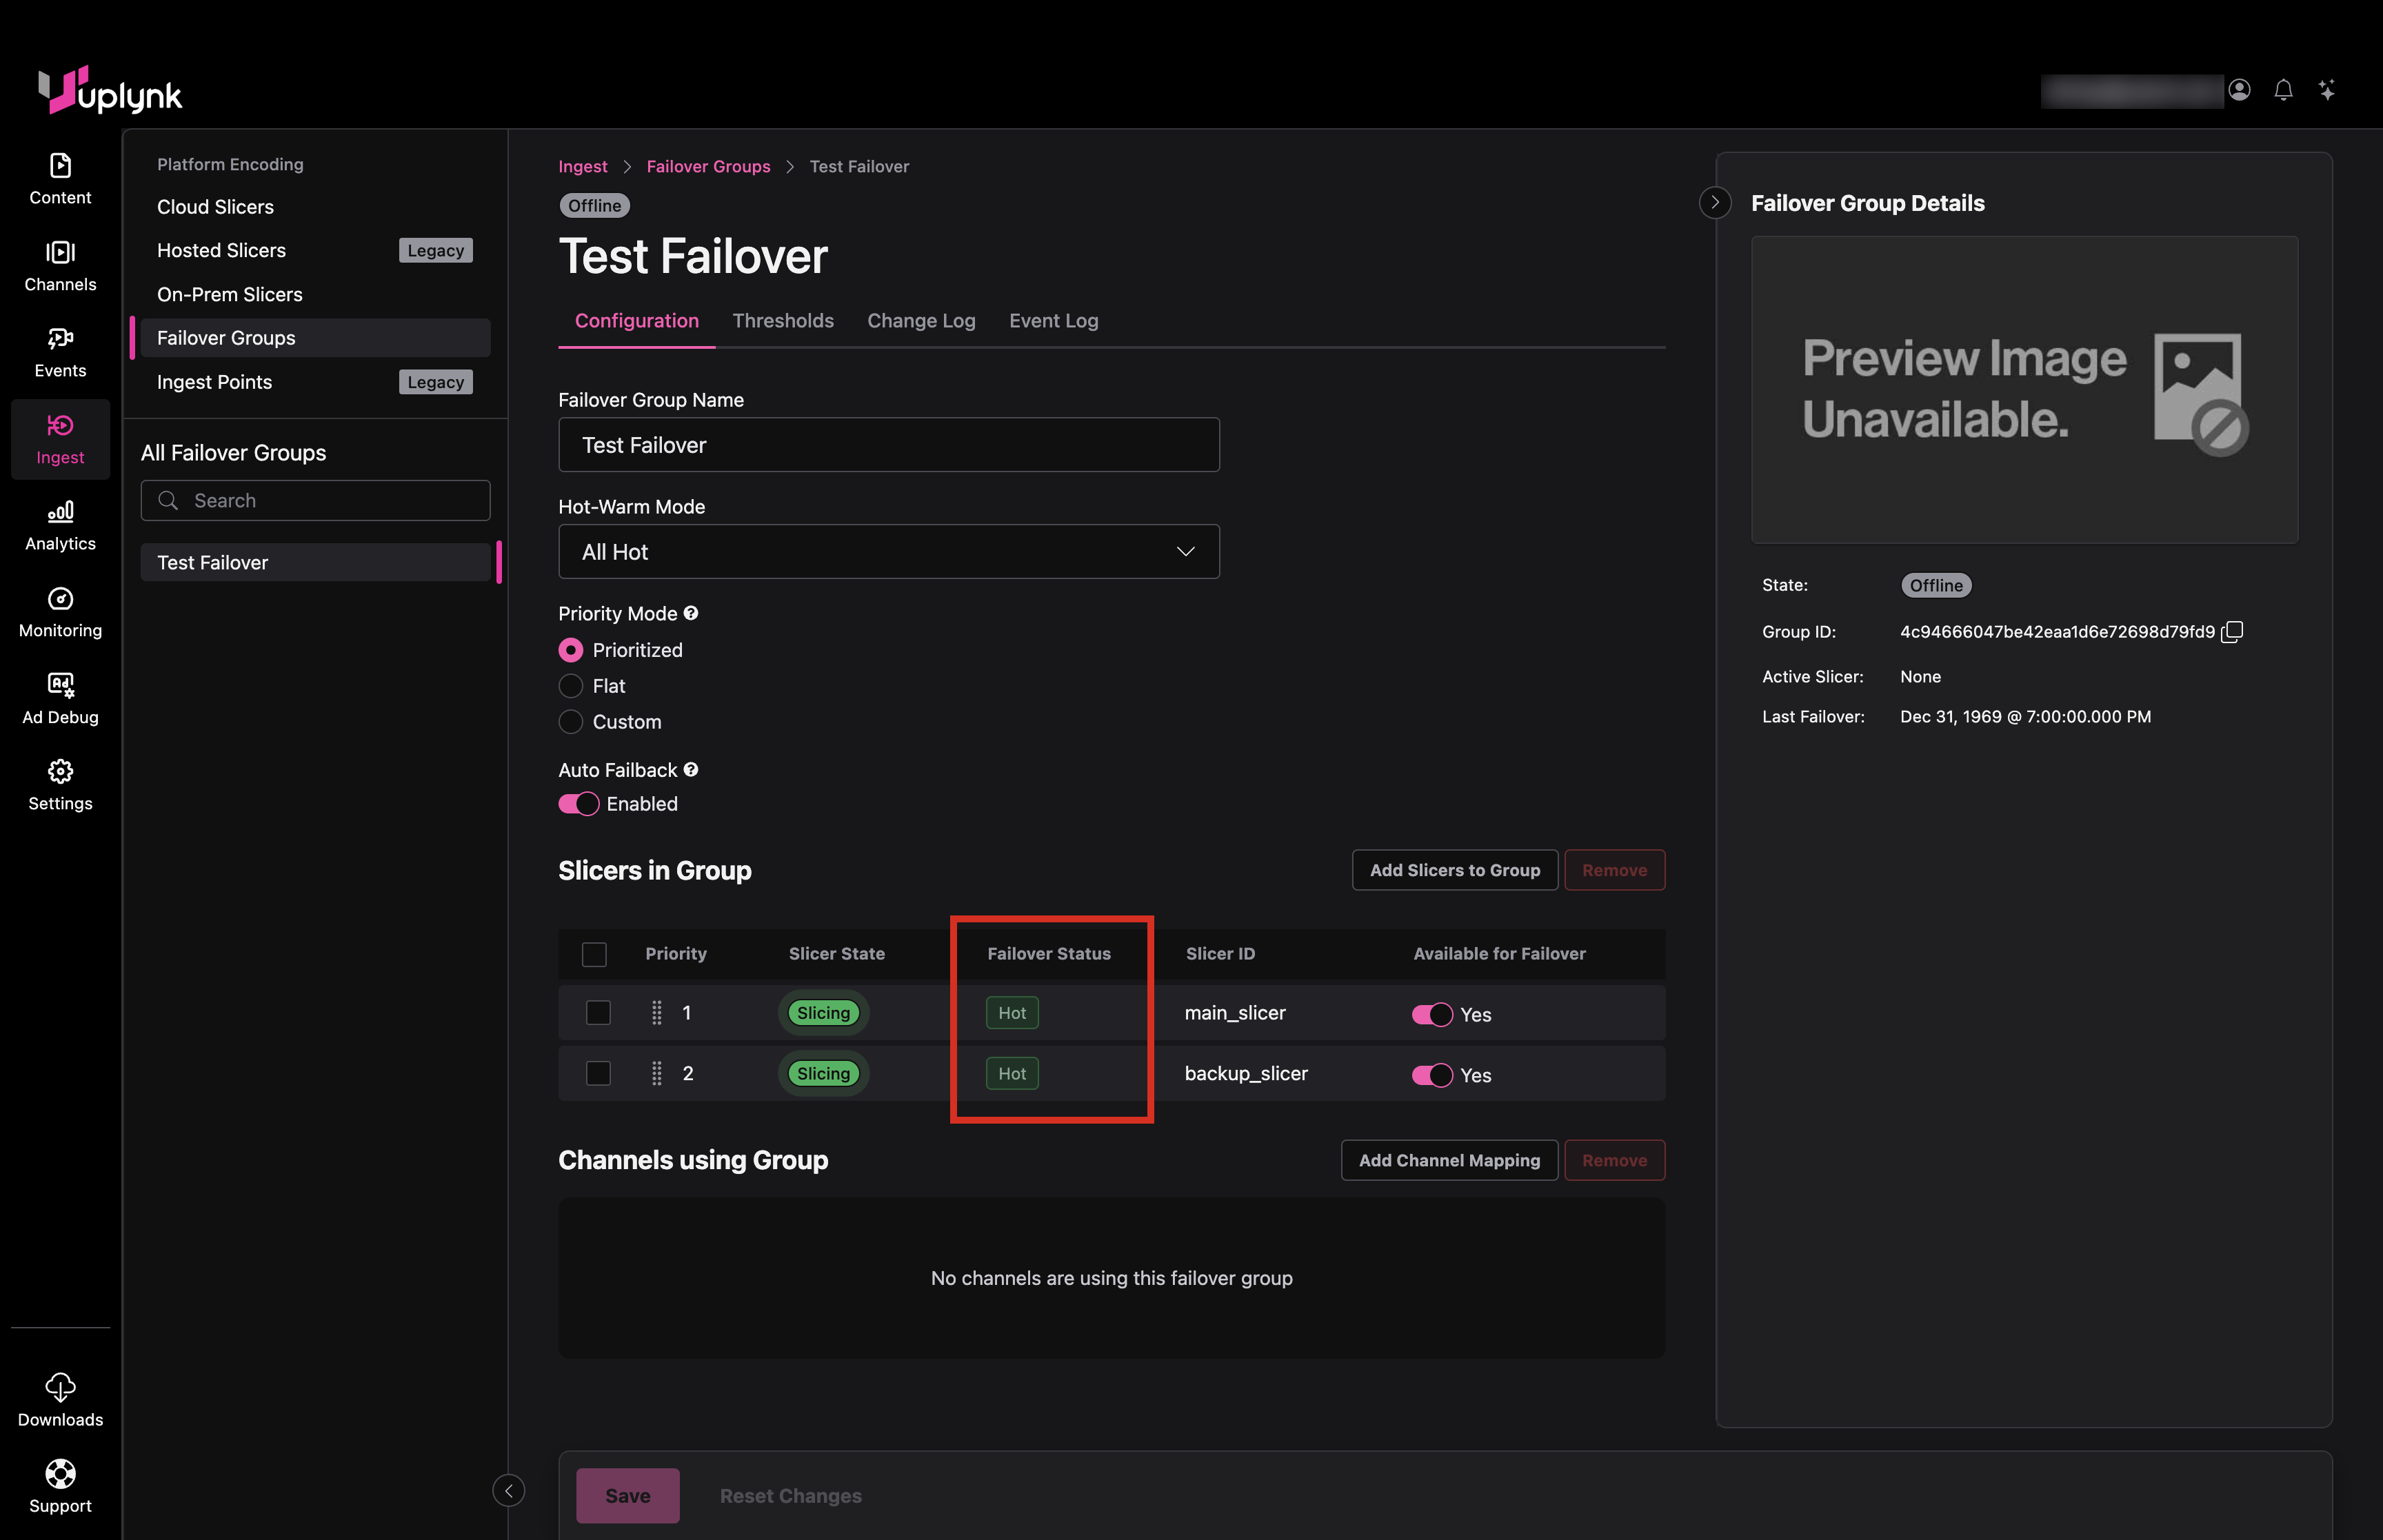
Immediately after enabling, the Slicers are denylisted since they are new to failover and appear as unhealthy. After several minutes, they are allowlisted and become healthy.
After becoming allowlisted, the status changes to Hot. You may need to refresh the browser to see the status update. The Event Log shows denylist-to-allowlist transitions.
Step 6: Mapping the Failover Group to the Channel
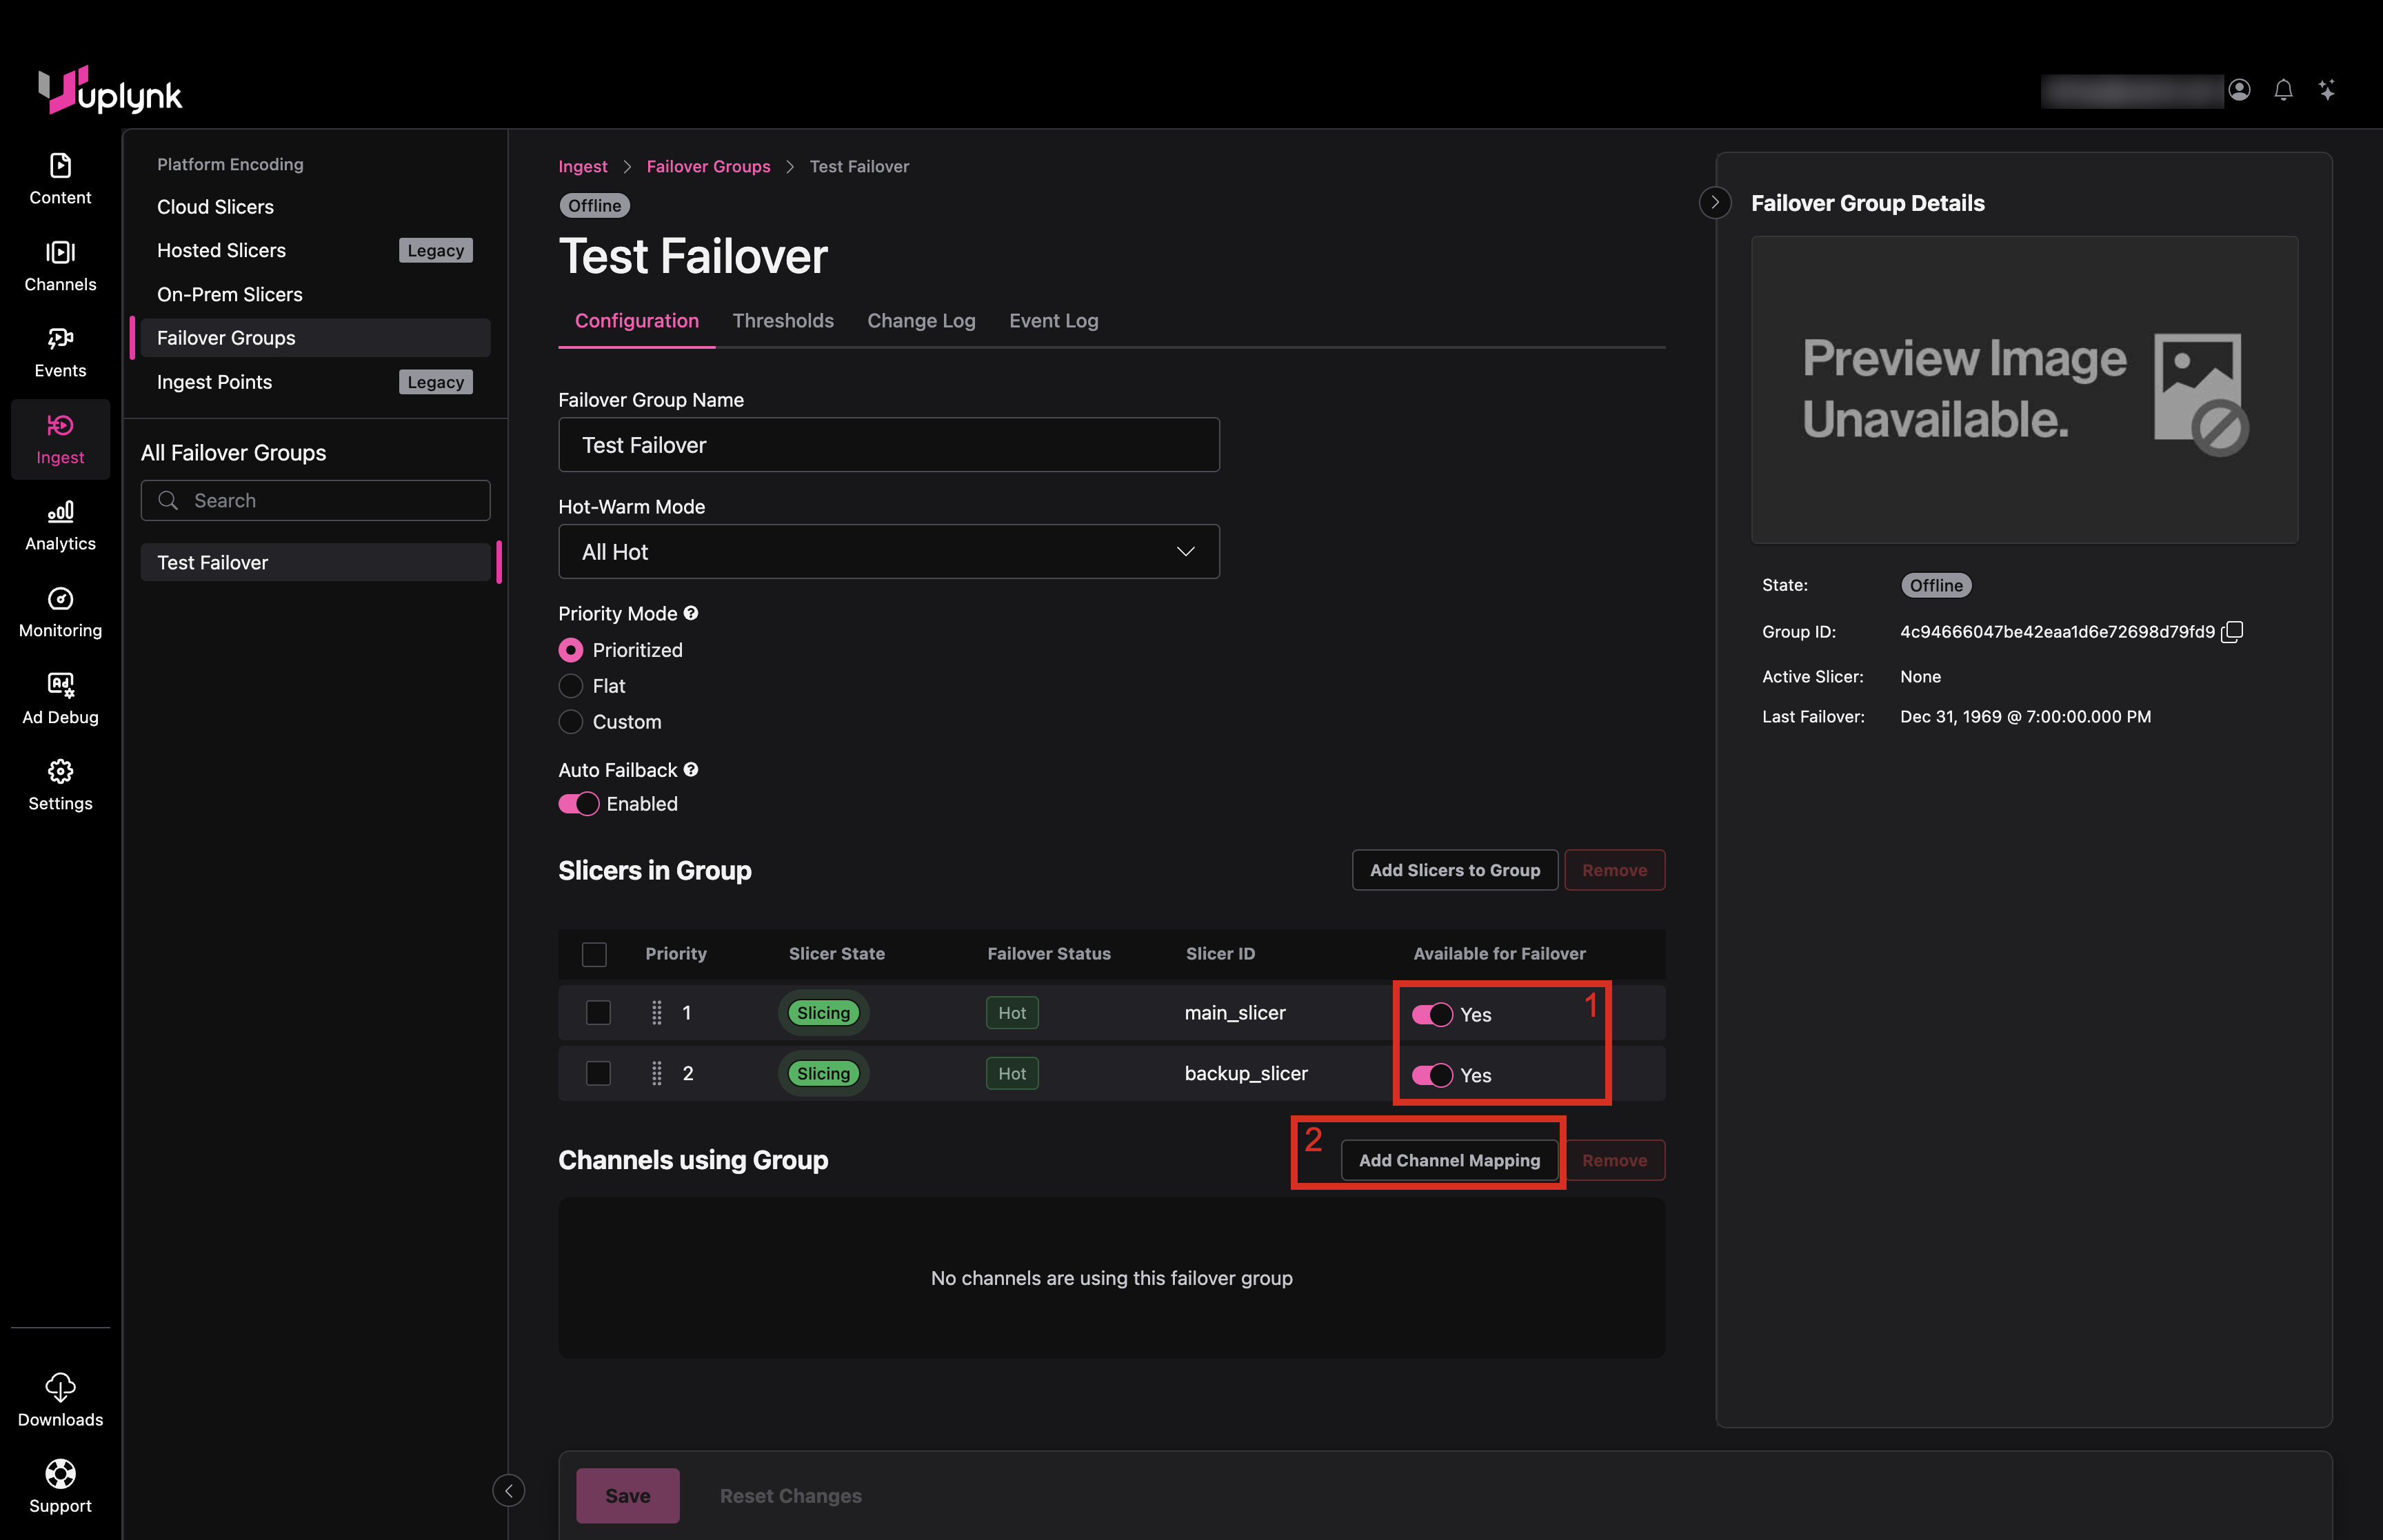
- Make sure Slicers are set to Yes for Available for Failover.
- Select Add Channel Mapping.
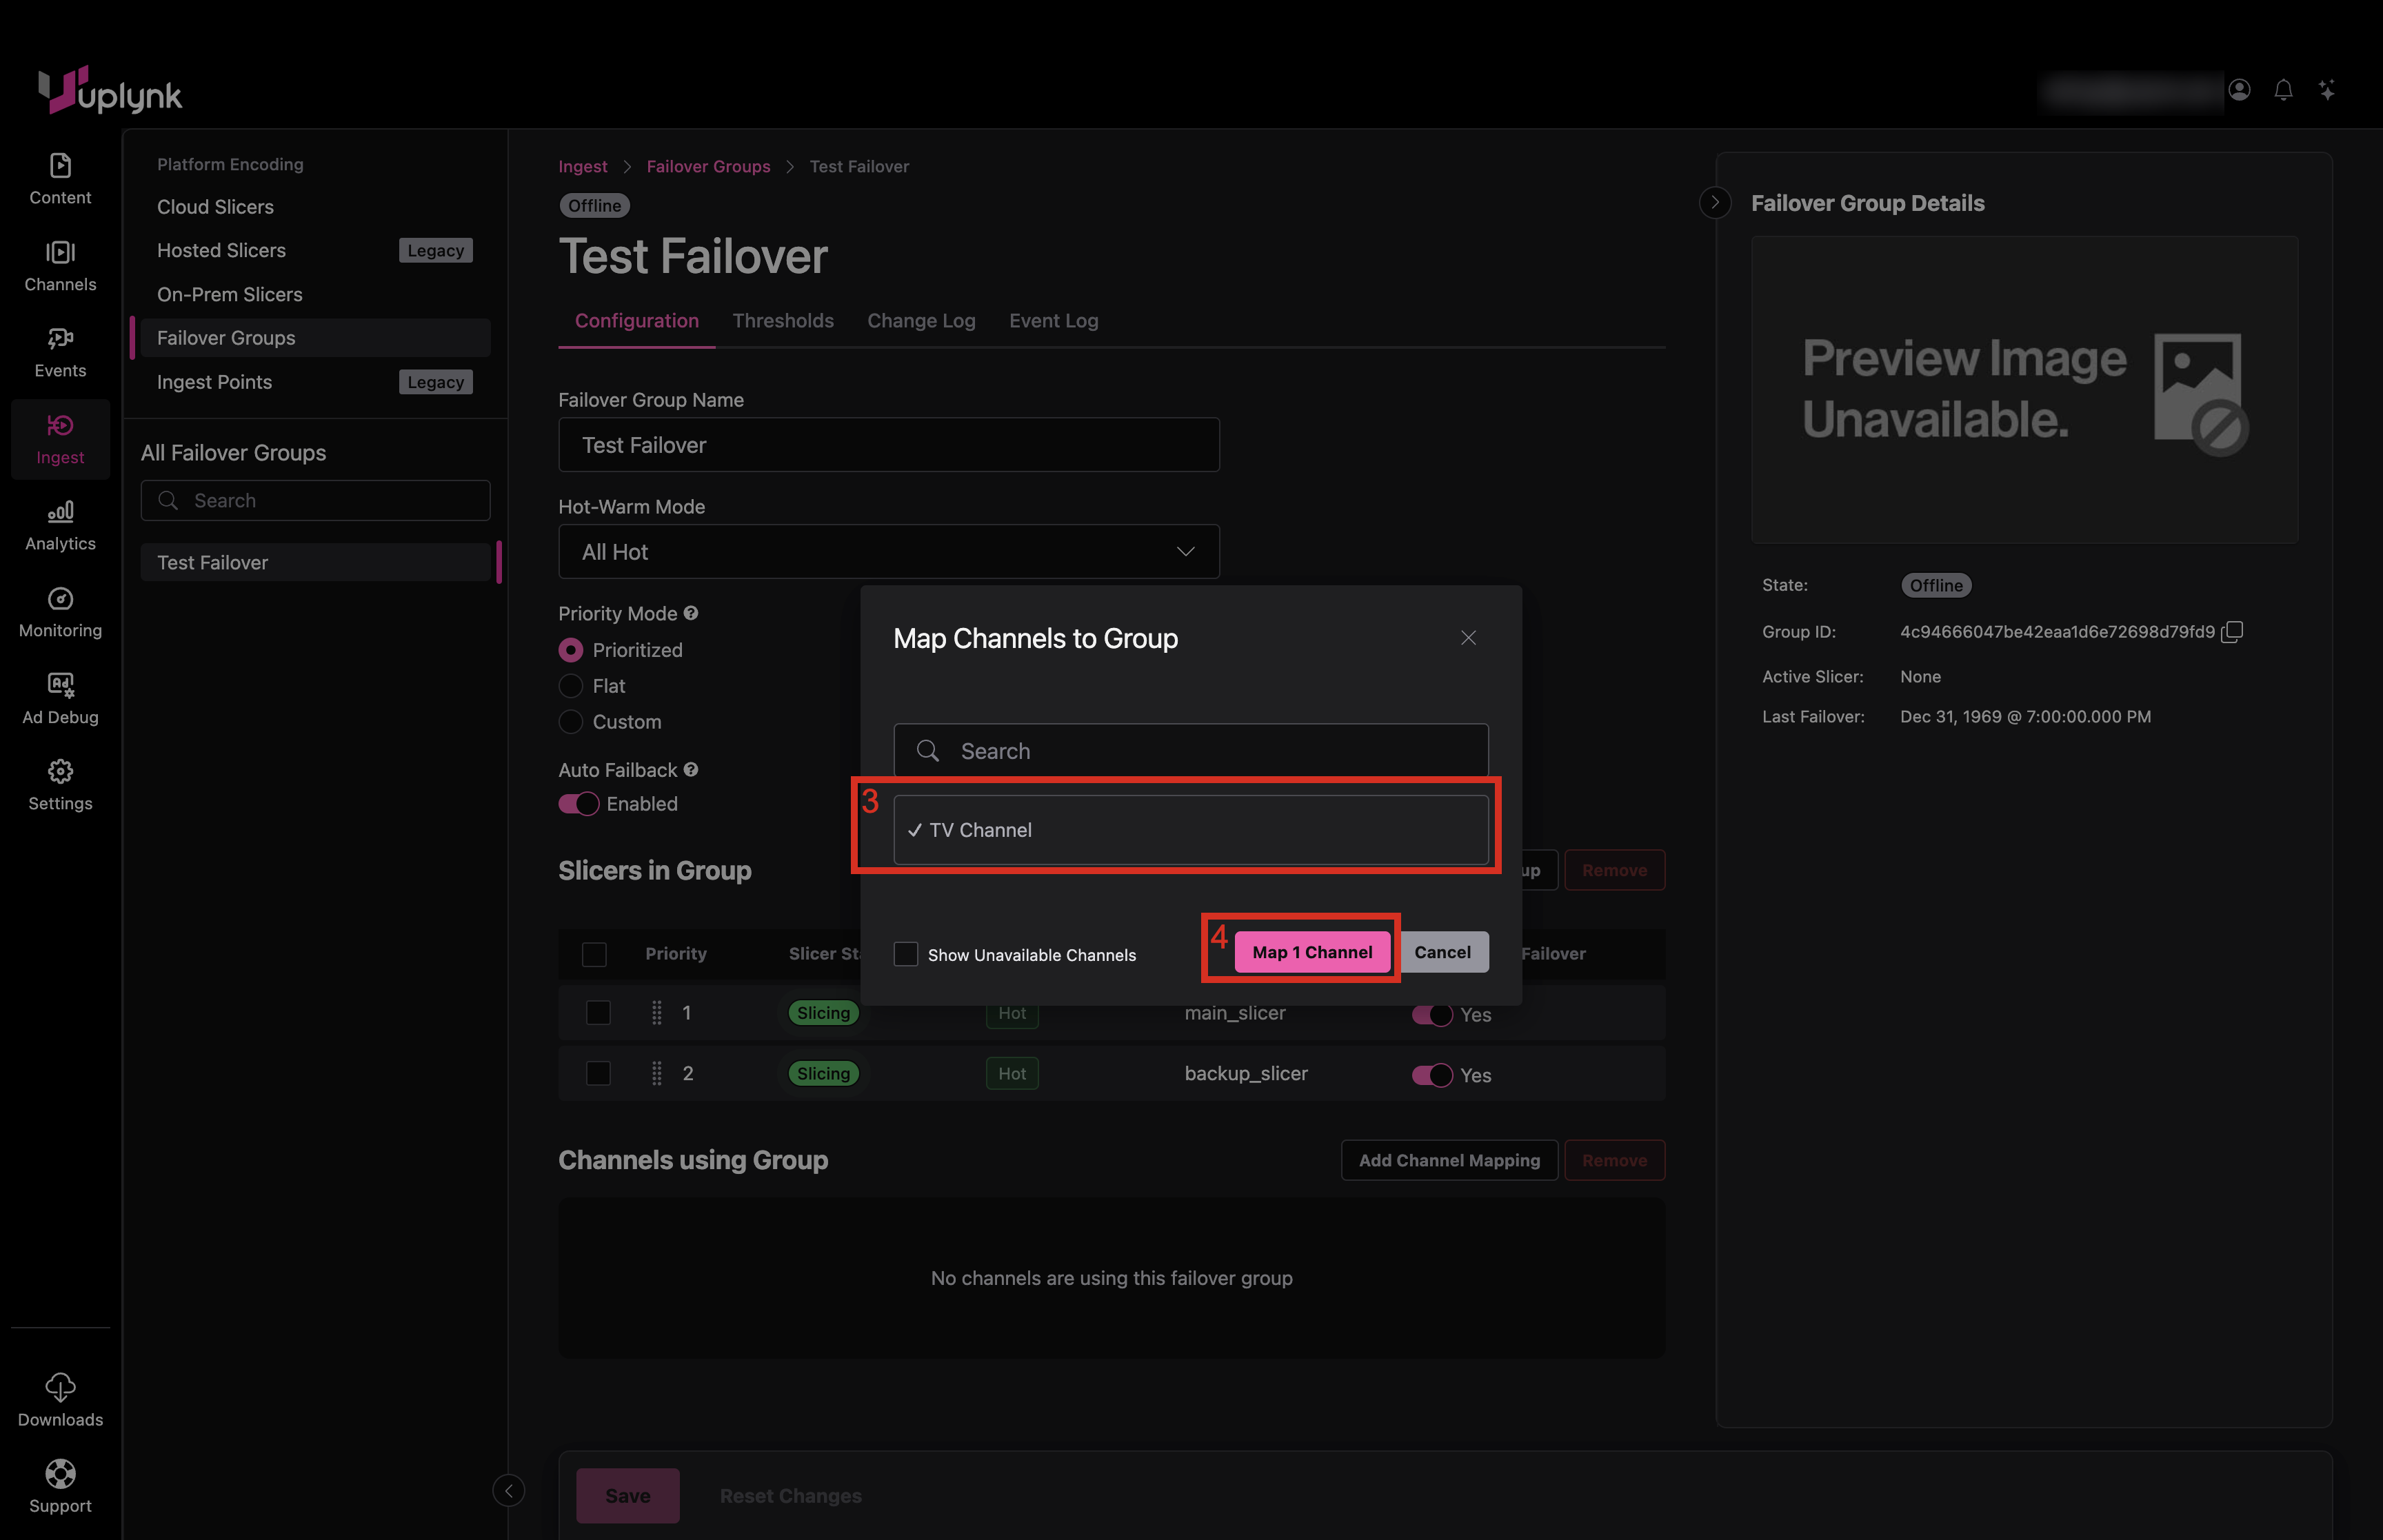
- Select the channel(s) to map to the Failover Group.
- Select Map X Channel(s) where X is the number of selected channels.
- The channel appears in the list.
- Select Save.
- The preview shows a thumbnail and the Active Slicer for the Failover Group.
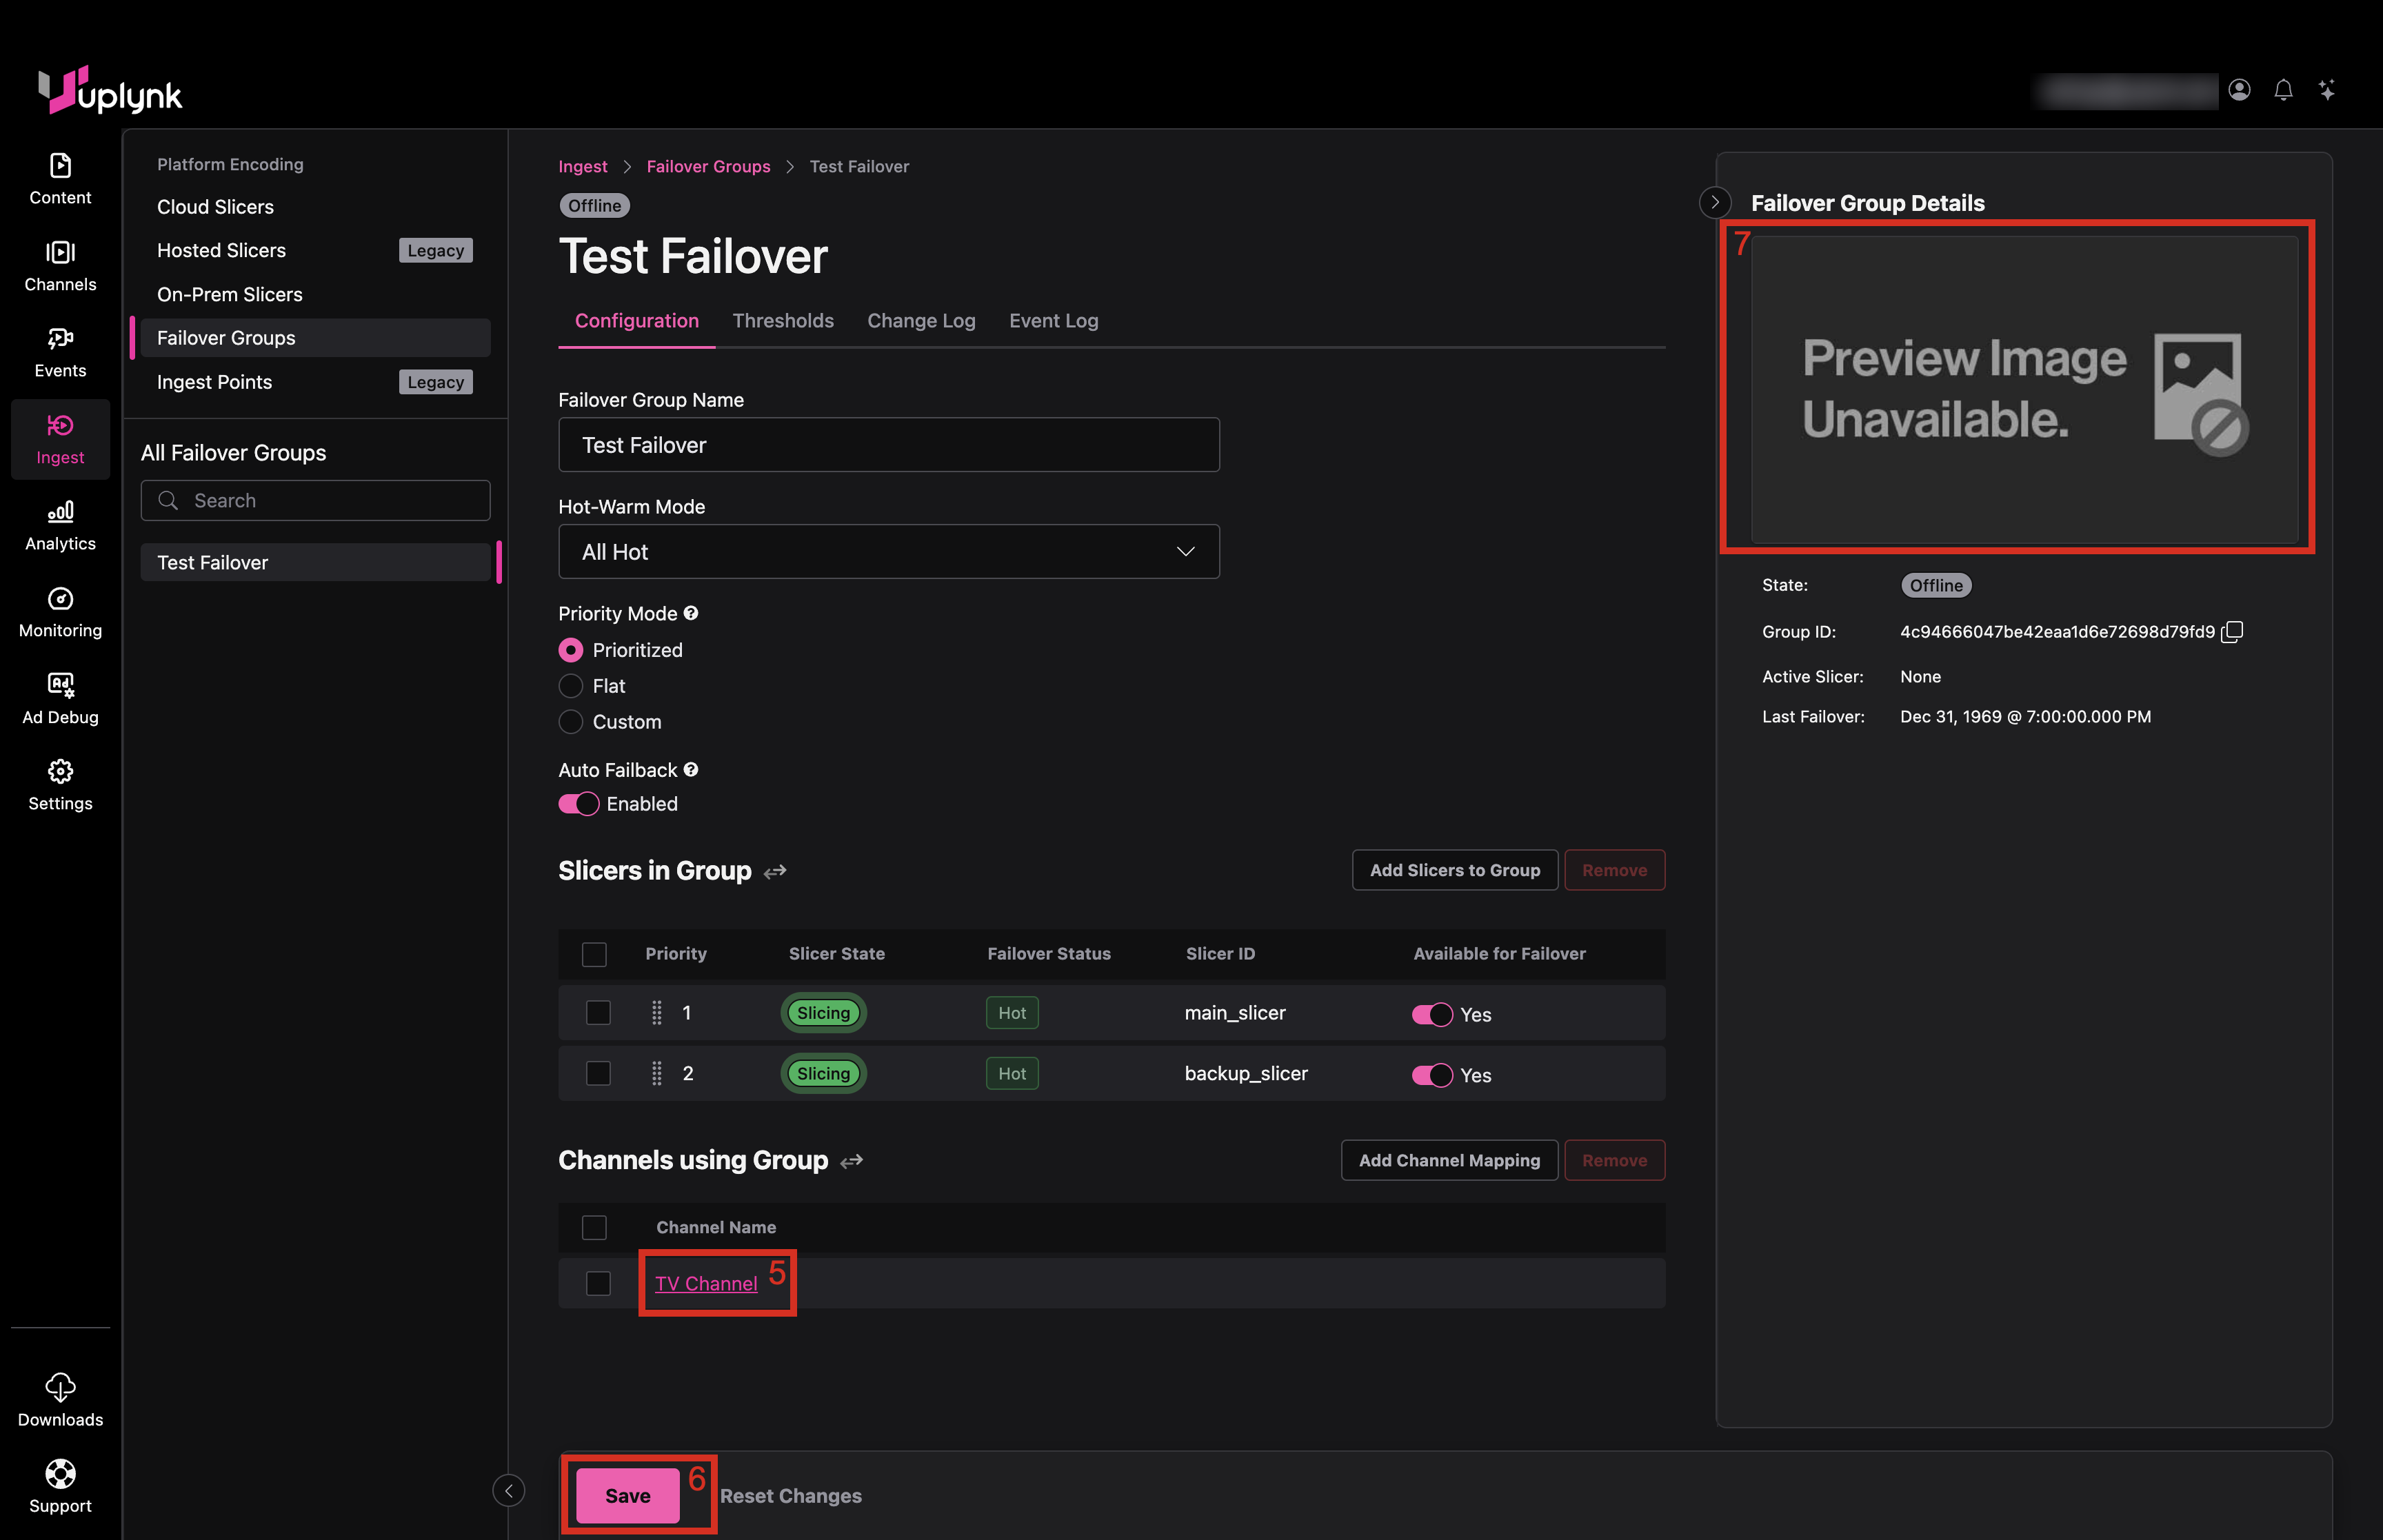
If the preview does not appear within a minute, you may need to disable and re-enable the Slicers in the Failover Group or restart the Slicers.
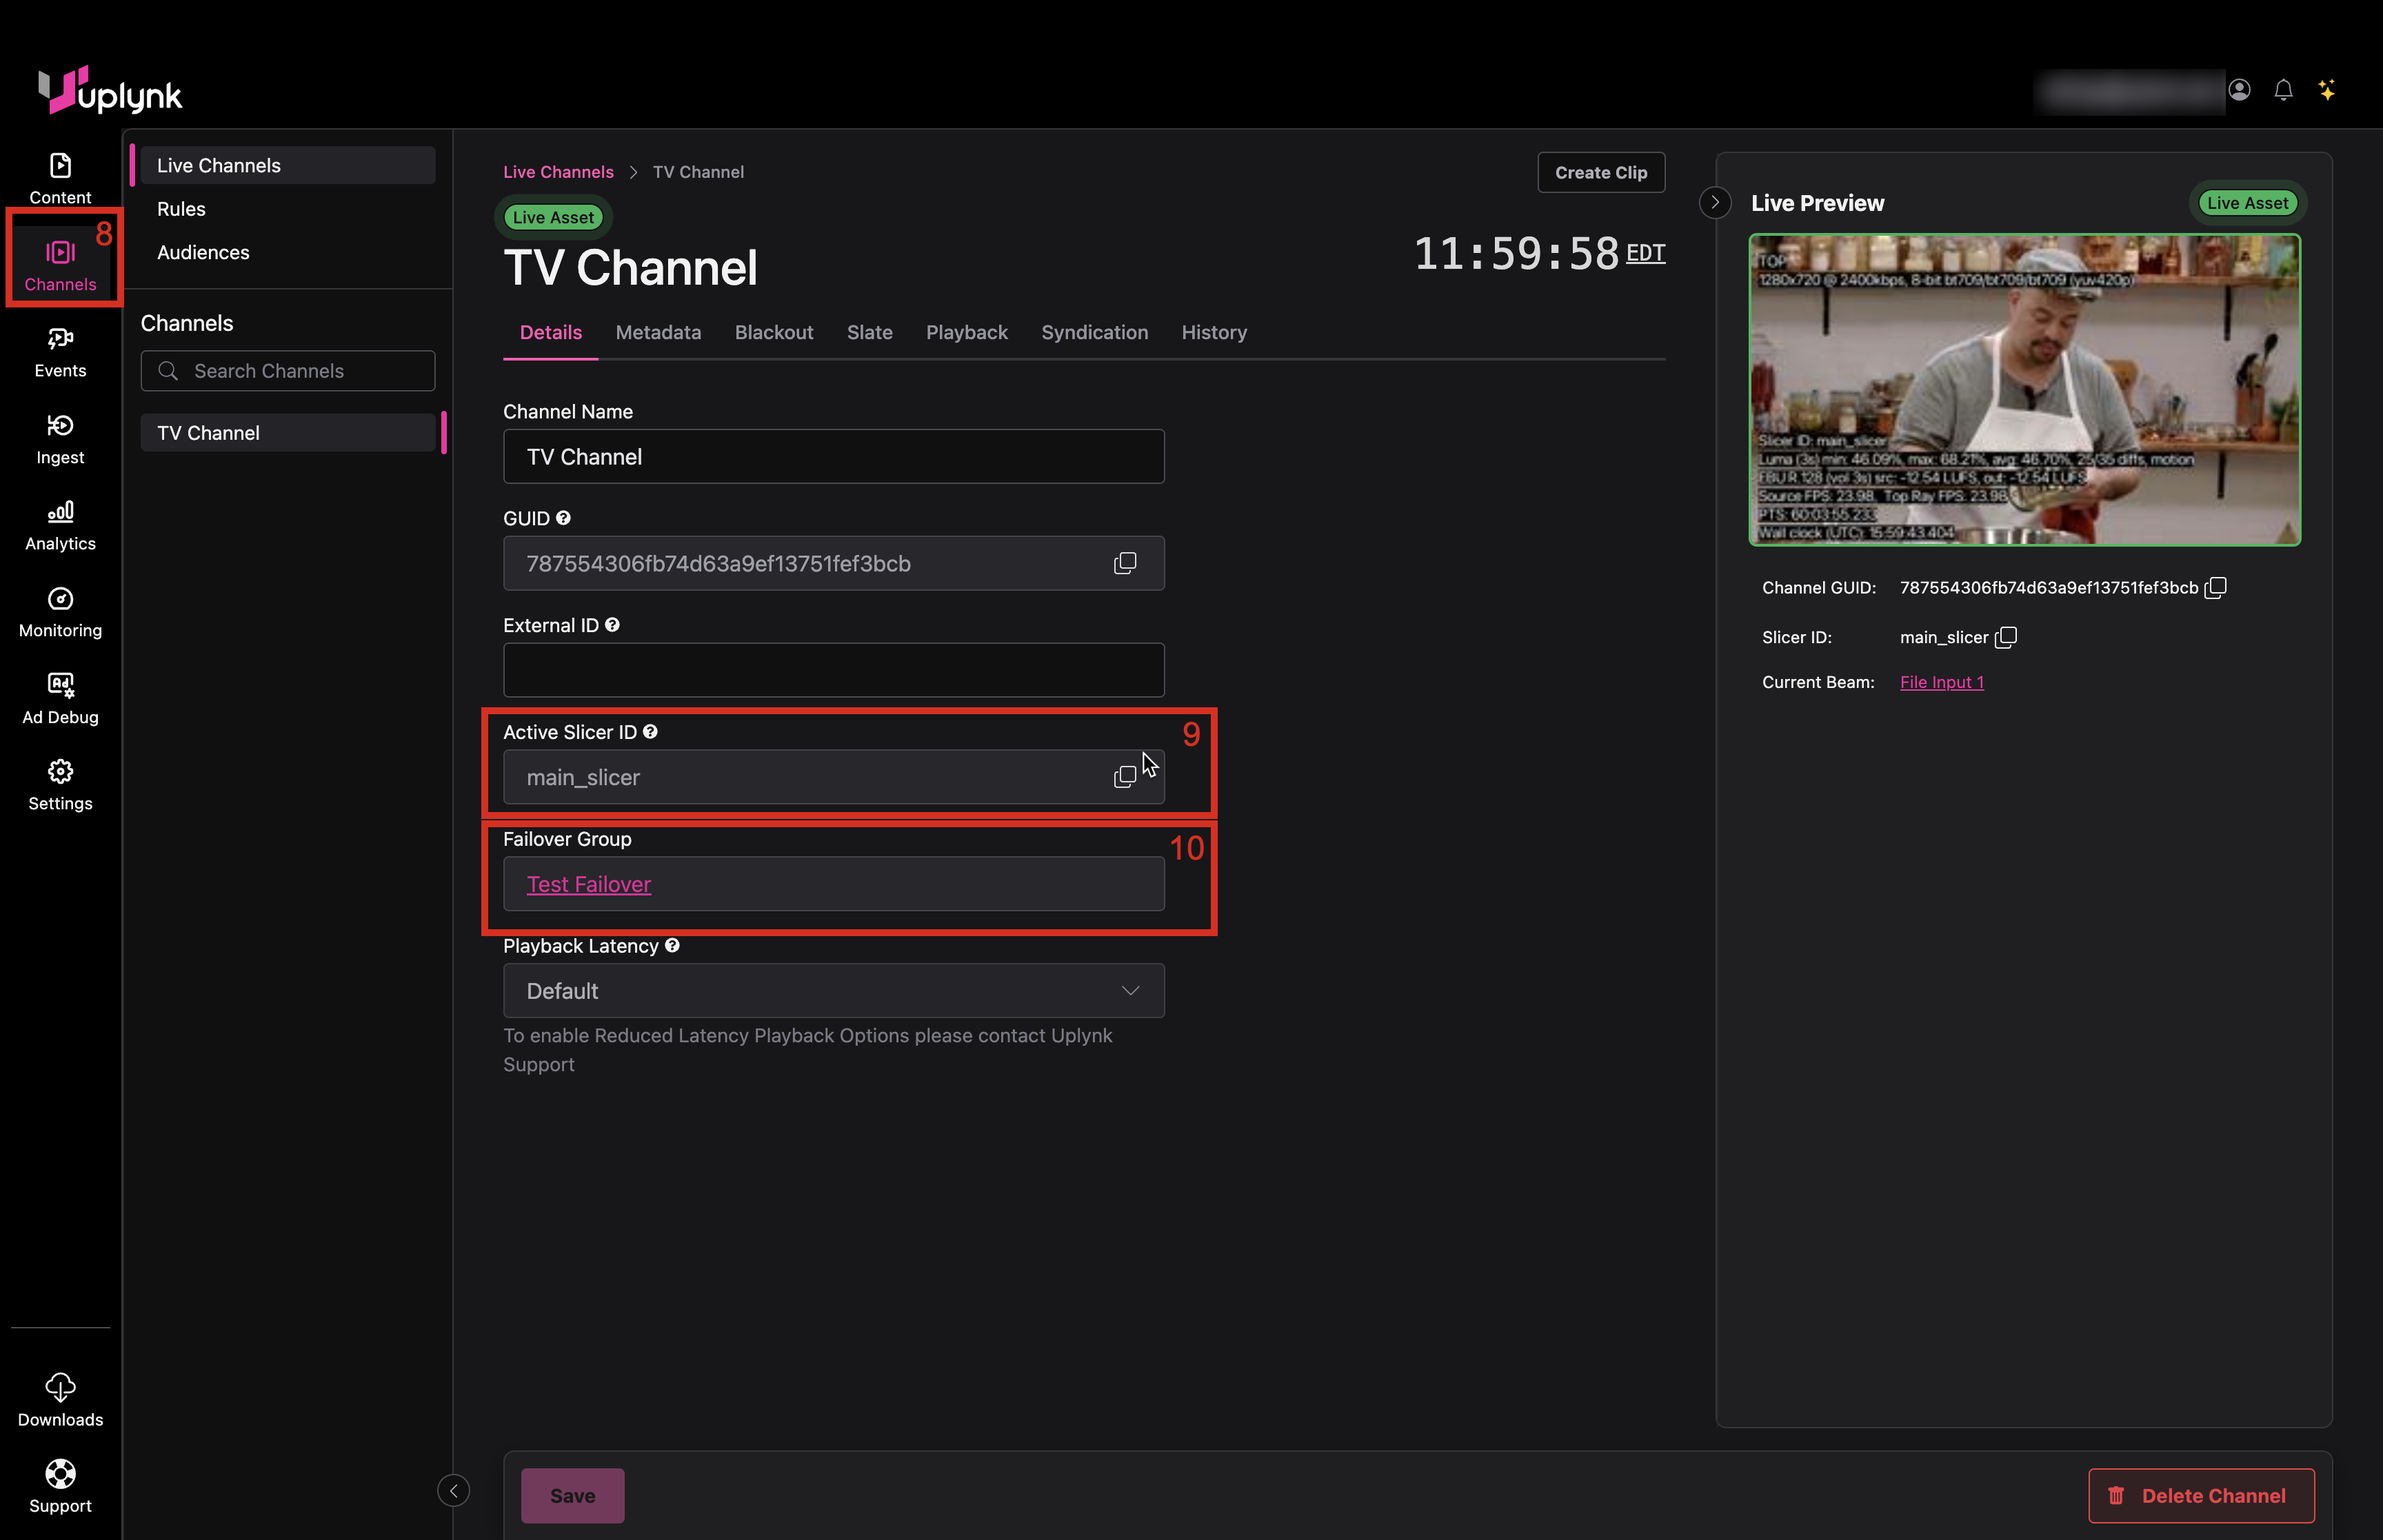
- Go to the Channels tab and select the channel.
- Observe the Active Slicer ID.
- Observe the Failover Group and link to the Failover Group configuration.
Enable Hot-Warm Failover
- Change the dropdown to Hot-Warm.
- Select Save.
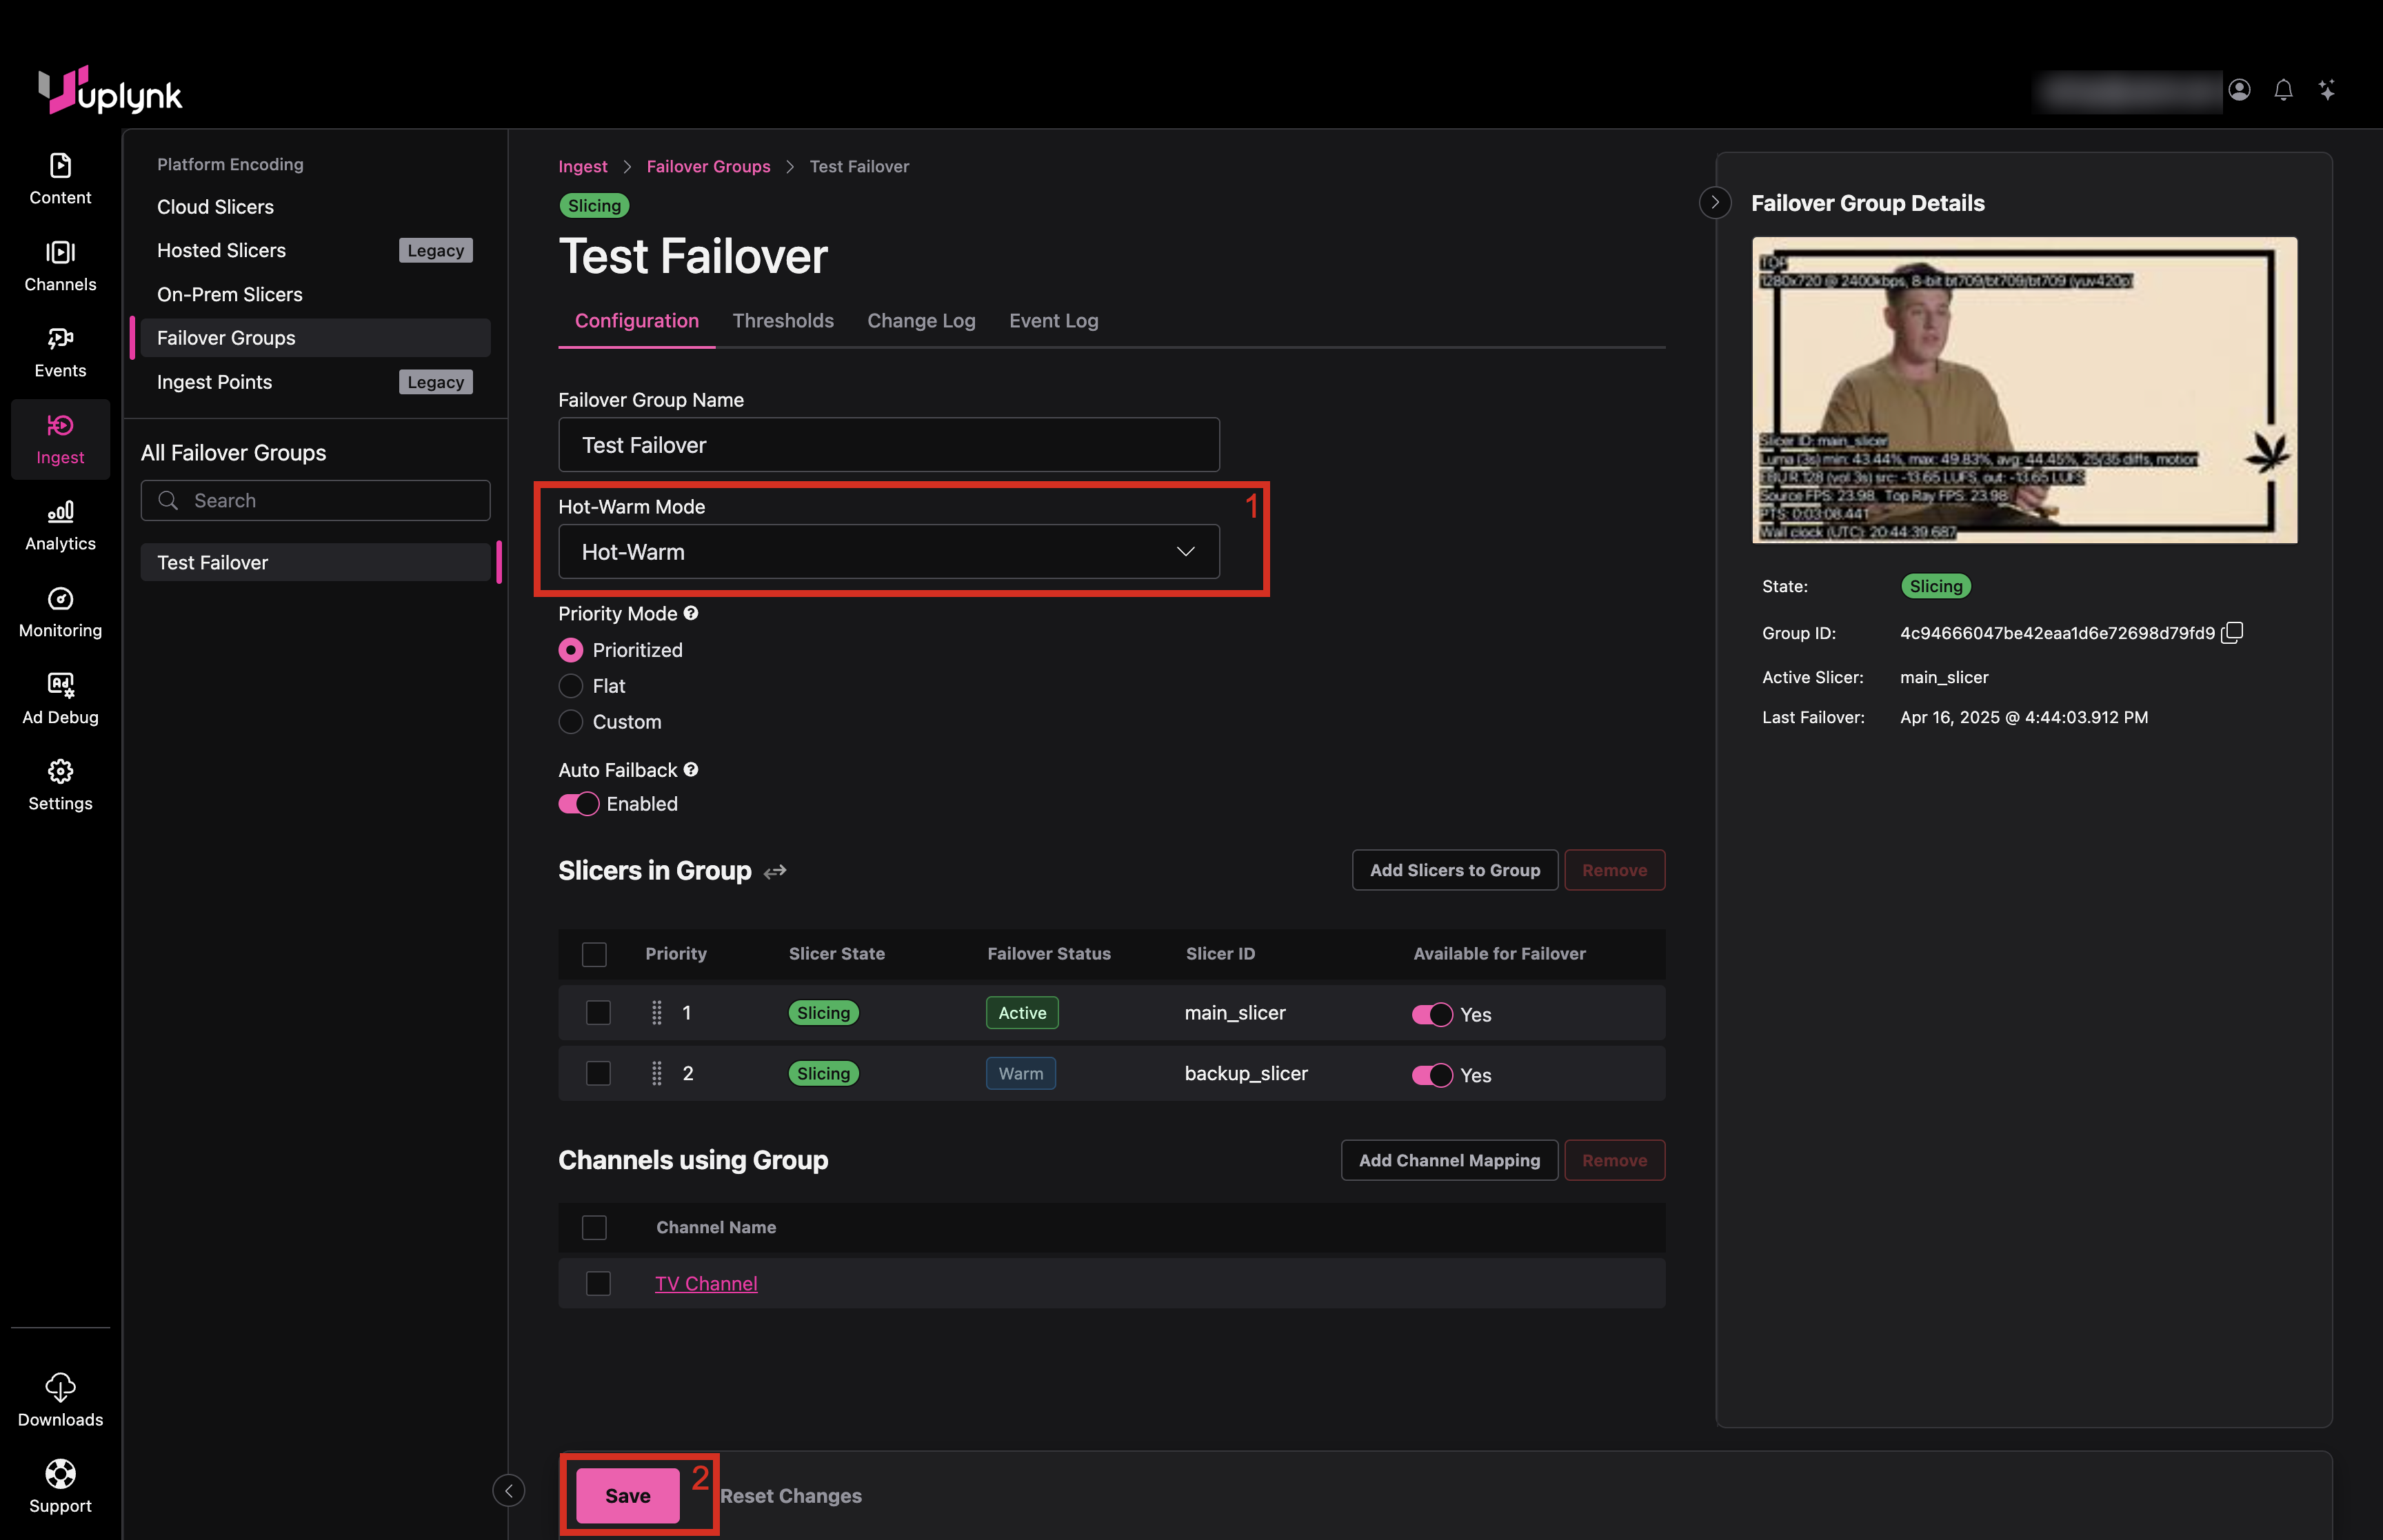
With Hot-Hot (the default), all Slicers perform full processing, including encoding and storage. Failover is basically instantaneous.
With Hot-Warm, only the active Slicer performs full processing and the backups do not encode, saving cost. There may be seconds of slate when failover occurs.
Slicers in Warm Mode are put into an "Ads" state in the system. This is reflected in the UI.
Enable Flat Priority Mode
- Change Priority Mode to Flat.
- Select Save.
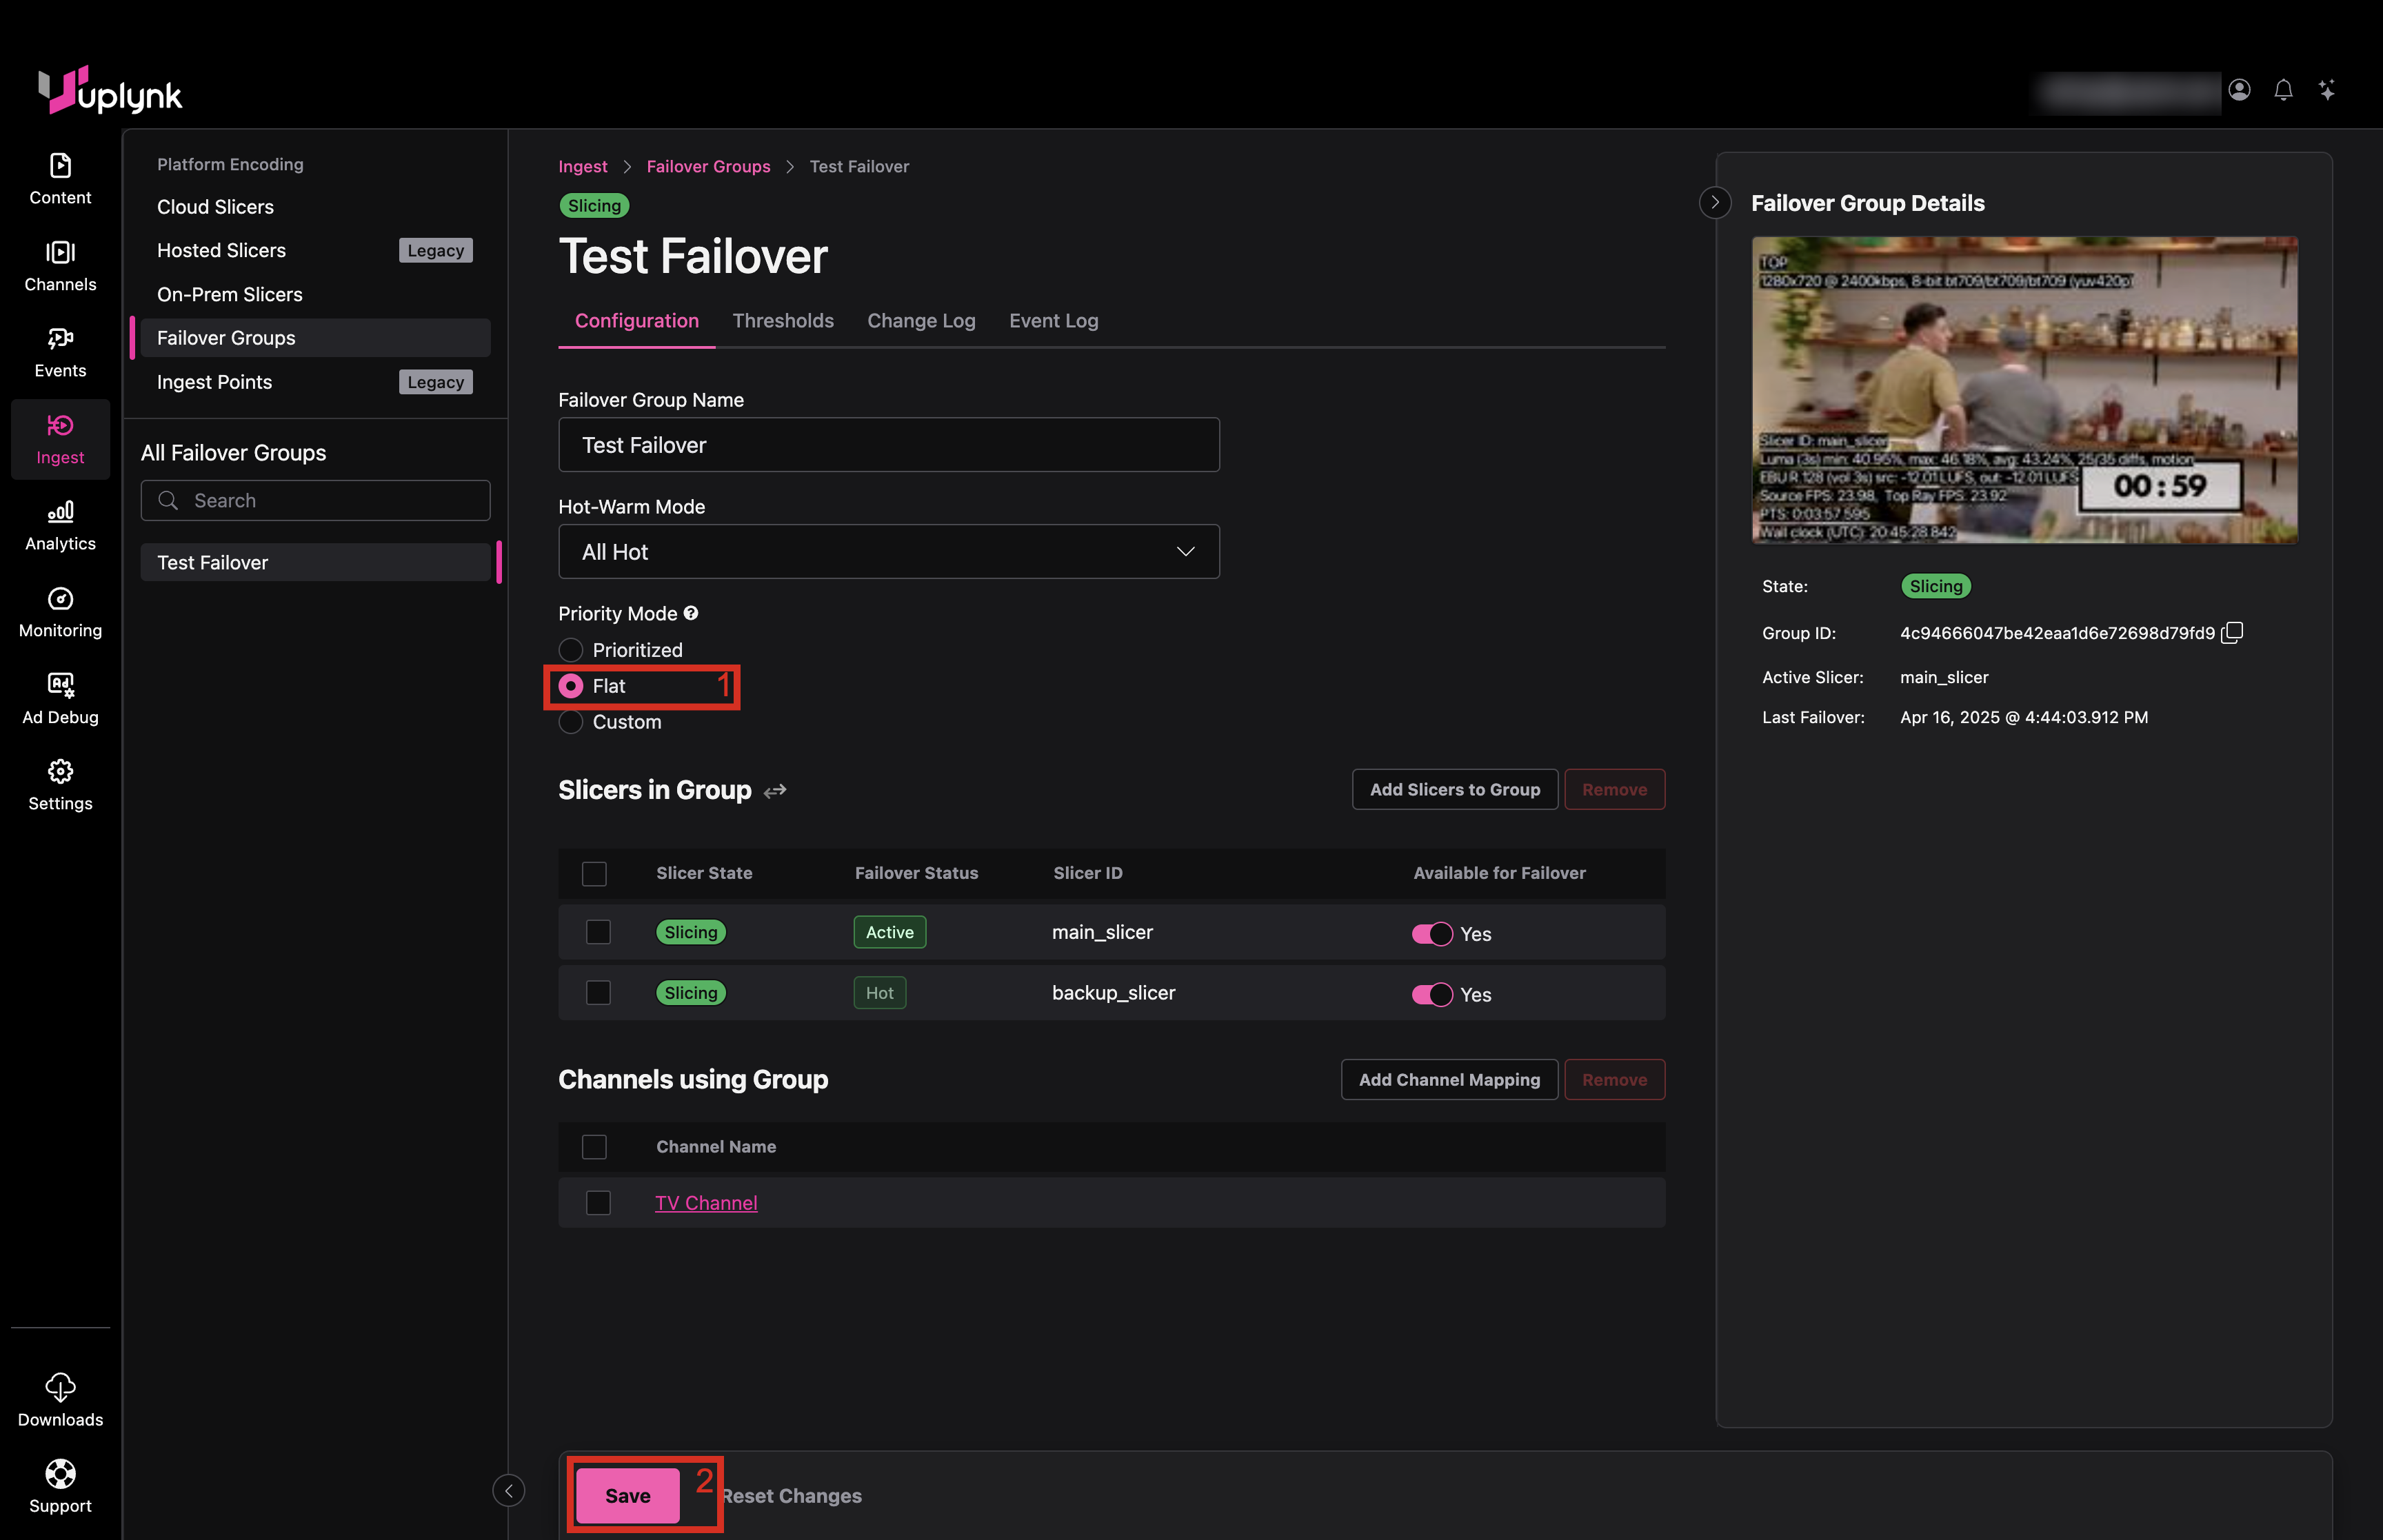
All Slicers have equal priority and a replacement Slicer is randomly chosen from healthy ones.
No automatic failback occurs when a failed Slicer becomes healthy again since all Slicers are considered equal.
Enable Custom Priority Mode
- Change Priority Mode to Custom.
- Edit the priorities (multiple Slicers can share the same priority).
- Select Save.
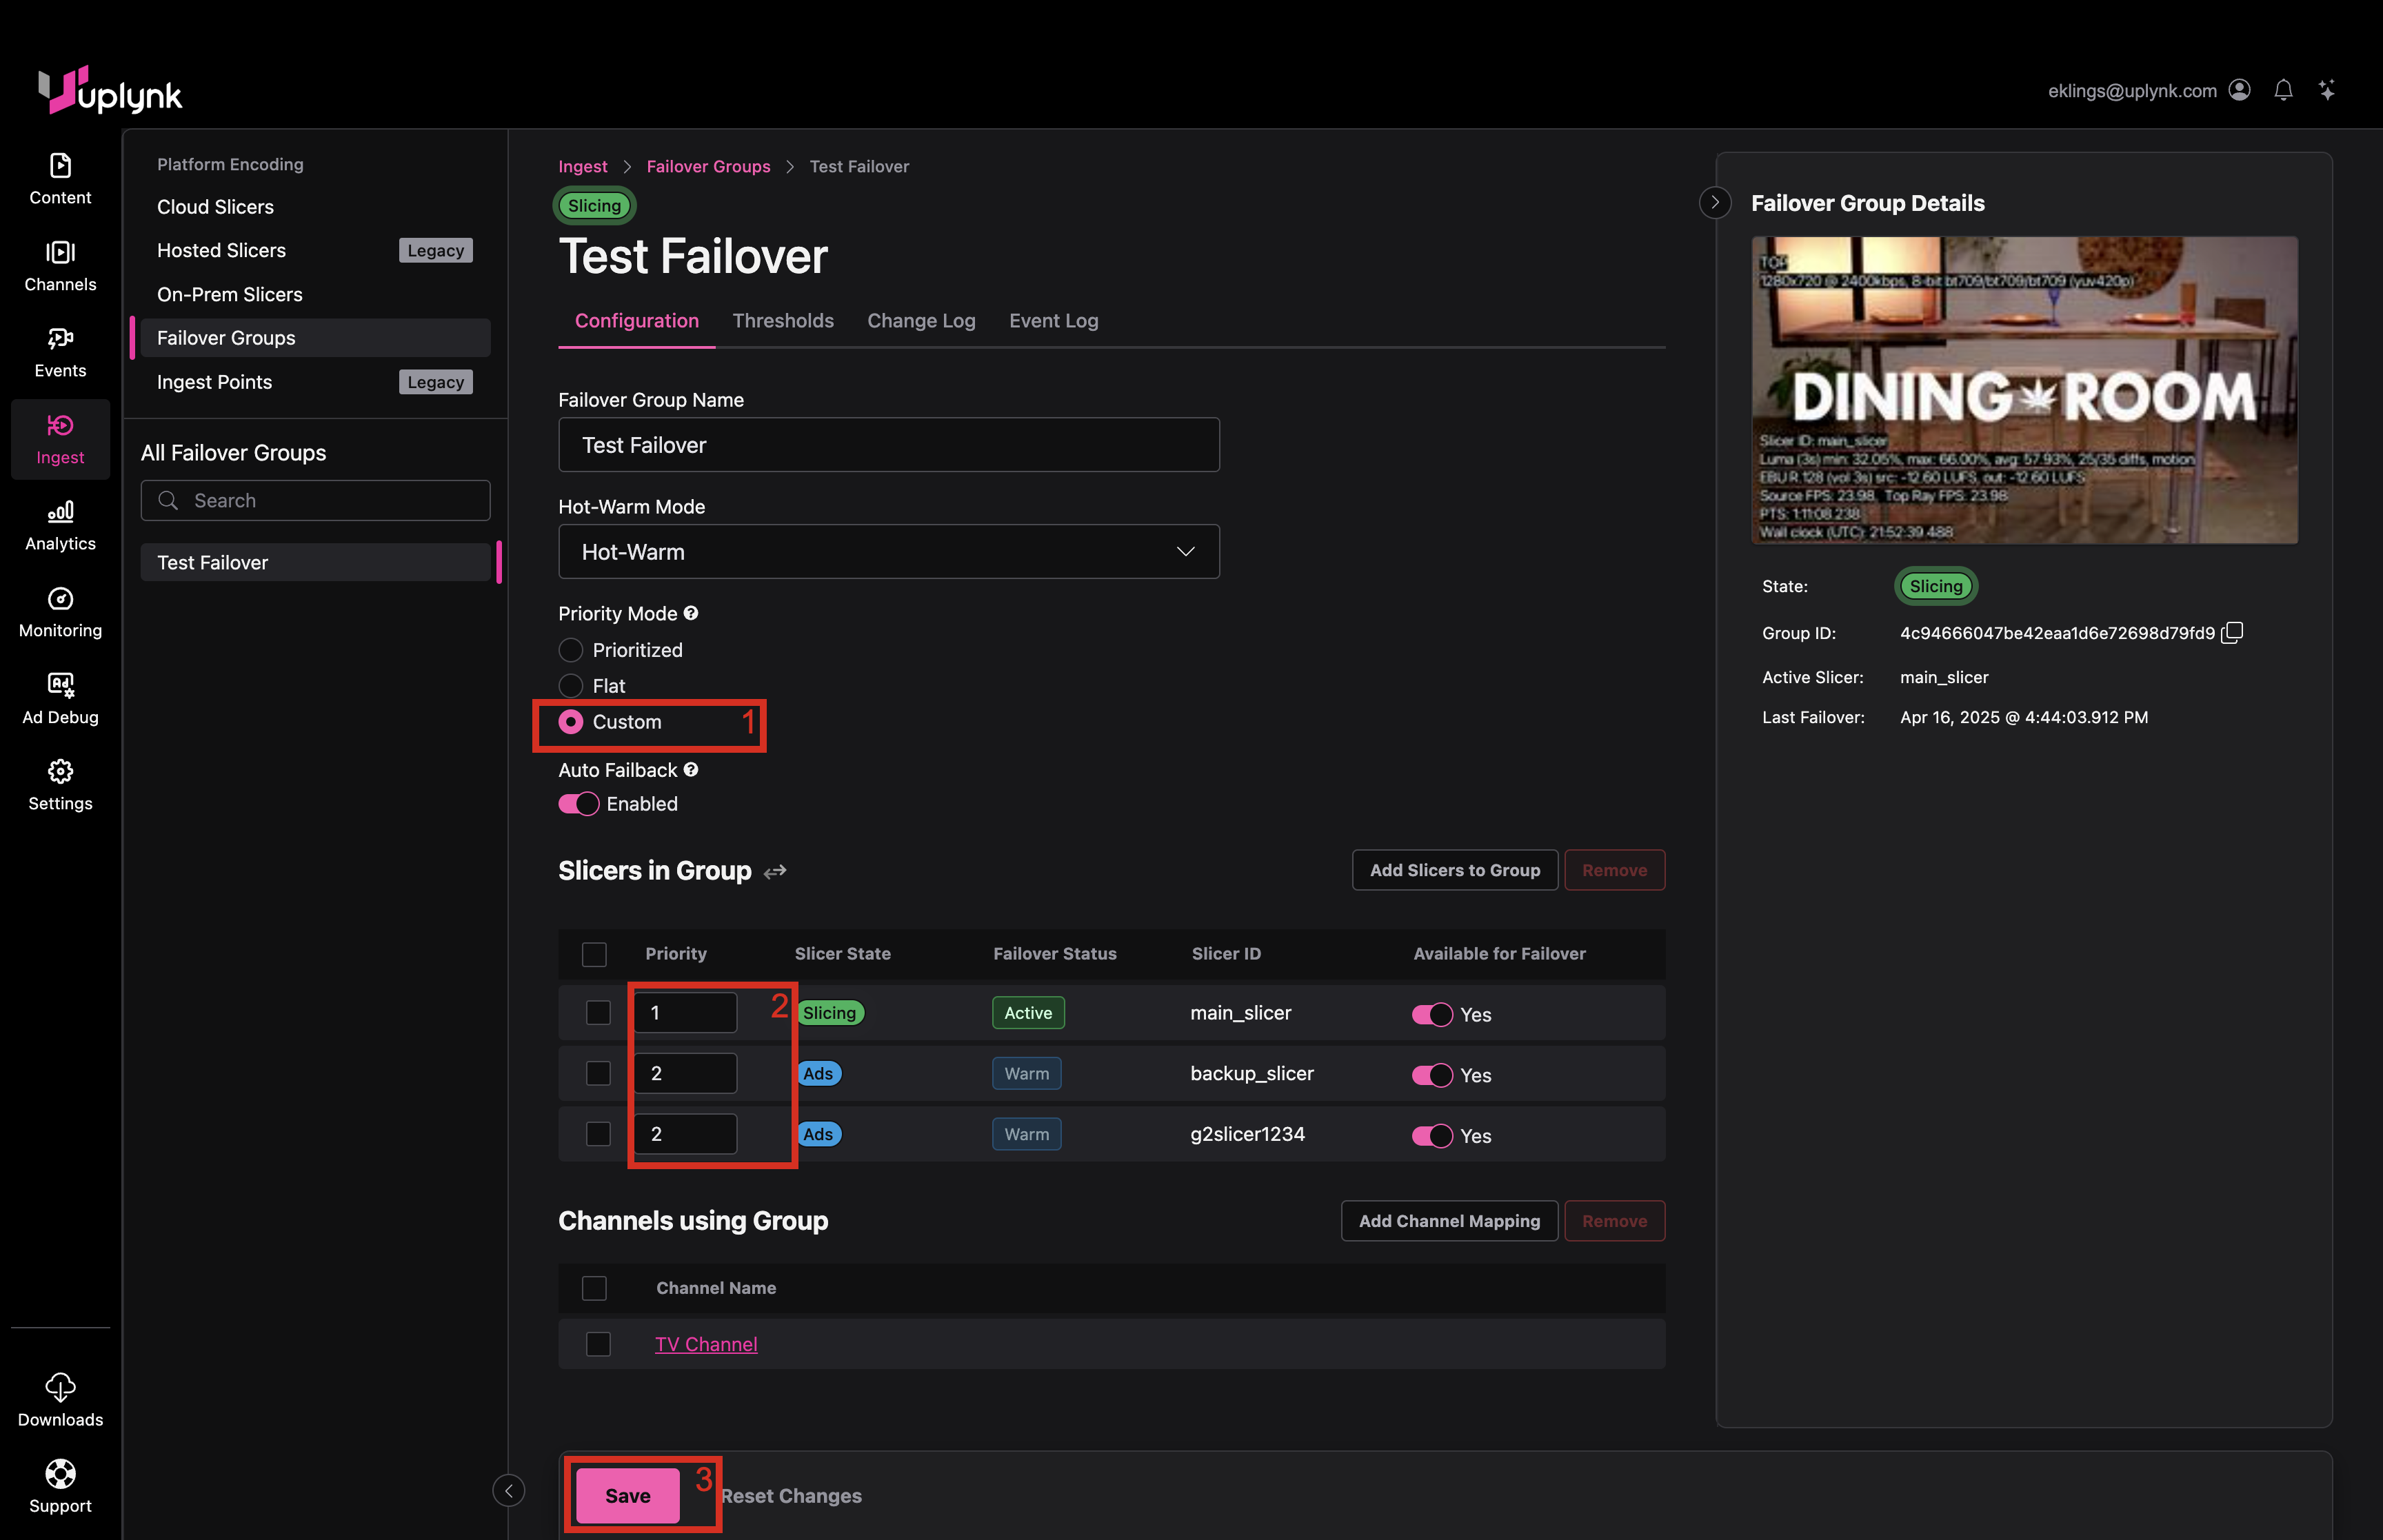
In Custom Priority Mode, the system fails over to any healthy Slicer that has the same or next highest priority as the failed Slicer.
If the failed Slicer becomes healthy, auto failback only occurs if the newly healthy Slicer has a higher priority than the current one. If the current Slicer is Priority 1 and the newly healthy one is also Priority 1, there is no failback.
Disable Auto Failback (Prioritized and Custom Priority Modes Only)
- Set Auto Fallback to Disabled.
- Select Save.
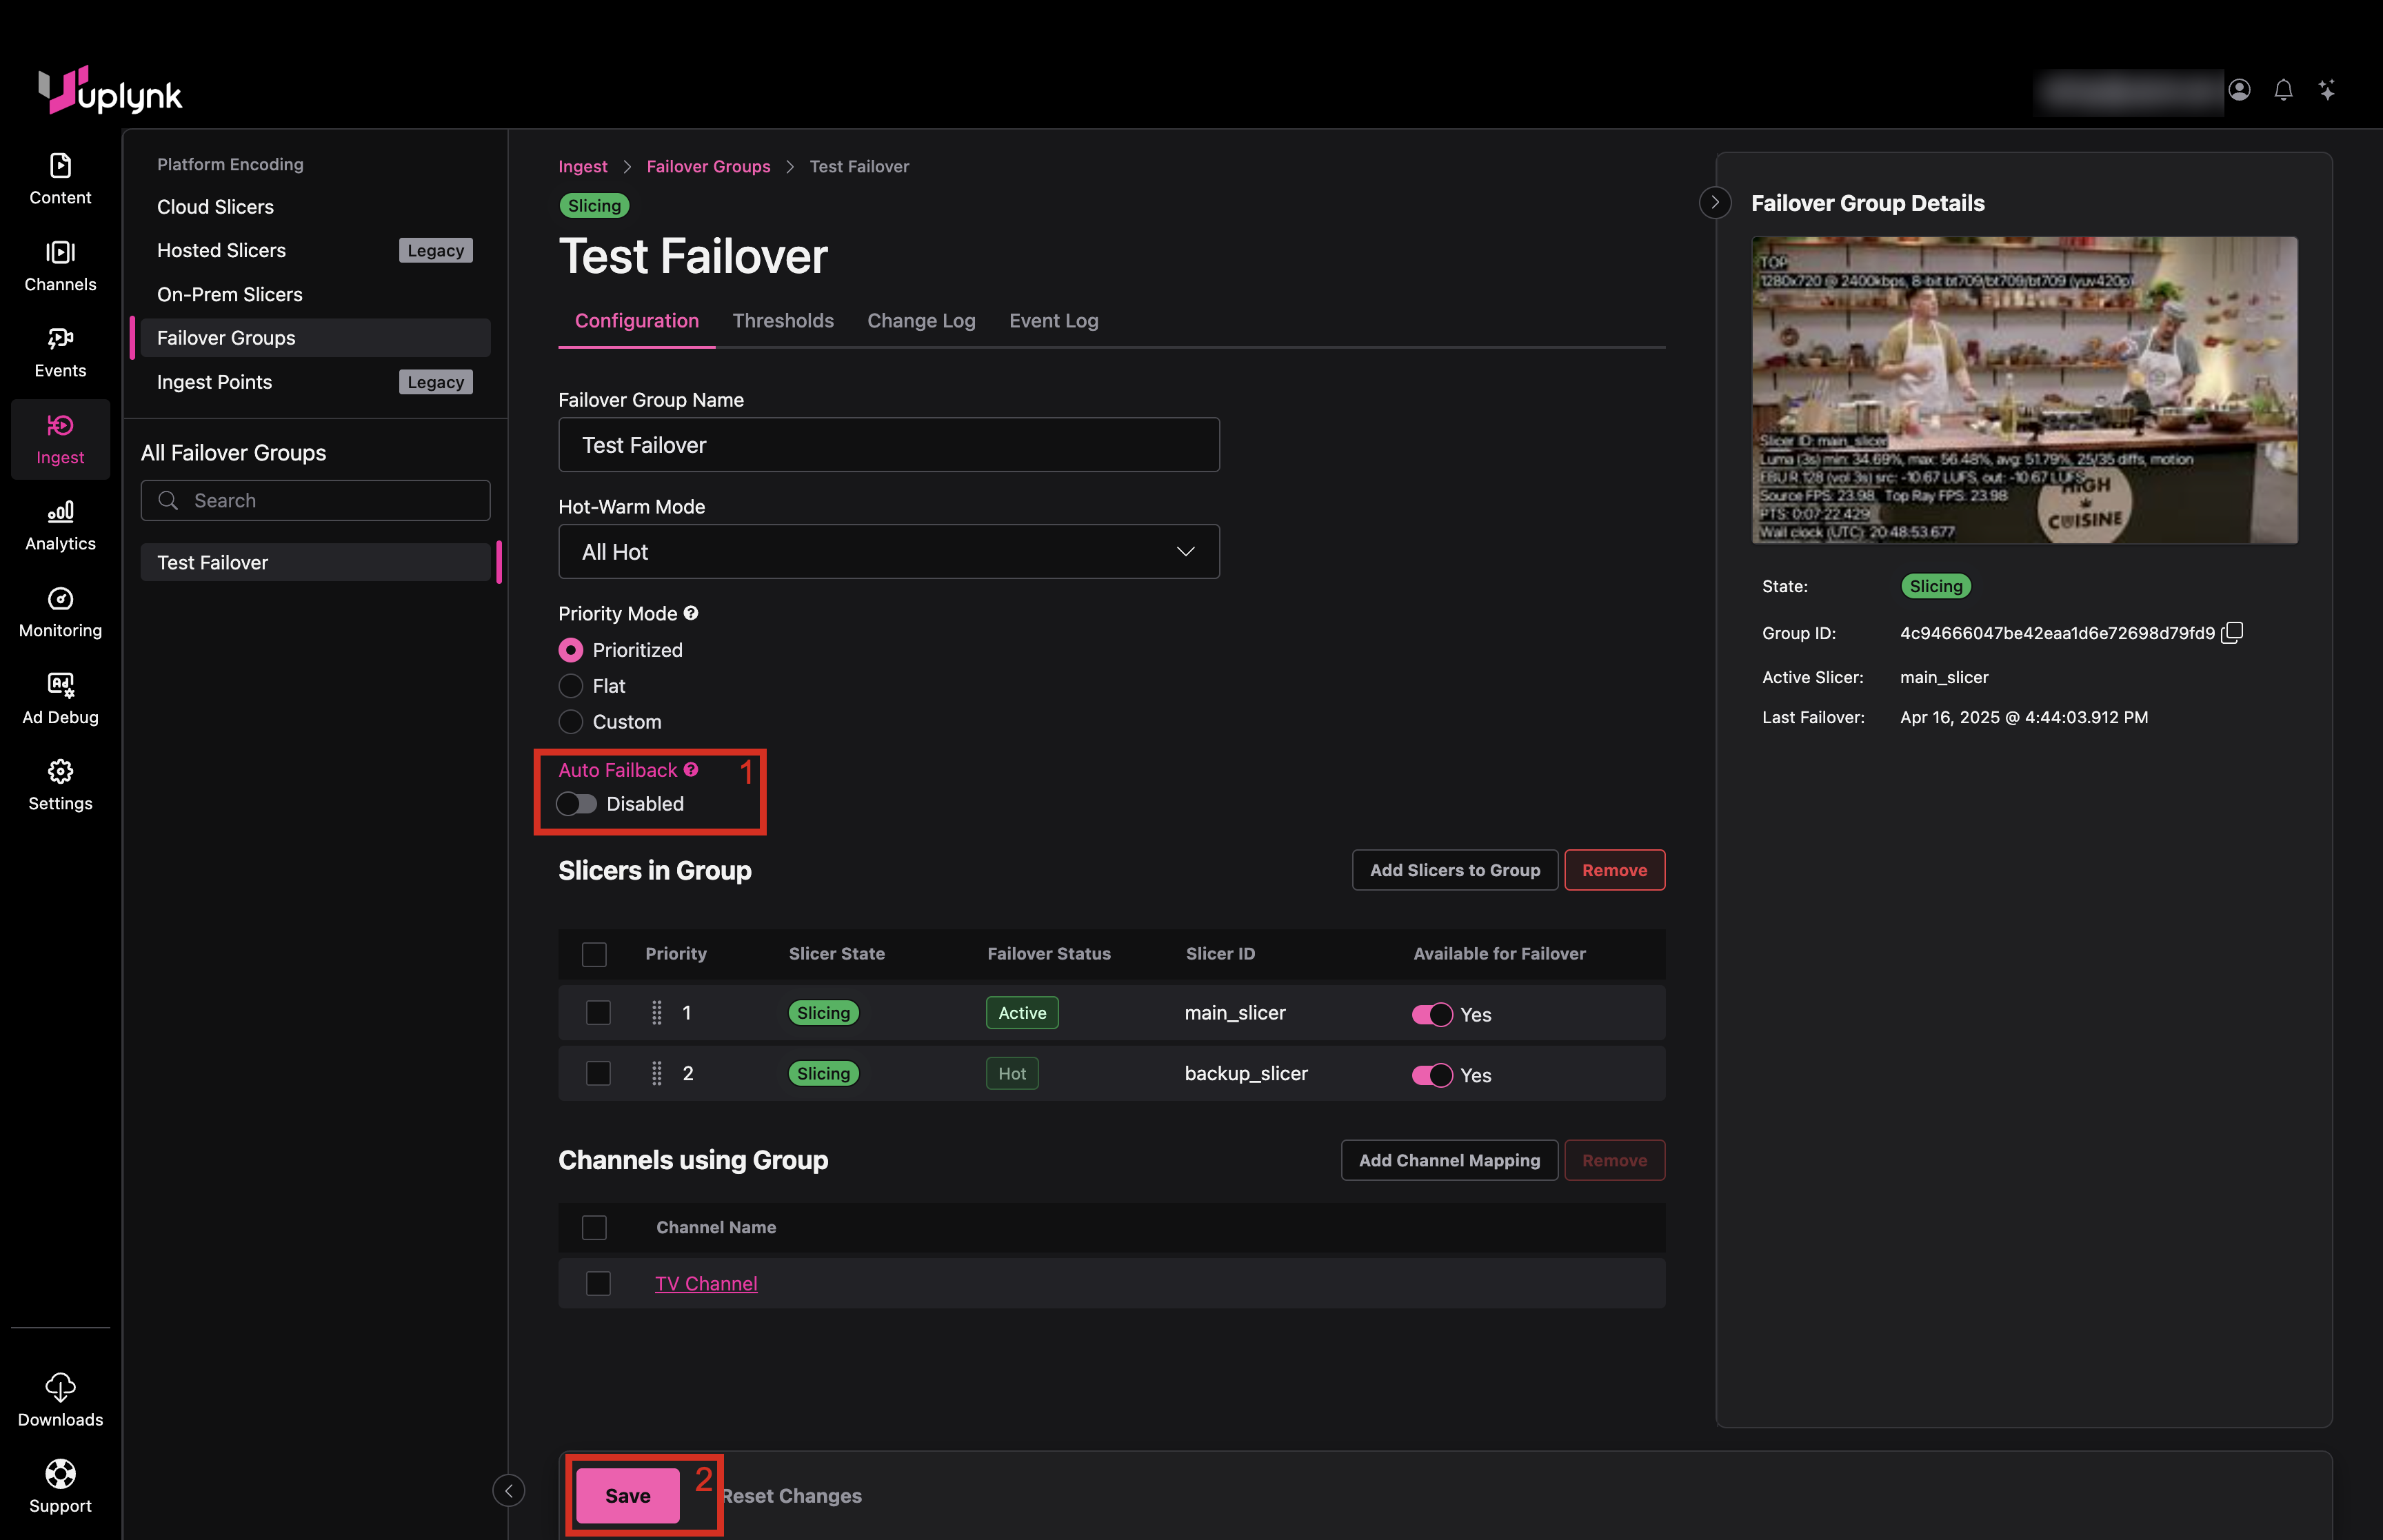
With Auto Failback disabled, after the failed Slicer becomes healthy again, the system does not fail back even though priorities are set.
With Auto Failback enabled, after the failed Slicer becomes healthy again, the system fails back if the newly healthy Slicer has a higher priority.
Flexible Hot-Warm Failover
When there are more than two Slicers in a Failover Group, you can choose how many Hot backups are desired with the rest being Warm.
At this time, it is recommended to use Prioritized Priority Mode only since Flat Mode picks a random Slicer and may select a Warm Slicer.
Blue indicates Warm, and Warm Slicers are always in an Ads state.
Failover Groups Summary
-
Healthy Active Slicer is green and indicated with ]
-
Healthy Hot inactive Slicer is green and indicated with ]
-
Healthy Warm Slicer is blue and indicated with ]
- Unhealthy Slicer is red and overrides the green and blue
- Disabled Slicer is gray and indicated with ]
Updating Existing Channels to Use Slicer Failover
In this scenario, you have a single existing channel fed by a single existing Slicer. The goal is to replace the single existing Slicer with a Failover Group on the existing channel and then add the existing Slicer to the new Failover Group.
Steps:
- Observe the existing channel with the original "main" Slicer.
- Create a new Failover Group.
- Add backup Slicer(s) to the new Failover Group.
- Add the existing channel to the new Failover Group. Since the original "main" Slicer is not in the new Failover Group, the system switches the channel to a backup Slicer in the new Failover Group.
- In the Uplynk CMS, add the original "main" Slicer to the new Failover Group as top priority.
Once enabled and saved, the system switches the channel back to this original "main" Slicer (this takes several minutes while the original "main" Slicer transitions from a denylisted to allowlisted state).
Updated about 2 months ago