
Live Event Configuration
Define a live event's schedule, Live Slicers, ad pods, authorization, content expiration, and markers.
This section explains how to set up a live event for use with a Live Slicer. Live event setup is slightly different when using the CameraSlicer.
A live event may also be created or updated via the Live Events Integration API.
A live event must be scheduled before it can be broadcasted. At its core, setting up a live event consists of:
-
Defining when it will start and/or end: Starting with Live Slicer version 21071400, our service uses system time, as determined by Network Time Protocol (NTP), to identify when to perform a scheduled start or stop of your live event.
-
Determining whether its playback URL must be signed.
-
Determining whether the live event will be made available as on-demand content upon its completion.
-
Defining the external ID through which a playback URL may be generated.
-
Defaulting appropriate live event configurations (e.g., slate, content expiration, the ability to resume a live event, etc.) from the Slate and Live Events pages located under the Settings tab.
Set up a Live Event
-
Navigate to the Live Events page. From the main menu, navigate to Events > Live Events.
-
Click +Event.
-
In the Event Name option, assign a unique name to the live event.
-
Click Create. Tick the box to edit the event after creation.
-
Optional: Perform the following actions from the Details tab:
- Schedule the Live Event: Assign the desired start and stop date/time through the Scheduled Start Time and Scheduled Stop Time options. Set the Auto Start/Stop option to "Yes" to automatically run the live event according to the schedule.
- Define an External ID: Assign a unique ID to the live event through the External ID option. This ID may be used to generate a playback URL.
-
Optional: From the Config tab, define live event settings, such as:
-
Assigning an operator.
-
Determining the post-event playback experience for new viewers.
-
Deciding whether a token will be required for playback.
-
Setting up slate.
-
Configuring how long content generated from the live event will be kept.
Playback Latency: Select the level of latency behind live for this event:
- Default: 60 seconds
- Low: Low 20s, 5+ second buffering, Missing Content Slate (MCS) is possible
- Lower: Upper teens
-
-
From the Slicers tab, type the name of the desired Live Slicer in the Slicer ID option and then click + Add.
The specified name must be a case-sensitive match to the value defined in the
slicerIDsetting of the Live Slicer configuration file.
For your convenience, suggested Live Slicers will be provided as you type.
Manage this suggestion list
The easiest way to add a Live Slicer to the suggestion list is to click Yes when adding the desired Live Slicer to a live event configuration.
Manage this suggestion list from the Live Event Slicers section of the Live Events page. The Account Slicers list displays all Live Slicers that have ever sliced content to your account, while the Live Event Slicers section defines the set of Live Slicers suggested when setting up a live event configuration.
-
Optional. From the Ads tab, define the ad pods that will be associated with the live event.
Add a Set of Ad Pods by Importing a CSV File
-
Optional. From the Metadata tab, define the metadata that will be associated with the live event.
-
The Playback tab contains a playback URL, test Flash/HTML5 players, and HTML embed code. Use this information to test your live event and set up a media player.
-
Click Save.
Copy a Live Event
-
Select the desired live events from the Live Events page.
-
Click Duplicate {n} Events.
-
If a live event selected in step 1 contains metadata, you will be prompted to review the fields that will be added to the new live event:
- Exclude metadata from the new live event by clicking the rubbish-bin icon that appears to the right of each desired field.
- Click Duplicate when finished.
- Clicking Close will prevent that live event from being copied.
-
A copy of each live event selected in step 1 will be created. Each new live event will be named
Copy of {Live Event}.
What are the differences between a live event and its duplicate?
Duplicating a live event will not generate an exact copy. Unique or event-specific settings within the new live event will be cleared or reset to a default value. These settings are listed below.
| Setting | Value |
|---|---|
| Assets | Blank |
| Auto Start/Stop | No |
| External ID | Blank |
| Logs | The following two actions will be logged:
|
| Playback | The following changes will be applied to playback settings:
|
| Scheduled Start Time | Blank |
| Scheduled Stop Time | Blank |
| Status Information | The following status information will be set:
|
Add a Set of Ad Pods by Importing a CSV File
-
Verify that your CSV file uses an ad pod-compatible format.
-
From the Add Pod pane, click Browse....
-
Navigate to the desired CSV file, select it, and then click Open.
-
Click Import from CSV.
The Ads tab will be populated by the ad pods defined within the selected CSV file. Ad pods will be listed in the order they were defined in the CSV file.
Manually Define Ad Pods
-
From the Add Pod pane, specify a unique name for the ad pod under the Name option.
-
In the Duration option, specify the duration of the ad pod. Format:
hh:mm:ss -
Click + Add.
-
Optional. Add metadata that will be sent to the third-party ad server when the ad pod is queued up by an operator.
- Select the newly created ad pod.
- From the Add Metadata pane, specify a unique name in the Key option.
- In the Value option, specify the value for the key being created.
- Click + Add.
- Optional. Add an additional key/value pair by repeating the steps above.
-
Repeat steps 1 - 4 as needed.
-
Click Save.
Add Metadata by Importing a CSV File
- Verify your CSV's format and data.
- Format: The format should follow either of the following conventions:
| Type | Description |
|---|---|
| Columns | This format requires all key names to be defined in the first row. Example: Key1,Key2,Key3Value1,Value2,Value3 |
| Rows | This format requires all key names to be defined in the first column. Example: Key1,Value1Key2,Value2Key3,Value3 |
-
Data: Verify that the CSV's data does not conflict with metadata already associated with the live event.
Importing a CSV will overwrite metadata fields when a key with the same name is found.
- From the Add Metadata pane, click Browse....
- Navigate to the desired CSV file, select it, and then click Open.
- Click Import from CSV. The Metadata tab will be populated by the metadata defined within the selected CSV file. Metadata fields will be listed in the order they were defined in the CSV file.
Manually Define Metadata
-
From the Add Metadata pane, specify a unique name for the metadata field under the Key option.
-
In the Value option, specify the value for the key being created.
-
Click
+ Add. -
Optional: Add an additional key/value pair by repeating steps 1 - 3.
-
Click Save.
Ad Pods
An ad pod defines an ad break window and associates metadata with it.
Methods to Take an Ad Break
-
Live Event Configuration:
- An operator may cue and then take an ad pod that was defined within the live event's Ads tab prior to the start of the live event.
- Once the ad pod's duration has elapsed, the live event will automatically switch back to the Slicer source.
-
Manually: An operator may start and end an ad pod during a live event by switching the source between Slicer and Ad Break.
-
API: The Live Slicer API contains several endpoints (i.e.,
pod_start,pod_end, andreplace_pod) through which ad pods may be triggered.
Ad State Alerts
You may configure the Live Events Dashboard to alert the operator when a live event is in an ad state for a specified number of minutes. Once enabled, a warning will be displayed 15 seconds prior to the specified number of minutes. After the specified time limit has elapsed, a critical alert will replace the warning.
- Set up a default alert configuration through the Default Ad Break Warning (min) option from the Live Events page.
- Override this default setting on a per live event basis by opening the desired live event, clicking the Config tab, and then setting the Ad Break Warning (mins) option to the desired number of minutes.
Ad Pod CSV Setup
Quickly add multiple ad pods to a live event configuration by importing a CSV file. Define the following fields within that CSV file:
Ad Pod Fields
| Field | Description |
|---|---|
| Name Required | Assigns a unique name to an ad pod. |
| Duration Required | Assigns a duration to the ad pod. Specify duration in seconds or the time formats defined below.
|
| KeyName | Assigns a key/value pair to the ad pod. Key information:
|
Use a spreadsheet application (e.g., Excel or Google Sheets) to quickly create CSV files. Make sure that the first row in the spreadsheet contains the above fields.
Sample CSV File
The following sample CSV file contains two required fields (i.e., Name and Duration) and two fields that define key/value pairs (i.e., Type and Region):
Name,Duration,Type,Region
Widgets,30,Informational,
Conference,45,Conference,US
Event 1,90,Event,
Event 2,120,Event,
Event 3,150,Event,
Importing this sample CSV file will add the following ad pods to the live event configuration:
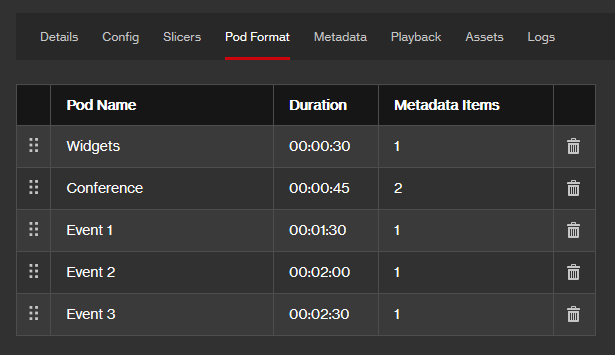
Notice that only the Conference ad pod contains two key/value pairs. The other ad pods were assigned only a single key/value pair, since the second key/value field (i.e., Region) was not assigned a value for those ad pods.
Live Event Authorization
A live event may be created, viewed, and operated by either the owner of the account or any authorized user. Authorization may be granted to other users via the following permissions:
| Permission | Description |
|---|---|
| Read | Allows a user to view detailed information for each live event associated with your account. Either the Write or the Assigned permission is required to operate a live event. |
| Write | Allows a user to modify and operate any live event associated with your account. |
| Assigned | Identifies a user as a potential operator for the live events associated with your account. In addition to this permission, authorization must be granted to this user on a per live event basis. After which, the user will be allowed to operate authorized live events via the Live Events Dashboard. |
Permissions may be defined on a per user basis from the Account Access page. Navigate to this page by clicking the Settings tab and then clicking Account Access Settings from the side navigation tab.
Authorize a User as an Operator
- Grant the Assigned permission to the desired user from the Account Access Settings page. If the operator requires the capability to view or make changes to a live event prior to its start, then grant the Read and Write permissions as well.
Users who have been granted the Write permission may operate any live event and therefore do not require authorization on a per live event basis. Skip the following two steps for this type of user.
-
Navigate to the Live Events page. From the main menu, navigate to Events > Live Events.
-
Select the desired live event to open it.
-
Click the Config tab.
-
From the Event Operator option, select the user identified in step 1.
-
Click Save.
Content Expiration
A live event may generate the following types of content:
- Temporary Live Event Assets: The primary and each backup Live Slicer will generate temporary audio/video assets. These assets are stitched together to form the live stream and on-demand content.
- CMS Asset: An asset that replicates the viewing experience of the live event will be added to the CMS library upon its completion. Live events with a duration longer than 8 hours will be split into multiple assets.
Account-Level Settings:
- A default content expiration policy may be defined from the Live Events page. Define the desired content expiration policy through the settings in the Content Expiration section. These settings determine whether the CMS asset and the temporary assets generated from the live event will be automatically deleted once the specified number of hours have elapsed from the completion of the live event.
A minimum content expiration policy of 150% of the duration of the live event is automatically applied to the temporary assets generated for all live events.
Live Event Configuration:
- Override the default expiration policy for the CMS asset generated for a live event through the VOD Auto Expire Hours option.
Valid values are:
<Blank Value>: The default expiration policy will be honored.0: The asset generated from the live event will be immediately deleted from the CMS library.<Hours>: The asset generated from the live event will be deleted from the CMS library after the specified number of hours have elapsed.
Markers
Mark key events within your live event via markers. A marker is a custom tag that can be applied to a specific moment within your live event. Marking an event adds it to:
-
Live Events: Adds a log entry. View your live event's log data via the EVENT DETAILS tab of the Live Events Dashboard and the Logs tab of your live event configuration.
Log event syntax:
Event Marker Set: {Marker Type}:{Marker Name} -
Live Event Status Reporting: Triggers an
eventwhose event property uses the following syntax:"event": "Event Marker Set: {Marker Type}:{Marker Name}", -
Live Stream: Adds an ID3 tag, which is a text information frame (TXXX frame), to the live stream.
-
Get Live Events API: Returns marker log data within the
markerslist.
Each marked event logs the type of marker, the name of the marker, and the specific moment at which the live event was marked.
Marker Setup
Setting up markers requires:
- Creating a marker template that contains the set of markers that may be applied to your live event.
- Assigning the desired marker template to your live event.
Assign a template by loading the desired live event configuration, verifying that the Details tab is active, and then selecting the desired template from the Marker Template option.
Once you have performed both of the above steps, your live event operator can mark key events using the set of markers corresponding to the marker template assigned to the live event.
Create a Marker Template
-
Navigate to the Marker Templates tab: Go to the Live Events page and click on the Marker Templates tab.
-
Click + Marker Template.
-
From the Marker Template Name option, type the name that will be assigned to the new template and then click Add.
-
Select the new template from the list.
-
Add a Marker Category:
- Click + Type.
- From the Type Name option, type the name of the marker category.
- Click Add.
- Repeat the previous step as needed to add more categories.
-
Add a Marker to the Template:
- Select the desired marker type to expand it.
- From the Marker Name option, type the name that will be assigned to the marker.
- Click Add.
- Repeat the previous step as needed to add more markers.
-
Click Save.
Mark Key Events Within a Live Event
-
Verify that the desired marker template has been assigned to your live event configuration.
-
Start Live Event: Open the Live Event Dashboard and start your live event.
-
Select Marker
In the Markers section, select the desired marker by performing the following steps:- From the Type option, select the desired type of marker.
- From the Tag option, select the desired marker.
- If the desired marker is not listed, type the name of the desired marker and press ENTER. It will then be added to the list of available markers for the duration of your Live Event Dashboard session. To permanently add this marker for future live events, follow the instructions in the Create a marker template procedure.
-
Wait until the desired moment in the live event, then click Mark to use the selected marker to add a marked event to your log data, live stream, and Live Event Status Reporting.
-
Repeat steps 3 and 4 as needed.
Updated 6 days ago