
Schedule Entry Components
Add, modify, replay, reorder, delete, import and export schedule entries, and replace the live feed.
Schedule Entry Components
Each schedule entry consists of the following elements:
-
Type: A schedule entry replaces the live feed with either an ad break, an asset, or the live feed from a different Live Slicer.
-
Start Time: A schedule entry's start time identifies the date and time at which either an ad break or an asset will start.
NOTE: Before scheduling ad breaks and content replacement, adjust the time zone to reflect your programming's time zone. Upon selecting a different time zone, the time slot for your existing entries will shift to reflect your selection.
-
Duration:
- Ad Break and Live Slicer: Manually specify the duration for an ad break or Live Slicer schedule entry. View syntax.
- Asset: The schedule entry's duration is determined by the duration of its asset and all of the ad breaks associated with that asset. View syntax.
A schedule entry's duration cannot exceed 12 hours.
-
Content: A schedule entry's content varies by type:
-
Ad Break: During playback, an upcoming ad break triggers your player to issue a request for ads. An ad decision server may then serve dynamic ads that are automatically inserted into the scheduled ad break.
-
Asset: This type of schedule entry consists of an asset and the ad breaks inserted into it. Dynamic ads may be inserted into those ad breaks during playback as described above.
View an asset's ad breaks from the Ad Breaks tab. The Offset column indicates when each ad break starts relative to the start of the asset. For example, an offset of
00:10:30indicates that the ad break starts 10 minutes and 30 seconds into the asset.Insert ad breaks into an asset while encoding it. For example, use the break parameter to insert one or more ad breaks when encoding content via the Slicer.
-
Slicer: This type of schedule entry consists of the live feed from a specific Live Slicer. You may only schedule another user's Live Slicer if it is streaming to a library shared with your account.
-
Add a playlist to insert the assets and ad breaks associated with it into your live channel's schedule. These assets and ad breaks are inserted in sequential order starting from the selected start time.
Once you have added a playlist to your schedule, you may modify or delete each schedule entry as needed. Modifying or deleting a schedule entry does not affect any other schedule entry or the original playlist. Modifying or deleting the original playlist does not affect your live channel's schedule.
Information describing a schedule entry is available for 30 days after it ends.
Add an Entry to Live Channel Schedule
-
Navigate to Live Channels: Select the desired live channel. Select the Schedule tab.
Live channels created without scheduling enabled have a History tab and no scheduling functionality.
-
Optional. Adjust the time zone as needed.
-
Navigate to the desired date and then select the time slot where the entry will be scheduled.
Select a more precise time slot by zooming in. Zoom in by sliding the Zoom option to the right.
You may set a start time that is precise to the second via the Start Time option. See the next step for more information.
-
Schedule an asset, ad break, Live Slicer, or playlist by performing one of the following procedures:
-
If the service detects a conflict with one or more previously scheduled entries, you must resolve it before proceeding. Resolve a conflict by performing one or more of the following steps:
-
Adjust the entry's start time from within the Start Time option.
-
If you are adding an ad break, adjust the entry's duration from within the Total Duration option.
-
From the Conflicts tab, you may instruct the service to remove conflicting entries or to trim the entry being added.
-
To remove previously scheduled entries that conflict with the entry being added, select the Remove conflicts option.
To trim the beginning of the asset to fit within the current scheduling gap, select the Autofit new entry by trimming it from the beginning option.For example, selecting this option when scheduling a 20 minute asset within a 15 minute scheduling gap trims the first 5 minutes of that asset. Playback of this entry will start 5 minutes into the asset.
-
To trim from the end of the asset to fit within the current scheduling gap, select the Autofit new entry by trimming it from the end option.
For example, selecting this option when scheduling a 20 minute asset within a 15 minute scheduling gap trims the last 5 minutes of that asset. Viewers will only be able to play the first 15 minutes of this entry.
Trimming an asset can affect the number of ads served. Specifically, ads will not be served for an ad break positioned within a trimmed portion of the asset.
-
Select Cancel if you no longer wish to add this entry to your live channel's schedule.
-
-
Select Add Asset, Add Ad Break, Add Slicer, or Add Playlist to apply the above change(s).
Modify a Schedule Entry
-
Navigate to the Schedule tab for the desired live channel:
- Go to Live Channels.
- Select the desired live channel.
- Select the Schedule tab.
-
Select the desired entry and then select Edit Asset, Edit Ad Break, or Edit Slicer.
If the entry has a short duration, hover over it to expand it. If it is still too small, zoom in to the schedule by sliding the Zoom option to the right.
-
Perform one of the following steps:
- Asset: Modify the asset's start time and ad break durations as needed.
- Ad Break: Modify the ad break's name, start time, or duration as needed.
- Live Slicer: Modify the Live Slicer's ID, start time, or duration as needed.
-
Select Update Asset, Update Ad Break, or Update Slicer to save your changes.
Replay Schedule Entries
Use this feature to replay a live session during a specified time slot.
-
Navigate to the Schedule tab for the desired live channel:
- Go to Live Channels.
- Select the desired live channel.
- Select the Schedule tab.
-
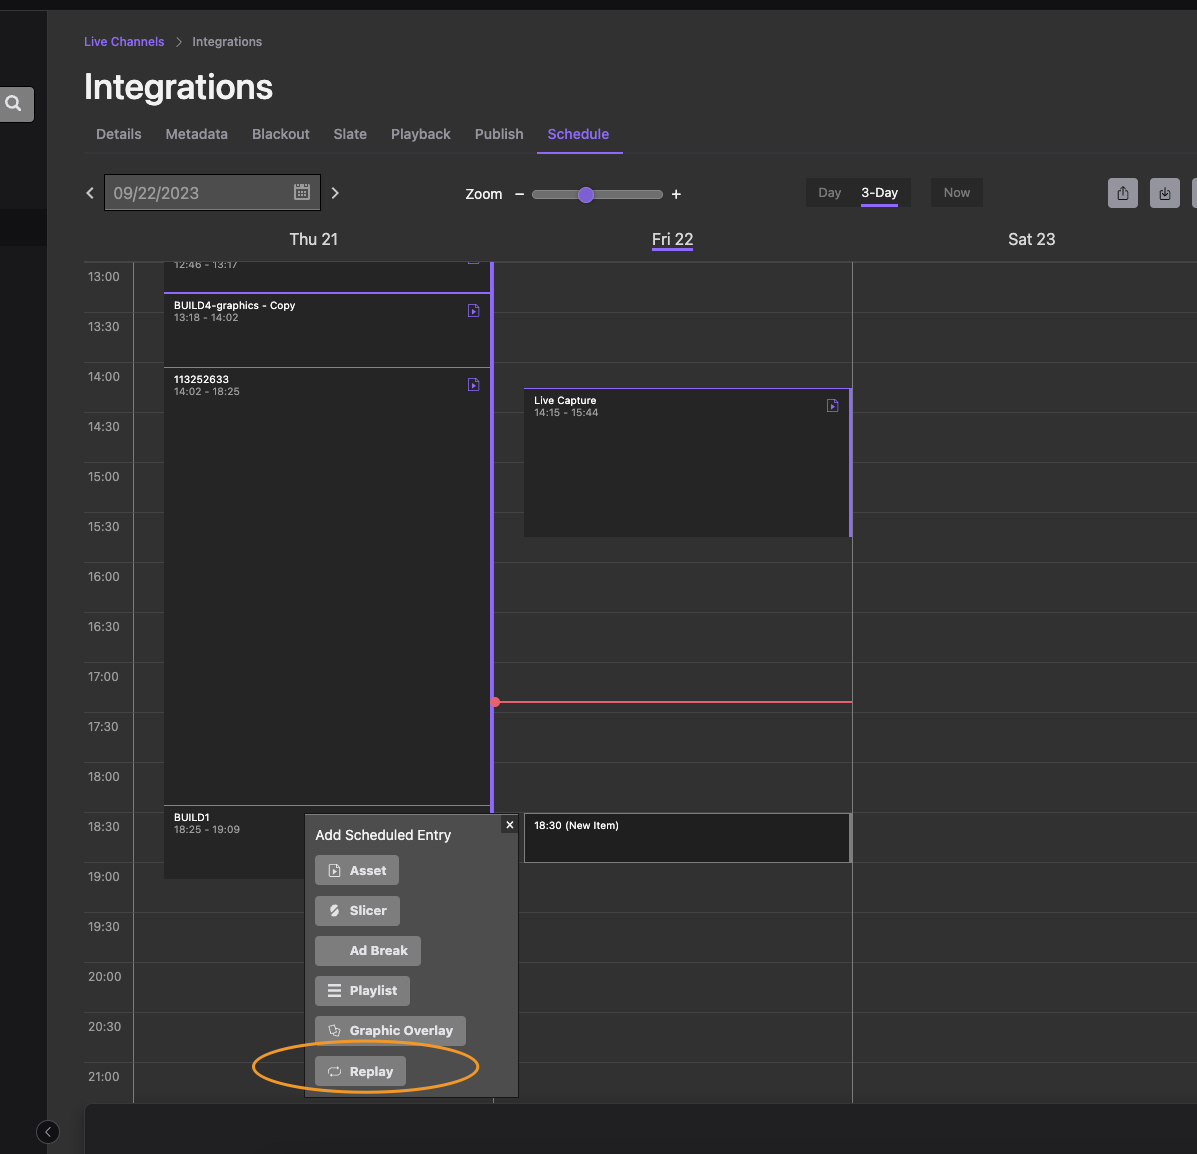
Select an empty time slot in the future and choose Replay from the list of options. This launches the Replay window.
-
Fill out the Details tab for the replay:
- Name: This title appears in the schedule.
- Start Time: The time the replay should begin playing.
- Duration: The length of time of this replay.
- Source - Start Time: The start time of the content you want replayed.
- Source - End Time: The end time of the content you want replayed.
-
Select Add Replay at the bottom left to save this entry and add it to the schedule.
Reorder Schedule Entries
-
Navigate to the Schedule tab for the desired live channel:
- Go to Live Channels.
- Select the desired live channel.
- Select the Schedule tab.
-
Select the entry to drag and drop to the new time slot, or hold down the Shift key, select, and drag the entry over another entry to magnetize them together.
-
The update is confirmed with a pop-up in the top right corner.
Delete a Schedule Entry
-
Navigate to the Schedule tab for the desired live channel:
- Go to Live Channels.
- Select the desired live channel.
- Select the Schedule tab.
-
Select the desired entry and then select Edit Asset, Edit Ad Break, or Edit Slicer.
If the entry has a short duration, hover over it to expand it. If it is still too small, zoom in to the schedule by sliding the Zoom option to the right.
-
Select Delete.
-
When prompted, confirm the deletion by typing DELETE and then selecting Delete.
Export a Schedule
Export fields from scheduled content to a .csv file so you can reuse the same schedule or share it with other stakeholders.
-
Navigate to the Schedule tab for the desired live channel:
- Go to Live Channels.
- Select the desired live channel.
- Select the Schedule tab.
-
Select the export option from the top right corner.
-
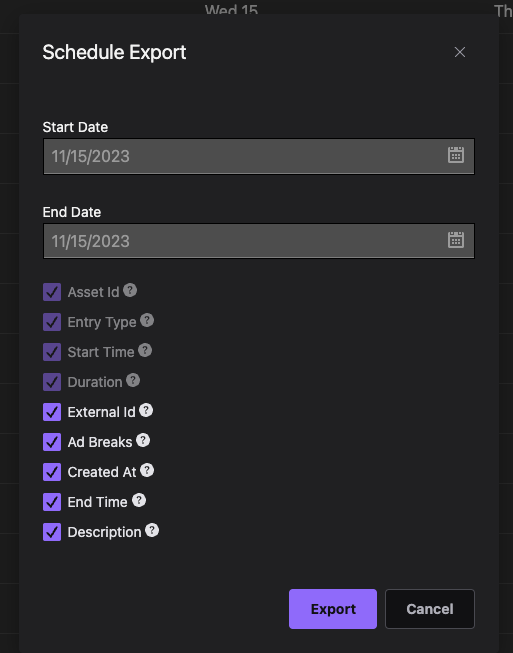
In the Schedule Export window, select the start and end dates of the schedule to export.
-
Check the box for the fields to export. Certain fields are selected by default, and you can include other fields to customize the data exported:
- Asset Id: The ID of the asset/ad/slicer.
- Entry Type: The type of the entry (asset/ad/slicer).
- Start Time: The time the entry starts based on its position in the schedule.
- Duration: The total duration of the asset (including ads).
- External Id: The external ID of an asset, if applicable.
- Ad Breaks: The duration of each break measured in seconds.
- Created At: The timestamp (in ISO) when the entry was added.
- End Time: The timestamp (in ISO) when the entry ends.
- Description: A description of the asset, if applicable.
-
Select Export to save the csv file to your system's default location.
Import a Schedule
Use this feature to import a .csv file of an existing schedule to quickly add content to your channel. Importing a .csv file overrides any content currently scheduled in the channel.
Prerequisite: Export the schedule you want to upload to your channel.
-
Open the
.csvfile you exported and update the fields for the new schedule:-
id: The ID of the content that should reflect an asset, an ad, or a slicer.
-
type: The classification of the content. The available options are
asset,ad, orslicer. -
start_time: The time you want the asset to start playing.
If you want the first asset to start at a specific time, and then the following asset to start at the end time of the previous asset, leave the
start_timefield empty for the subsequent asset. -
duration: The length of time the content plays, including its ad breaks (e.g., if the asset is 30 minutes long and has two ad breaks, and you set the duration to one hour, each duration will be 15 minutes long).
-
-
Save your changes to the
.csvfile. -
Navigate to the Schedule tab for the desired live channel:
- Go to Live Channels.
- Select the desired live channel.
- Select the Schedule tab.
-
Select the import option from the top right corner.
-
Drag your
.csvfile into the window or selectBrowse Filesto find and open the file to upload. -
Optional: Fix any errors indicated in the Status column.
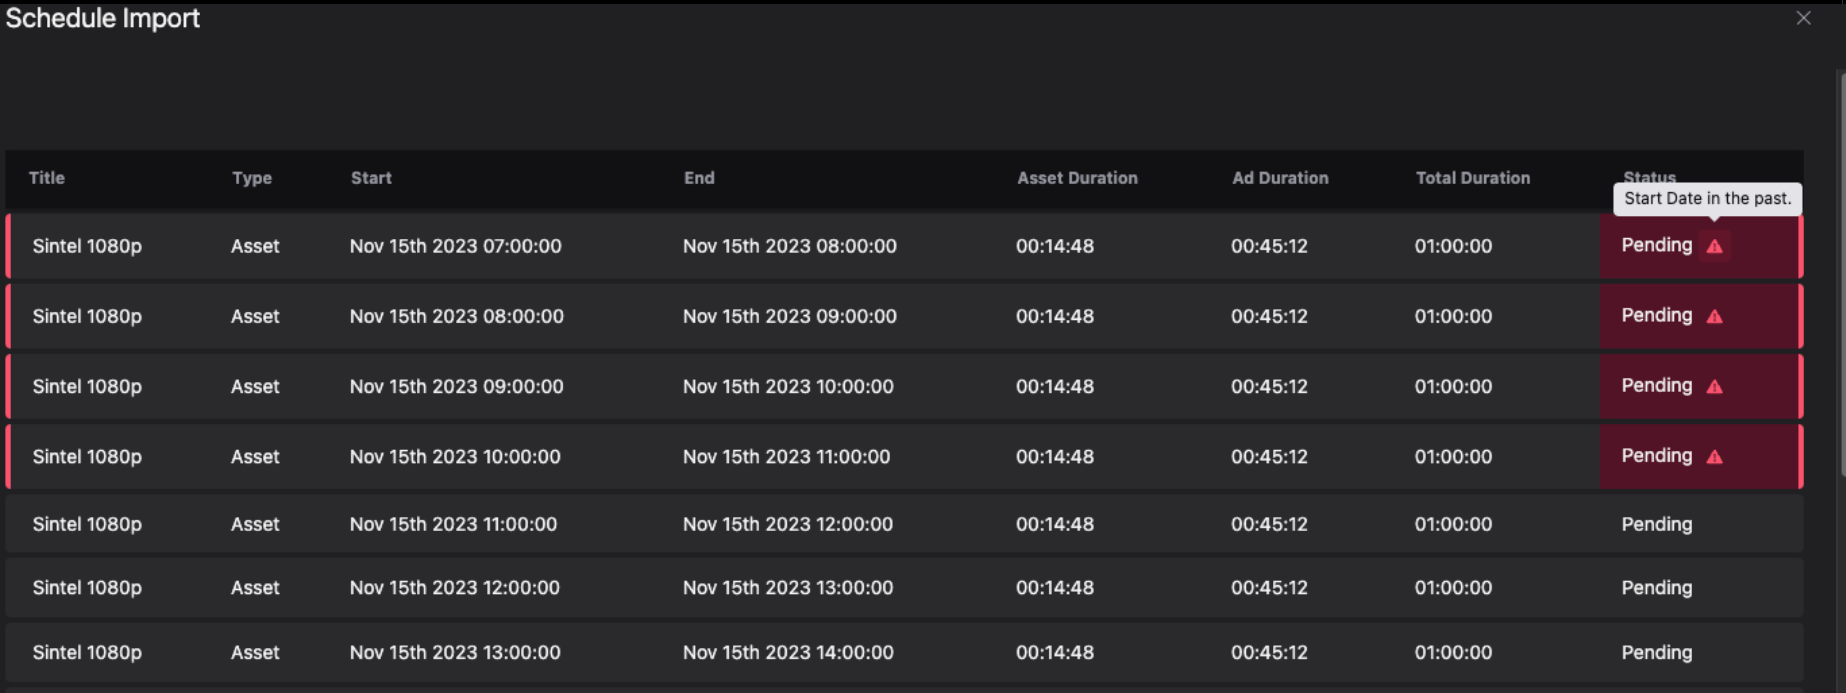
- Hover over the error indicator to see the error description.
- Close the Schedule Import window.
- Correct the errors in the
.csvfile and save the changes. - Import the file again.
-
Select Import, then select Import again to acknowledge the overwrite notice.
-
Optional: Pause or cancel import.
- Pause/Resume: Once the import has started, you can suspend or continue the upload by toggling the Pause/Resume button at the bottom right of the list.
- Cancel: Select Cancel to stop the import with no impact on your existing channel content.
-
Close the Schedule Import window when the import is complete. Upon completion, the status of all assets is marked as successful, and the channel's schedule is updated with the imported entries.
Adjust the Time Zone
-
Select a time zone that corresponds to your core audience.
Your viewer's time zone determines the programming that plays out. For example, if you schedule an entry for 10:00:00 PDT, it plays out in New York at 13:00:00 EDT and in Paris at 19:00:00 CEST.
-
Adjust the current time zone by selecting the current time zone, choosing the desired time zone, and then selecting Save.
Upon selecting a different time zone, the time slot for your existing entries will shift to reflect your selection.
Replace the Live Feed with an Asset
-
Select Asset.
-
Optional: Select the library corresponding to the desired asset from within the Library option.
-
Optional: Search for the desired asset by entering a keyword directly to the right of the Library option and then select the search icon.
-
Select the desired asset.
-
Optional: In the Start Time option, adjust the asset's start date and time.
-
Optional: If the asset contains ad breaks, determine the duration of each ad break by performing the following steps:
- Select the Ad Breaks tab.
- Set the duration for each ad break by performing one of the following steps:
- Locked:
- Set the Total Duration Type option to
Locked. Upon updating the asset's total duration, time in excess of the asset's duration is distributed evenly among all of its ad breaks. - Enter the desired duration for all ad breaks.
- Select Set All Durations.
- Adjust the duration for each ad break as needed.
- Upon updating an ad break's duration, the entry's total duration is automatically calculated by summing the duration of the asset and all of its ad breaks.
- Set the Total Duration Type option to
- Unlocked:
- Set the Total Duration Type option to
Unlocked. - From the Total Duration option, define the amount of time that will be set aside for the asset including all of its ad breaks. For example, if your asset's duration is 21 minutes, the Total Duration option is set to 30 minutes, and the asset contains 3 ad breaks, 9 minutes will be evenly distributed between the 3 ad breaks. This means that the duration for each ad break will be 3 minutes.
- Set the Total Duration Type option to
- Locked:
-
Perform either of the following steps:
- Save your changes by selecting Add Asset.
- Save your changes and add another asset by selecting Add and Select Another Asset.
Insert an Ad Break
- Select Ad Break.
- In the Name option, assign a name to the ad break.
- Optional. In the Start Time option, adjust the ad break's start time.
- In the Total Duration option, enter the duration of the ad break.
- Select Add Ad Break.
Replace Live Feed with a Live Feed from Another Live Slicer
-
Select Slicer.
-
In the Slicer ID option, identify a Live Slicer by the ID defined within the
SlicerIDsetting of its Live Slicer configuration file.Shared Live Slicer
You may schedule another user's Live Slicer if it is streaming to a library shared with your account. However, you must also identify the user that owns the Live Slicer through the following syntax:
{Workspace ID}:{Live Slicer ID} -
Optional. In the Start Time option, adjust the asset's start date and time.
-
In the Total Duration option, enter the duration of the Live Slicer's live feed that will be scheduled within your live channel.
-
Perform either of the following steps:
- Save your changes by selecting Add Slicer.
- Save your changes and add another Live Slicer by selecting Add and Select Another Slicer.
Insert a Playlist's Assets and Ad Breaks
-
Select Playlist.
-
In the Playlists option, select the desired playlist.
-
Optional. In the Start Time option, adjust the start time at which all of the playlist's assets and ad breaks will be inserted in sequential order.
-
Perform either of the following steps:
- Save your changes by selecting Add Playlist.
- Save your changes and add another playlist by selecting Add and Select Another Playlist. Use this option to add another playlist's assets and ad breaks immediately after the last schedule entry generated from the playlist selected in step 2.
Time
You must specify time when setting the duration for an asset, ad break, or Live Slicer.
Use h, m, and s as shorthand for hours, minutes, and seconds, respectively. For example, 5m represents 5 minutes, while 4m 30s represents 4 minutes and 30 seconds.
Syntax: hh:mm:ss
Example
Use the following value to define a duration of 5 minutes and 30 seconds:00:05:30
Restrictions
The following capabilities are unsupported for live channels that can leverage schedule entries:
There used to be a restriction using blackouts with live channels that can leverage schedule entries, but that is no longer the case.
Updated 24 days ago